Create an NFT Gallery using thirdweb and Next.js

⚠️ Warning: This guide currently uses v4 of the Connect SDK. For v5 (latest) code snippets, please check out our documentation while this guide is being updated. ⚠️
In this guide, we are going to create an NFT gallery where users will be able to see all NFTs from an NFT collection/NFT Drop/Signature drop!
We will also let the user connect their wallet to see if they own any NFTs from the collection.
Before we get started, below are some helpful resources where you can learn more about the tools we're going to be using in this guide.
Let's get started.
Setup
I am going to use the Next.js Typescript starter template for this guide.
If you are following along with the guide, you can create a project with the template using the thirdweb CLI:
npx thirdweb@latest create appIf you already have a Next.js app you can simply follow these steps to get started:
- Install
@thirdweb-dev/reactand@thirdweb-dev/sdkandethers@5 - Add MetaMask authentication to the site. You can follow this guide to do this.
By default the network in _app.tsx is Mainnet, we need to change it to Mumbai
import type { AppProps } from "next/app";
import { ThirdwebProvider } from "@thirdweb-dev/react";
import "../styles/globals.css";

// This is the chain your dApp will work on.
// Change this to the chain your app is built for.
// You can also import additional chains from `@thirdweb-dev/chains` and pass them directly.
const activeChain = "mumbai";

function MyApp({ Component, pageProps }: AppProps) {
  return (
    <ThirdwebProvider activeChain={activeChain}>
      <Component {...pageProps} />
    </ThirdwebProvider>
  );
}

export default MyApp;
Deploy an ERC721 NFT Drop Smart Contract
If you don't already have an NFT collection smart contract, you can use the guide below to get yourself started with a ERC721 NFT Drop:
Start building website
Getting the NFTs
In the pages/index.tsx page we will now use the useContract hook provided to use by the React SDK to get access to the contract like this:
const { contract } = useContract(
  "0x05B8aab3fd77580C29c6510d8C54D9E6be4262d2",
  "nft-drop"
);
nft-collection or signature-drop make sure to replace it with nft-drop for better intellisense.Make sure to update the contract address to the address of the Signature Drop contract you created. After doing this, to get the NFTs from this contract we need to use another hook that will give us the NFTs, called useNFTs:
const { data: nfts, isLoading: loading } = useNFTs(contract?.nft, {
  start: 0,
  count: 10,
});
Here, we are adding a start and count to the query to get the first 10 NFTs. You can update these values as per your needs! These hooks can be imported from the @thirdweb-dev/react package like this:
import { useContract, useNFTs } from "@thirdweb-dev/react";Rendering the NFTs
Delete everything inside the main div and let's render our NFTs! To render the NFTs, we need to map through them and render them:
<div>
  {nfts && nfts?.length > 0 && (
    <div>
      {nfts.map((nft) => (
        <div key={nft.metadata.id.toString()}>
          <h1>{nft.metadata.name}</h1>
          <ThirdwebNftMedia metadata={nft.metadata} />
          <p>owned by {truncateAddress(nft.owner)}</p>
        </div>
      ))}
    </div>
  )}
</div>
As you can see we are using a function for truncating the address. Add this function:
const truncateAddress = (address: string) => {
  return (
    address.substring(0, 6) + "..." + address.substring(address.length - 4)
  );
};
Now you would be able to see all the NFTs but the images are huge and the cards are not at all styled!
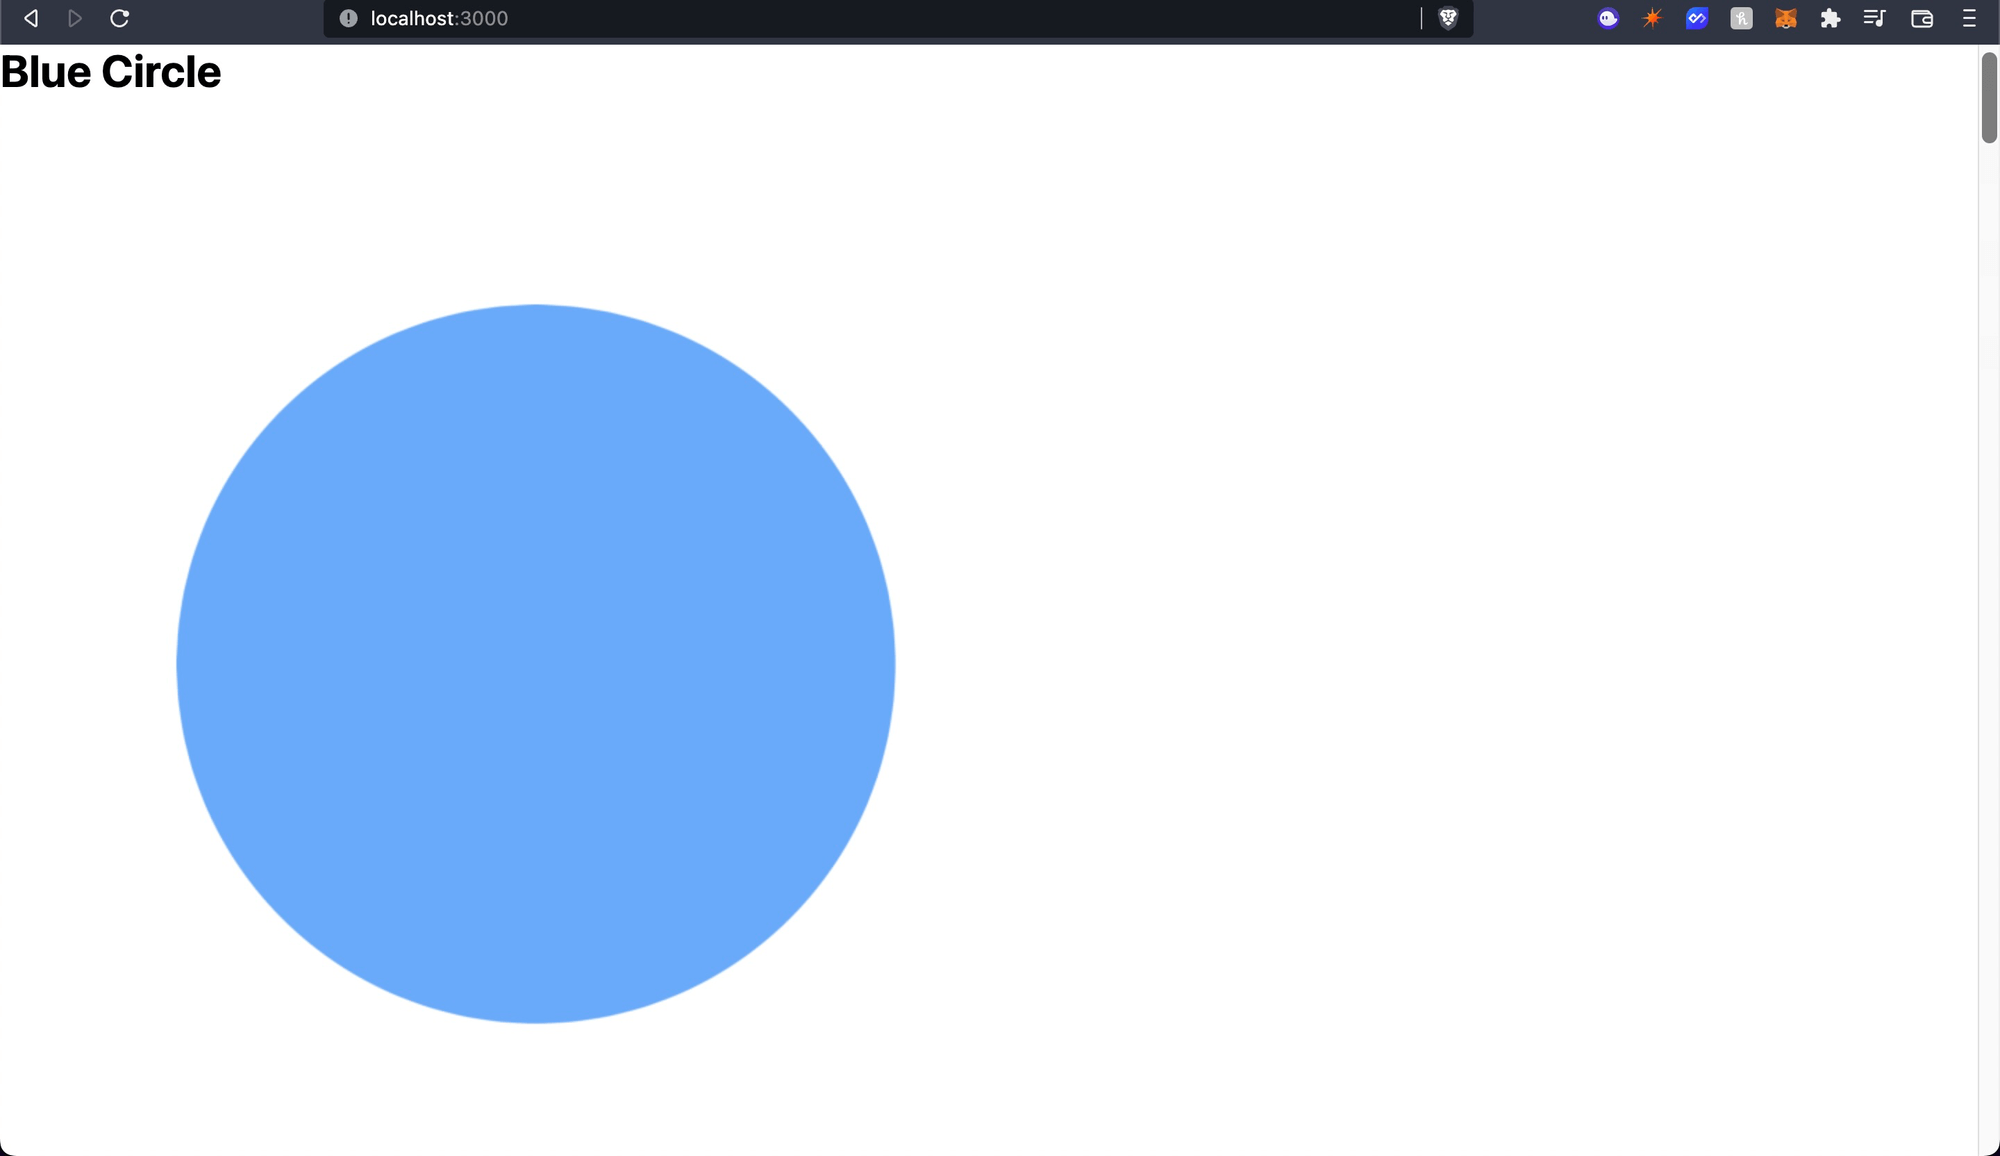
So let's style the images and the cards using CSS modules.
Let's now create Home.module.css inside the styles folder and add the following:
.container {
  display: flex;
  flex-direction: column;
  align-items: center;
  justify-content: center;
  width: 100vw;
  min-height: 100vh;
  background-color: #c0ffee;
}

.cards {
  display: flex;
  flex-wrap: wrap;
  justify-content: center;
  align-items: center;
  margin-top: 20px;
  gap: 20px;
  width: 80vw;
}

.card {
  display: flex;
  flex-direction: column;
  align-items: center;
  justify-content: center;
  border-radius: 10px;
  margin: 10px;
  box-shadow: 0px 0px 5px #000000;
  min-width: 250px;
  padding: 10px;
  background: #1ce;
}

.image {
  min-width: 100px;
  max-width: 150px;
  min-height: 100px;
  max-height: 150px;
  position: relative;
}
This is some basic styling for the cards, container, and image. Finally, let's use them in our pages/index.tsx page:
<div className={styles.container}>
  {nfts && nfts?.length > 0 && (
    <div className={styles.cards}>
      {nfts.map((nft) => (
        <div key={nft.metadata.id.toString()} className={styles.card}>
          <h1>{nft.metadata.name}</h1>
          <ThirdwebNftMedia metadata={nft.metadata} className={styles.image} />
          <p>owned by {truncateAddress(nft.owner)}</p>
        </div>
      ))}
    </div>
  )}
</div>
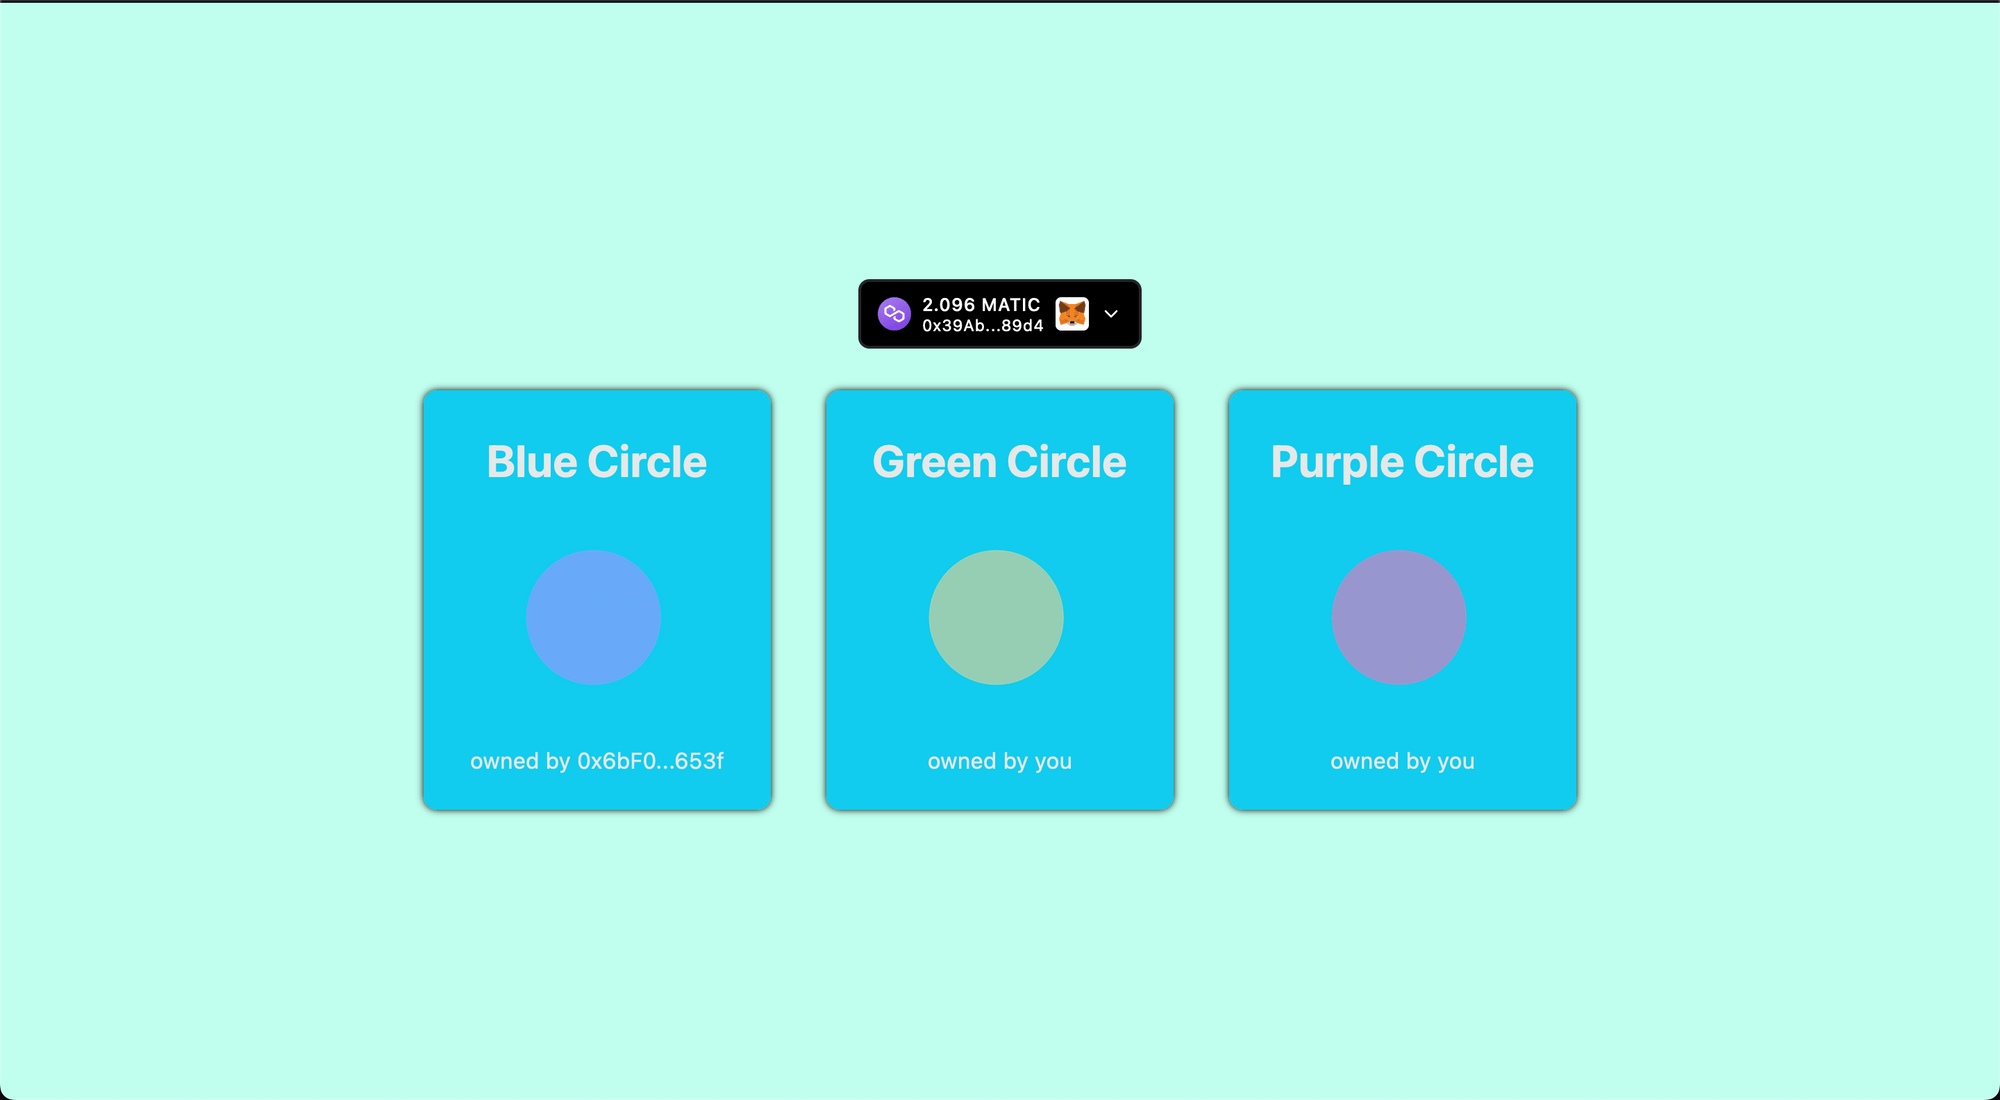
Now our home page looks pretty nice!
Some improvements
Not showing NFTs owned by null address
You might have seen that the NFTs that are owned by 0x0000000000000000000000000000000000000000 are also being shown but we probably won't want to show those because they haven't been minted yet or have been burned. So we can add a simple filter to do this before our map function:
{nfts
    .filter((nft) => nft.owner !== "0x0000000000000000000000000000000000000000")
    .map((nft) => (
      <div key={nft.metadata.id.toString()} className={styles.card}>
        <h1>{nft.metadata.name}</h1>
        <ThirdwebNftMedia metadata={nft.metadata} className={styles.image} />
        <p>owned by {truncateAddress(nft.owner)}</p>
      </div>
))}
This will make sure that only the NFTs that have an owner will be shown.
Adding a loading screen
The NFTs take quite some time to load so before the first return statement we will add this loading screen:
if (loading) {
  return <div className={styles.container}>Loading...</div>;
}
Showing special text if NFT is owned by you
We get the address of the user like this:
const address = useAddress();Now, just before the map function we can add this ConnectWallet component:
<ConnectWallet />
Finally, in the p tag where we show the owner address we can add this:
<p>
  owned by{" "}
  {address && nft.owner === address ? "you" : truncateAddress(nft.owner)}
</p>
Now, we have got an amazing gallery of our NFTs!
Conclusion
Hope you could integrate your own NFT gallery and if you did share it with the community! If you want to have a look at the code, check out the GitHub Repository.