How we built a full-scale Web3 survival game in 3 weeks
A technical deep dive into what it takes to build a great onchain game


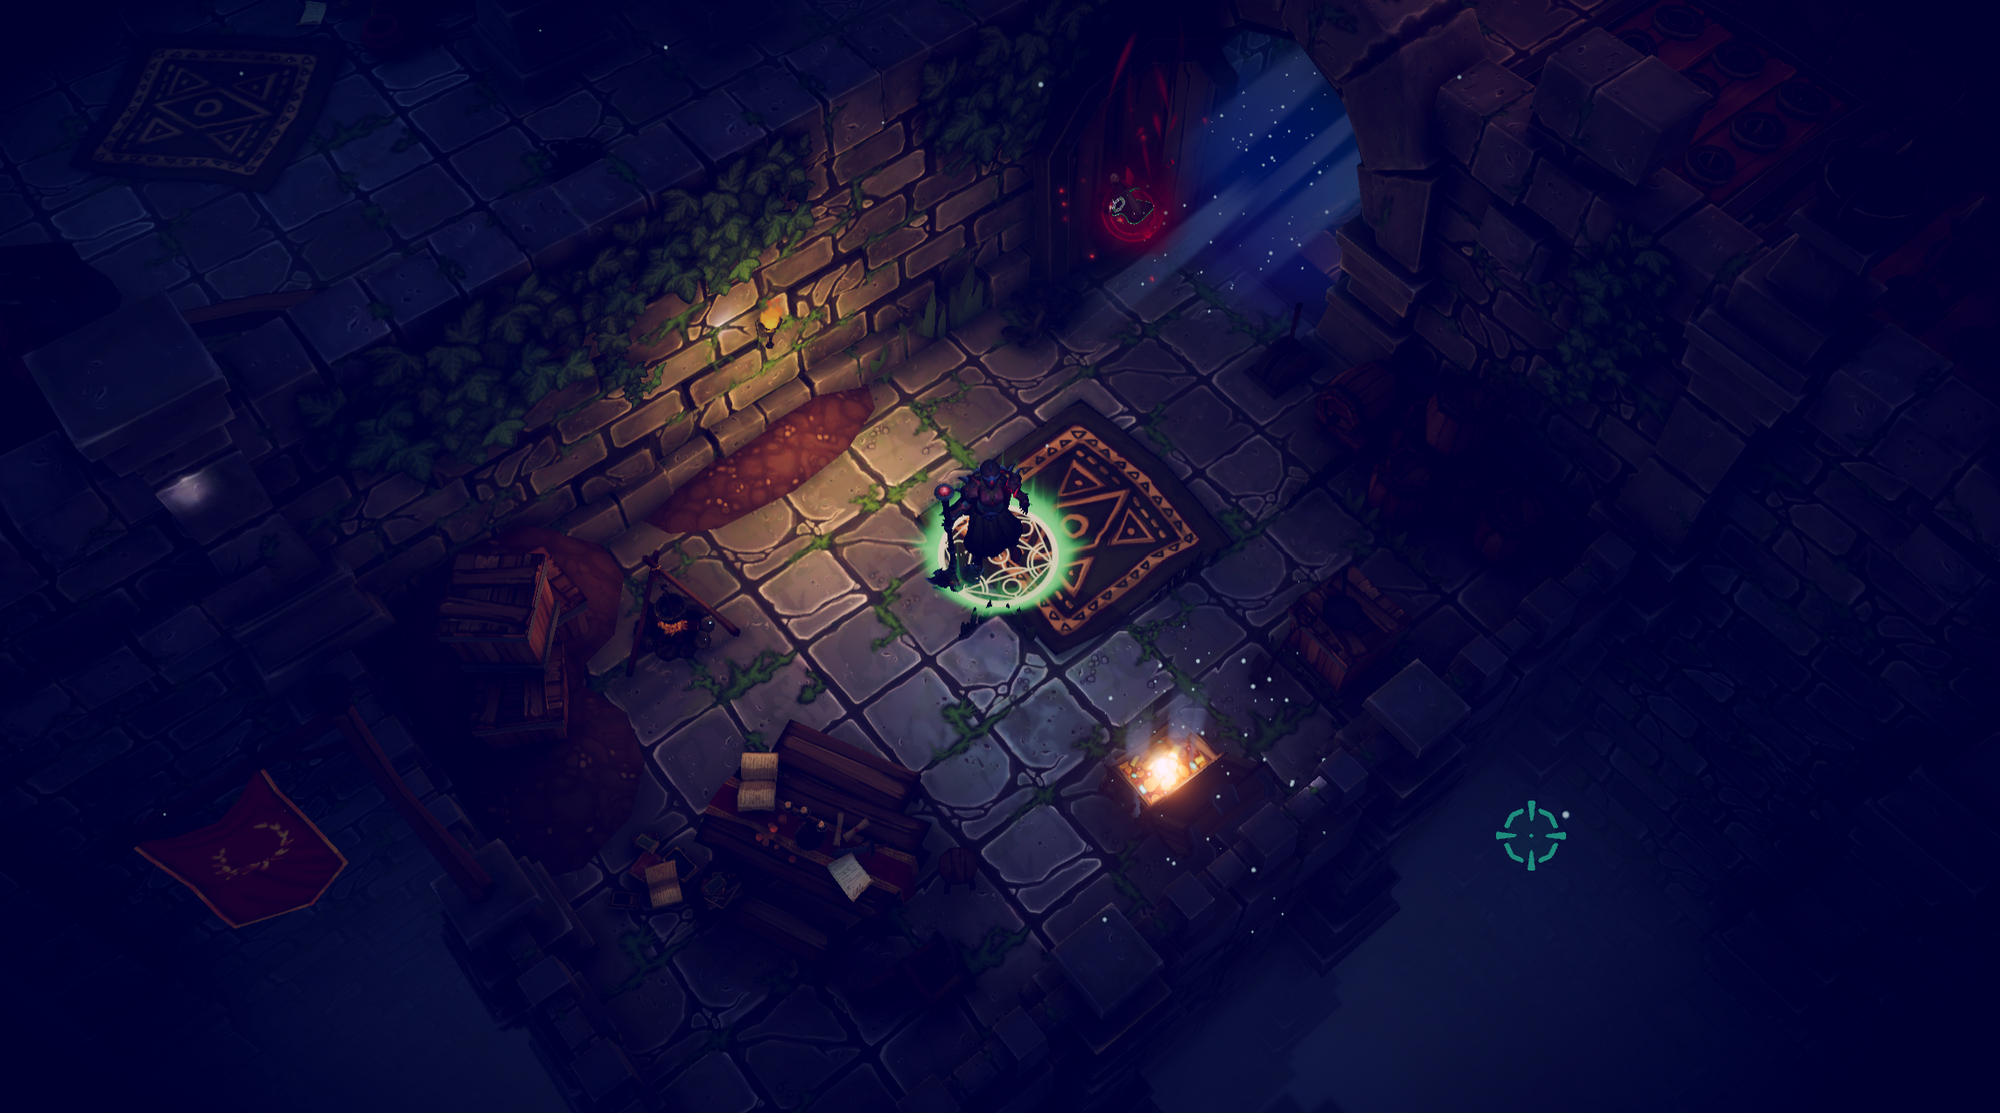
Welcome to the Web3 Warriors technical blog post! In this article, we explore how we built the immersive gaming experience of Web3 Warriors using thirdweb's GamingKit.
Web3 Warriors is a onchain survival game that demonstrates how to best leverage the potential of blockchain technology.
This article details how we built “invisible” web3 features so that players can just focus on gameplay, and still get the full benefits of web3. No wallet connection for authentication, no gas fees or popups for transactions. And for game developers, no backend or servers required!
Why We Built Web3 Warriors
The goal of Web3 Warriors is to show the power of Web3 technology in games. Traditional games often suffer from limitations such as lack of true ownership and a closed ecosystem.
With Web3 Warriors, we aimed to create an open and decentralized gaming ecosystem where players have full ownership and control over their in-game assets, can earn real value from their gameplay, claim items that are actually their own, and experience a new level of interactivity and interoperability outside of the game itself.
Onchain Components
Web3 Warriors does not use a backend. Instead, it incorporates various onchain components to enable its advanced functionalities. These components reside on the blockchain. Leveraging the blockchain as the game’s public cloud infrastructure ensures transparency, security, and immutability.
Invisible wallet
The first component is the player’s wallet, which is the starting point to hold currency and assets obtained through the game. We created an “invisible wallet” experience by leveraging Embedded Wallets and Smart Wallets that are generated for each player, based on an email.
Invisible wallet flow in Web3 Warriors
The Invisible Wallet plays a crucial role in Web3 Warriors, allowing players to securely manage their in-game assets and interact with the blockchain seamlessly. We opted for an Embedded Wallet with Email and Social authentication because it eliminates the need for transaction confirmations and provides encryption to safeguard user data. Moreover, the wallet allows users to easily restore their game progress as the wallet is tied to their email, ensuring a hassle-free and uninterrupted gaming experience.
To take it a step further, we create a Smart Wallet using Account Abstraction, and the generated email wallet serves as a starting point. This ensures the smart account is now tied to your email and is always the same, which allows you to login from anywhere with the wallet address and its contents preserved.
public async Task ConnectAccount(string username, bool isGoogle = false, bool isApple = false, bool isFacebook = false)
    {
        Debug.Log("Connecting Account");

        Username = username;

        var authProvider = isGoogle
            ? AuthProvider.Google
            : isApple
                ? AuthProvider.Apple
                : isFacebook
                    ? AuthProvider.Facebook
                    : AuthProvider.EmailOTP;

        ConnectedAccount = await ThirdwebManager.Instance.SDK.wallet.Connect(
            new WalletConnection(
                provider: WalletProvider.SmartWallet,
                chainId: 47279324479,
                email: authProvider == AuthProvider.EmailOTP ? username : null,
                personalWallet: WalletProvider.EmbeddedWallet,
                authOptions: new AuthOptions(authProvider: authProvider)
            )
        );

        Debug.Log("Connected to Account: " + ConnectedAccount);
    }
Account Abstraction is a powerful tool that allows you to craft any wallet connection flow you can imagine. Smart Wallets can be paired with any type of EOA to have a consistent predicted address from the get-go, and bring your assets with you to any other frontend that uses the same Smart Wallet Factory.
The Smart Wallet is deployed after the first transaction (in this case, called a User Operation) is sent. You can try it by claiming your free pet after you login, then viewing your deployed account from the top left menu. Alternatively, one could also bundle both deployment and $BATTLE token approvals in the user's first loading screen, halving the time it takes to initially connect and also the time it takes to approve tokens on your first shop purchase. To do so simply call approve using an undeployed Smart Wallet, and it'll deploy itself.
Gasless Transactions
Gasless transactions are an essential feature in Web3 Warriors, enabling players to perform actions on the blockchain without needing initial funds or worrying about the costs of transaction fees.
The Unity SDK gives you access to our Paymaster infrastructure by default, which handles the payment of transaction fees on behalf of the players. This pairs really well with email wallets which don’t hold any funds initially. This combo enables a smooth and uninterrupted gaming experience, without the need for players to transfer funds or worry about gas prices.
For Web3 Warriors, we opted to use thirdweb's Paymaster infrastructure, which can be integrated simply in our main SDK Prefab - the ThirdwebManager - by simply turning on Gasless under your ThirdwebManager's Smart Wallet settings as shown below:
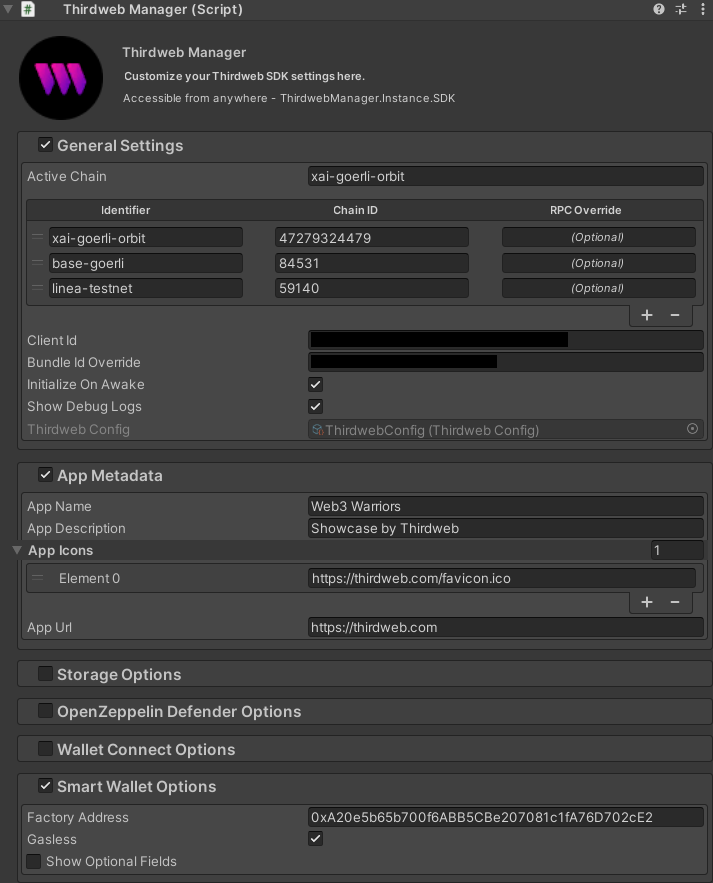
The ThirdwebManager is a simple yet powerful drag-and-drop prefab that persists throughout your game, maintaining your connection to the blockchain and the player’s wallet. In Web3 Warriors, we have a _preload Scene which is where this prefab resides. Easily deploy your Smart Wallet Factory from here.
$BATTLE - ERC20 Token Contract

Battle Tokens serve as the in-game currency within Web3 Warriors. We used our pre-built Token contract to create and manage our in-game ERC20 tokens.
These tokens can be minted by the game's admin or by one or more dedicated minter-permissioned wallets. This in-game currency enables various mechanics, such as purchasing armors and weapons or unlocking special features. The contract provides a flexible and scalable solution for handling the game's economy, without needing any sort of backend!
You can find one of the $BATTLE Token Contract used by the game here.
To deploy your own, you can head to our Explore page and select “Token” - no code needed!
Building the in-game currency mechanics
One of the core aspects of Web3 Warriors is the in-game currency mechanics that rely on the Battle Tokens. Let's explore how these mechanics are implemented:
Reading Balance
Using our standard ERC20 contract extension, you can set up a background Coroutine or Async Task to periodically refresh the player’s balance, and in Web3 Warrior’s case, notify UI elements if any are listening. Here’s an example:
private async void RefreshBattleTokensLoop()
{
    while (Application.isPlaying)
    {
        await new WaitForSeconds(30f);
        if (SceneLoader.Instance.CurrentScene == SceneName.Scene_Game)
            continue;

        try
        {
            await RefreshBattleTokens();
        }
        catch (System.Exception e)
        {
            Debug.LogWarning("Error Refreshing Battle Tokens | " + e.Message);
        }
    }
}
Additionally, we hook up a refresh for related user actions that update their balance, as seen below:
EventManager.Instance.OnBattleTokensMinted.AddListener(
		async (data) => await RefreshBattleTokens()
);

EventManager.Instance.OnModelMinted.AddListener(
    async (data) =>
    {
        await RefreshBattleTokens();
        await RefreshModels();
    }
);

EventManager.Instance.OnWeaponMinted.AddListener(
    async (data) =>
    {
        await RefreshBattleTokens();
        await RefreshWeapons();
    }
);
Finally, this is how simple it is to read a user’s balance:
private async Task RefreshBattleTokens()
{
    Debug.Log("Refreshing Battle Tokens");

    // A CurrencyValue is a typed object that can represent any currency
    CurrencyValue result = await ThirdwebManager.Instance.SDK
        .GetContract(GameContracts.BATTLE_TOKENS_CONTRACT)
        .ERC20.BalanceOf(ConnectedAccount);

    // Cache it as needed for your game
    TotalBattleTokensOwned = result.displayValue;

    // Notify UI
    EventManager.Instance.OnBattleTokensRefreshed.Invoke(TotalBattleTokensOwned);

    Debug.Log("Total Battle Tokens Owned: " + TotalBattleTokensOwned);
}
Signature Minting Flow
To distribute tokens when a player finishes a round, we used the signature minting technique. A dedicated wallet with a Minter role is able to generate signatures in order to mint tokens to the player’s wallet, if conditions are met.
This approach ensures secure and controlled token generation, preventing unauthorized minting. We recommend using a remote solution for private key management, but for demonstration purposes, we embedded a "minter only" private key that can be rotated.
Here’s how you use our signature minting Token contract functionality - we call this function when the player wins or gets defeated, ensure minting of tokens can only be done at the end of a completed run.
public async Task MintBattleTokens(int amount)
{
    if (amount == 0)
        return;

    Debug.Log("Crafting " + amount + " Battle Tokens");

    // Get the $BATTLE contract
    var contract = ThirdwebManager.Instance.SDK.GetContract(
    	GameContracts.BATTLE_TOKENS_CONTRACT
    );

    // Generate a mint request
	var mintRequest = new ERC20MintPayload(
    	ConnectedAccount,
    	amount.ToString()
    );

    // Generate a signed payload with an authorized wallet
	var signedPayload = await contract.ERC20.signature.Generate(
    	mintRequest,
    	_battleTokenMinterPk
    );

    // Mint with the signature
    await contract.ERC20.signature.Mint(signedPayload);

    // Cache as needed
    TotalBattleTokensOwned += amount;

    // Notify UI
    EventManager.Instance.OnBattleTokensMinted.Invoke(amount);
}
Signature minting can be extended to many use-cases since it allows distributing tokens and NFTs based on game state, such as score-based achievements, level criteria, quests completion and much more!
In Web3 Warriors, players complete runs to obtain BATTLE Tokens, which in turn can be spent to purchase armor and weapon skins from the shop. These skins are NFTs owned by the players, and are reflected inside and outside of the game!
Armors and Weapons - EditionDrop contracts
In Web3 Warriors, the acquisition of armors and weapons adds personalization and special mechanics to the gameplay. These are mainly cosmetic skins, represented by NFTs can be purchased directly in game using BATTLE tokens.
We used the pre-built Edition Drop contracts to manage the distribution and ownership of these NFTs. These contracts leverage the ERC1155 standard, enabling multiple copies of the same NFT while maintaining a controlled supply, which is perfect for skins and in-game items.
The Edition Drop contracts work hand in hand with the Battle Tokens, as players can only claim Armor and Weapon skins by spending their hard-earned in-game currency. This mechanism creates a balanced and fair economy within the game, where players are encouraged to explore, strategize, and accumulate Battle Tokens to enhance their characters.
Edition Drop contracts lets owners set up Claim Conditions onchain for each NFT, with custom pricing in any currency. This makes sure the requirements for acquiring these NFTs are enforced on chain. No central server required.
Explore the $ARMOR and $WEAPON Edition Drop contracts used in the game for the Xai Goerli version, which shows you live data on how many items have been obtained and who owns them!
To deploy your own game contract, you can head to our Explore page and select “Edition Drop” - no code needed!
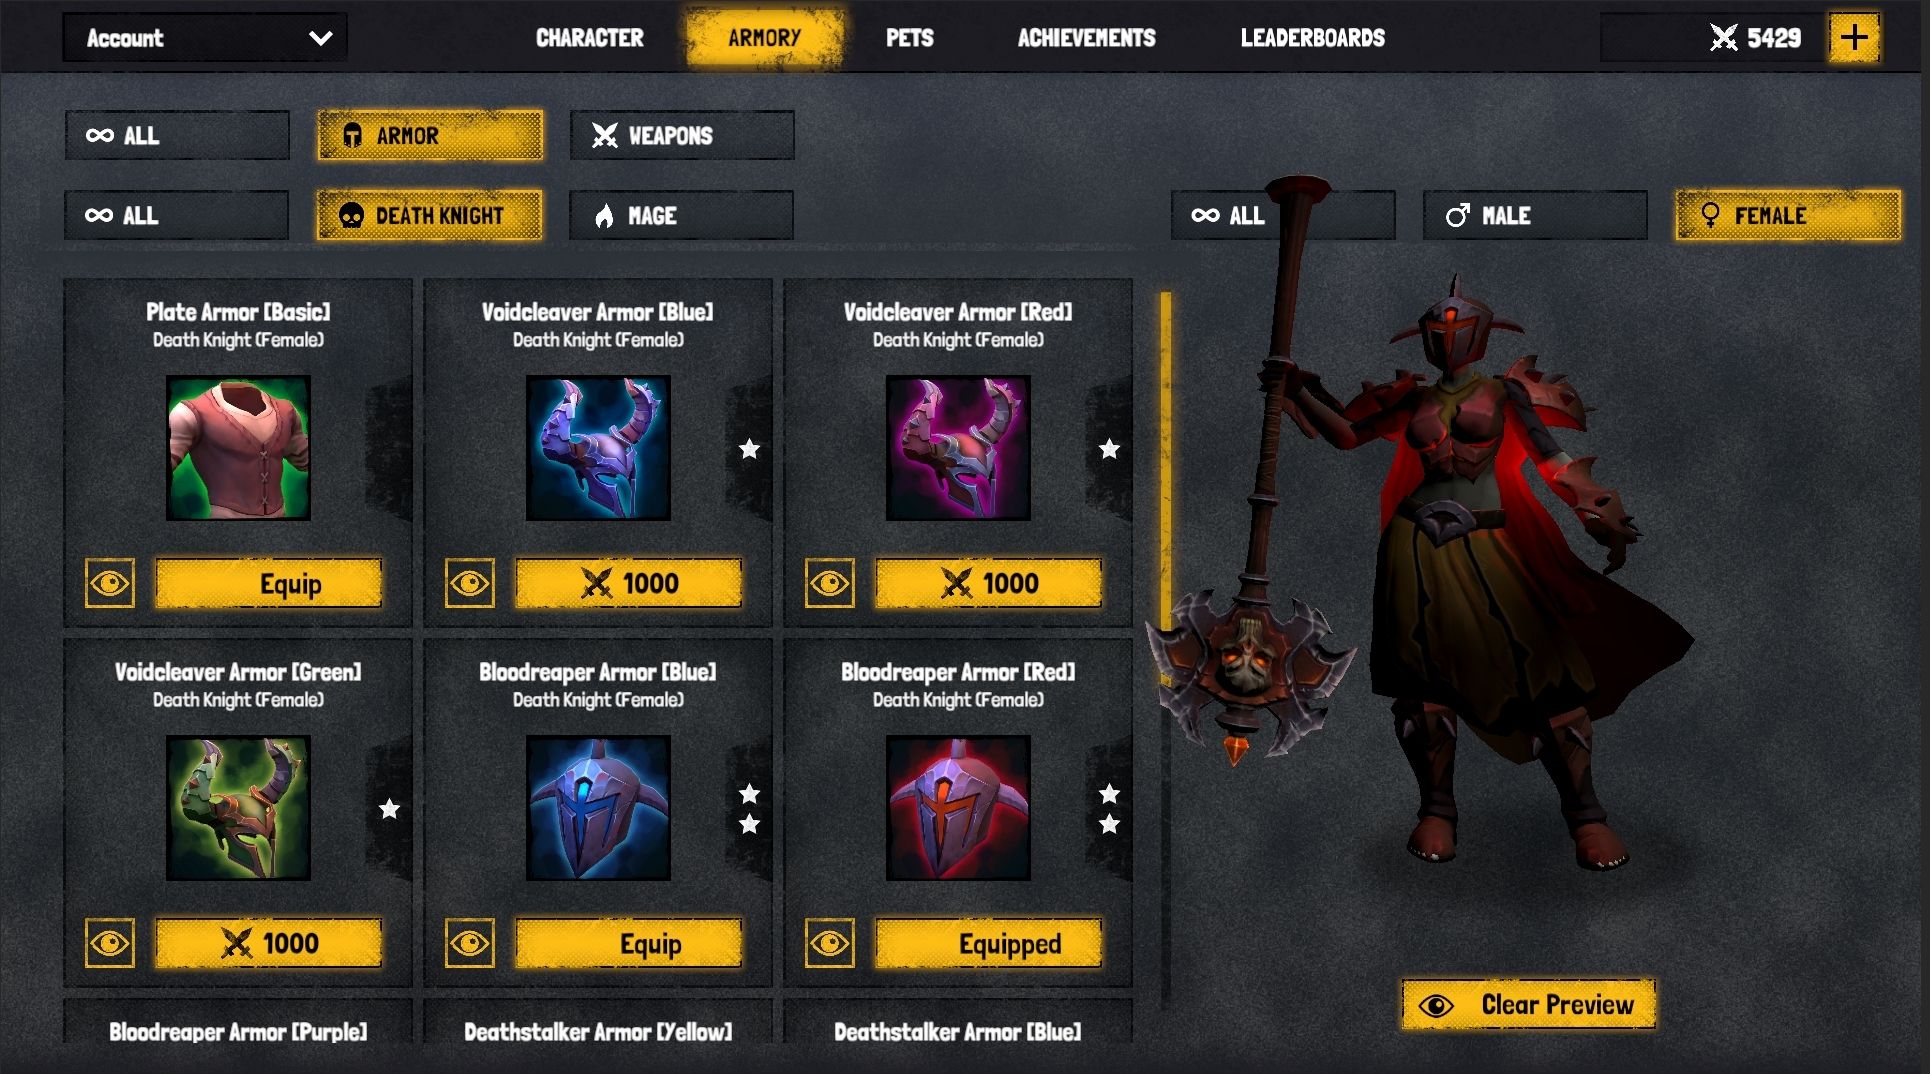
Building the Armory panel
To provide players with a seamless experience in managing their armors and weapons, we have developed an in-game Armory Screen. Let's take a closer look at its key features:
Fetching All/Owned NFTs
The Armory Screen allows players to view all the NFTs available in the game, as well as those they already own. All this data comes directly from the blockchain.
For simplicity’s sake, we map the description of the NFTs to their in-game identifiers, and fetch related data for each NFT. In this case, we update the price based on the NFT’s claim conditions.
Here’s how we load the available Weapon Skins in the armory:
private async Task LoadWeaponSkins()
{
    // Get the $WEAPON contract
    var weaponSkinsContract = ThirdwebManager.Instance.SDK.GetContract(
    	GameContracts.WEAPON_SKINS_CONTRACT
    );

    // Fetch all NFTs
	var weaponNfts = await weaponSkinsContract.ERC1155.GetAll();
    Debug.Log("Total Weapons " + weaponNfts.Count);

    // Loop through all NFTs and updated related game data
    foreach (var nft in weaponNfts)
    {
        foreach (var weaponSetup in PlayerModelManager.Instance.weaponSetups)
        {
            if (nft.metadata.description == weaponSetup.identifier)
            {
                Debug.Log("Fetching Weapon " + nft.metadata.description);
                // Fetch the active claim condition
                var claimConditions = await weaponSkinsContract.ERC1155.claimConditions.GetActive(nft.metadata.id);
                weaponSetup.price = claimConditions.currencyMetadata.displayValue;
            }
        }
    }
}
And here’s how we display what weapons the player currently owns:
private async Task RefreshWeapons()
{
    Debug.Log("Refreshing Weapons");

    var weaponSkinsContract = ThirdwebManager.Instance.SDK.GetContract(
        GameContracts.WEAPON_SKINS_CONTRACT
    );
    var ownedWeapons = await weaponSkinsContract.ERC1155.GetOwned();

    foreach (var weapon in ownedWeapons)
        AddWeapon(weapon.metadata.description);

    Debug.Log("Total Weapons Owned: " + ownedWeapons.Count);
}
Purchasing Assets
The Armory screen enables players to purchase armor and weapon skins using their Battle Tokens. Let’s walk through how this works.
Edition Drop contracts allow users to “claim” NFTs as long as they meet the onchain conditions defined in the claim conditions of the contract.
First, we setup our claim conditions for each NFT on the thirdweb dashboard, setting the price of NFTs in BATTLE tokens. Once that’s done, we need to do is to execute the claim function of the contract when a user clicks on purchase in the armory.
In our Unity code, we hook up the purchase buttons of each UI item with the claiming function
ItemUnlockButton.onClick.AddListener(() =>
{
    OnMintWeapon(weaponSetup);
});
When the player clicks purchase, we then simply execute the claim function on the contract. All verifications happen onchain. If the conditions are met, the player will exchange some BATTLE tokens for a Armor or Weapon NFT.
private async void OnPurchaseWeapon(WeaponSetup weaponSetup)
{
    try
    {
        // Check the balance up front allows us to show nicer error messages
        if (InventoryManager.Instance.TotalBattleTokensOwned < weaponSetup.price)
        {
            Debugger.Instance.ShowPanel(
                "Insufficient Battle Tokens",
                $"You need {weaponSetup.price - InventoryManager.Instance.TotalBattleTokensOwned} more Battle Tokens to mint this weapon.",
                false,
                true
            );
            return;
        }
        Debugger.Instance.ShowPanel(
            "Please Wait...",
            $"Crafting weapon: {weaponSetup.displayName}",
            true,
            false
        );

        // Get the contract
		var weaponSkinsContract = ThirdwebManager.Instance.SDK.GetContract(
        	GameContracts.WEAPON_SKINS_CONTRACT
        );

        var quantity = 1;

		// Execute the claim transaction as the connected player wallet
        await weaponSkinContract.ERC1155.claim(
        	weaponSetup.tokenId,
        	quantity
        );

        // If succesfully claimed, equip the purchased weapon
        InventoryManager.Instance.EquipWeapon(
            PlayerModelManager.Instance.ParseWeaponSetup(
                weaponSetup
            )
        );
        ShowPreview();
        MenuManager.Instance.RefreshShop();
            Debugger.Instance.ShowPanel(
            "Success!",
            $"Crafted weapon: {weaponSetup.displayName}",
            false,
            true
        );
    }
    catch (System.Exception e)
    {
        Debugger.Instance.ShowPanel(
            $"Unable to craft weapon: {weaponSetup.displayName}",
            e.Message,
            false,
            true
        );
    }
}
Other Unity SDK functionality used
The thirdweb Unity SDK excels at integrating smart contract in games and connecting different type of wallets, but that’s only a subset of the features included. Here’s some other noteworthy features that we used in web3 warriors:
Built-in IPFS Storage
The Unity SDK simplifies the process of uploading and downloading assets to and from IPFS (InterPlanetary File System), enabling decentralized storage of in-game content, at no cost.
All NFT metadata for weapons, armors and pets are stored on IPFS, the SDK handles it under the hood automatically.
The SDK also allows explicit use of decentralized storage. Here’s how we built the share flow: clicking a button takes a in-game screenshot, uploads it to IPFS and opens up a custom sharing link:
using System.IO;
using UnityEngine;

public class ShareButton : MonoBehaviour
{
    public async void OnShare()
    {
        try
        {
            Debugger.Instance.ShowPanel("Taking Screenshot...", $"Smile!", true, false);

            string fullPath = Application.persistentDataPath + "/sharedScreenshot.png";

            if (File.Exists(fullPath))
                File.Delete(fullPath);

            // Take the screenshot
            ScreenCapture.CaptureScreenshot(fullPath);
            Debugger.Instance.ShowPanel("Screenshot Saved! Uploading...", true, false);

            // Upload it and get back the IPFS hash
            var response = await ThirdwebManager.Instance.SDK.storage.UploadFromPath(fullPath);

            // Also get the player's wallet address
            var playerAddress = await ThirdwebManager.Instance.SDK.wallet.GetAddress();

            // Open the share link
            Application.OpenURL($"<https://web3warriors.thirdweb.com/{playerAddress}?ipfs={response.IpfsHash}>");

            Debugger.Instance.ShowPanel("Success!", "You can now share your character on socials!", false, true);
        }
        catch (System.Exception e)
        {
            Debugger.Instance.ShowPanel("[Storage] Upload Error", $"Error uploading from path: {e.Message}", false, true);
        }
    }
}
Embedded RPC connection
The thirdweb SDK comes out of the box with direct connections to 750+ blockchains.
You can find all the supported chains on the thirdweb Chainlist:
ThirdwebManager Prefab
The ThirdwebManager prefab acts as your persistent reference to the Thirdweb SDK. This prefab significantly accelerates the integration of Web3 features into Unity games. It holds your connection to the blockchain, the connected wallet state and more. Drag and Drop into your scene, setup a chain from the inspector, and voila!
Other notable features
The Unity SDK comes with many more features that we haven’t used (yet) but are worth a mention:
- Connect wallet UI prefab - drag and drop a fully functional connect wallet button into any scene. Supports all popular wallets.
- Marketplace contract - One of our most powerful contracts that allows to integrate marketplaces in your games, enabling player to player trading with custom rules
- Pack contract - Add lootbox mechanics in your game, fully onchain
Why You Should Build Web3 Games
Web3 technology opens up a world of possibilities for game developers and players alike. By building Web3 games, you can:
- Build Faster: Web3 games eliminate the need for complex backend infrastructure, enabling you to focus on the core gameplay experience and rapidly develop innovative gaming concepts.
- Revenue Streams: Web3 games introduce new revenue streams through features such as royalties, gating mechanisms, and controlled supply. This provides game developers and players with unique economic opportunities and incentives.
- Interoperability: Web3 technology fosters interoperability between games and platforms. Players can seamlessly transfer assets between different games and apps, creating a connected and expansive gaming ecosystem.
At thirdweb, we aim to accelerate the integration of Web3 technology into game development, providing tools, resources, and support to empower developers like you. We believe that open source tools are key to empower innovation.
The fastest way to build web3 games
By leveraging the thirdweb GamingKit & Unity SDK, we were able to expedite the development process. We focused on creating an great gaming experience and fun core loop. The web3 integration was the easy part!
The SDK is fully open-source and permission-less. Give it spin and let us know what you think!
Join us as we revolutionize the gaming landscape with Web3 Warriors and unlock the limitless possibilities of Web3 gaming!