How to Scan a QR Code and Claim an NFT

⚠️ Warning: This guide currently uses v4 of the Connect SDK. For v5 (latest) code snippets, please check out our documentation while this guide is being updated. ⚠️
This guide will show you how to create an experience for users where they can scan a QR code, generate a wallet via oAuth/email sign in, and claim an NFT!
We'll walk through the following:
- Setting up engine
- Deploying smart contract
- Creating fullstack app
- Generating QR codes
Before we begin, you can access the complete source code for this template on GitHub.
Let's get started!
Setting up thirdweb engine
We are going to need Docker for setting up engine, so make sure you have it installed. If not, go ahead and install it.
Once docker has been installed on your machine, run this command to create a postgres database:
docker run -p 5432:5432 -e POSTGRES_PASSWORD=postgres -d postgresThen, to run engine locally run this command:
docker run \
  -e THIRDWEB_API_SECRET_KEY="<thirdweb_secret_key>" \
  -e ADMIN_WALLET_ADDRESS="<admin_wallet_address>" \
  -e POSTGRES_CONNECTION_URL="postgresql://postgres:postgres@host.docker.internal:5432/postgres?sslmode=disable" \
   -e ENCRYPTION_PASSWORD="<thirdweb_secret_key>" \
  -p 3005:3005 \
  --pull=always \
  --cpus="0.5" \
  thirdweb/engine:latest
Replace <thirdweb_secret_key> with the secret key generated with your API key. If you haven't created one yet, create it for free on the dashboard. And, replace <admin_wallet_address> with your wallet address which will be the admin wallet of your engine instance.
Your server is running when this log line appears:
Server listening on: http://0.0.0.0:3005Deploying an NFT collection contract
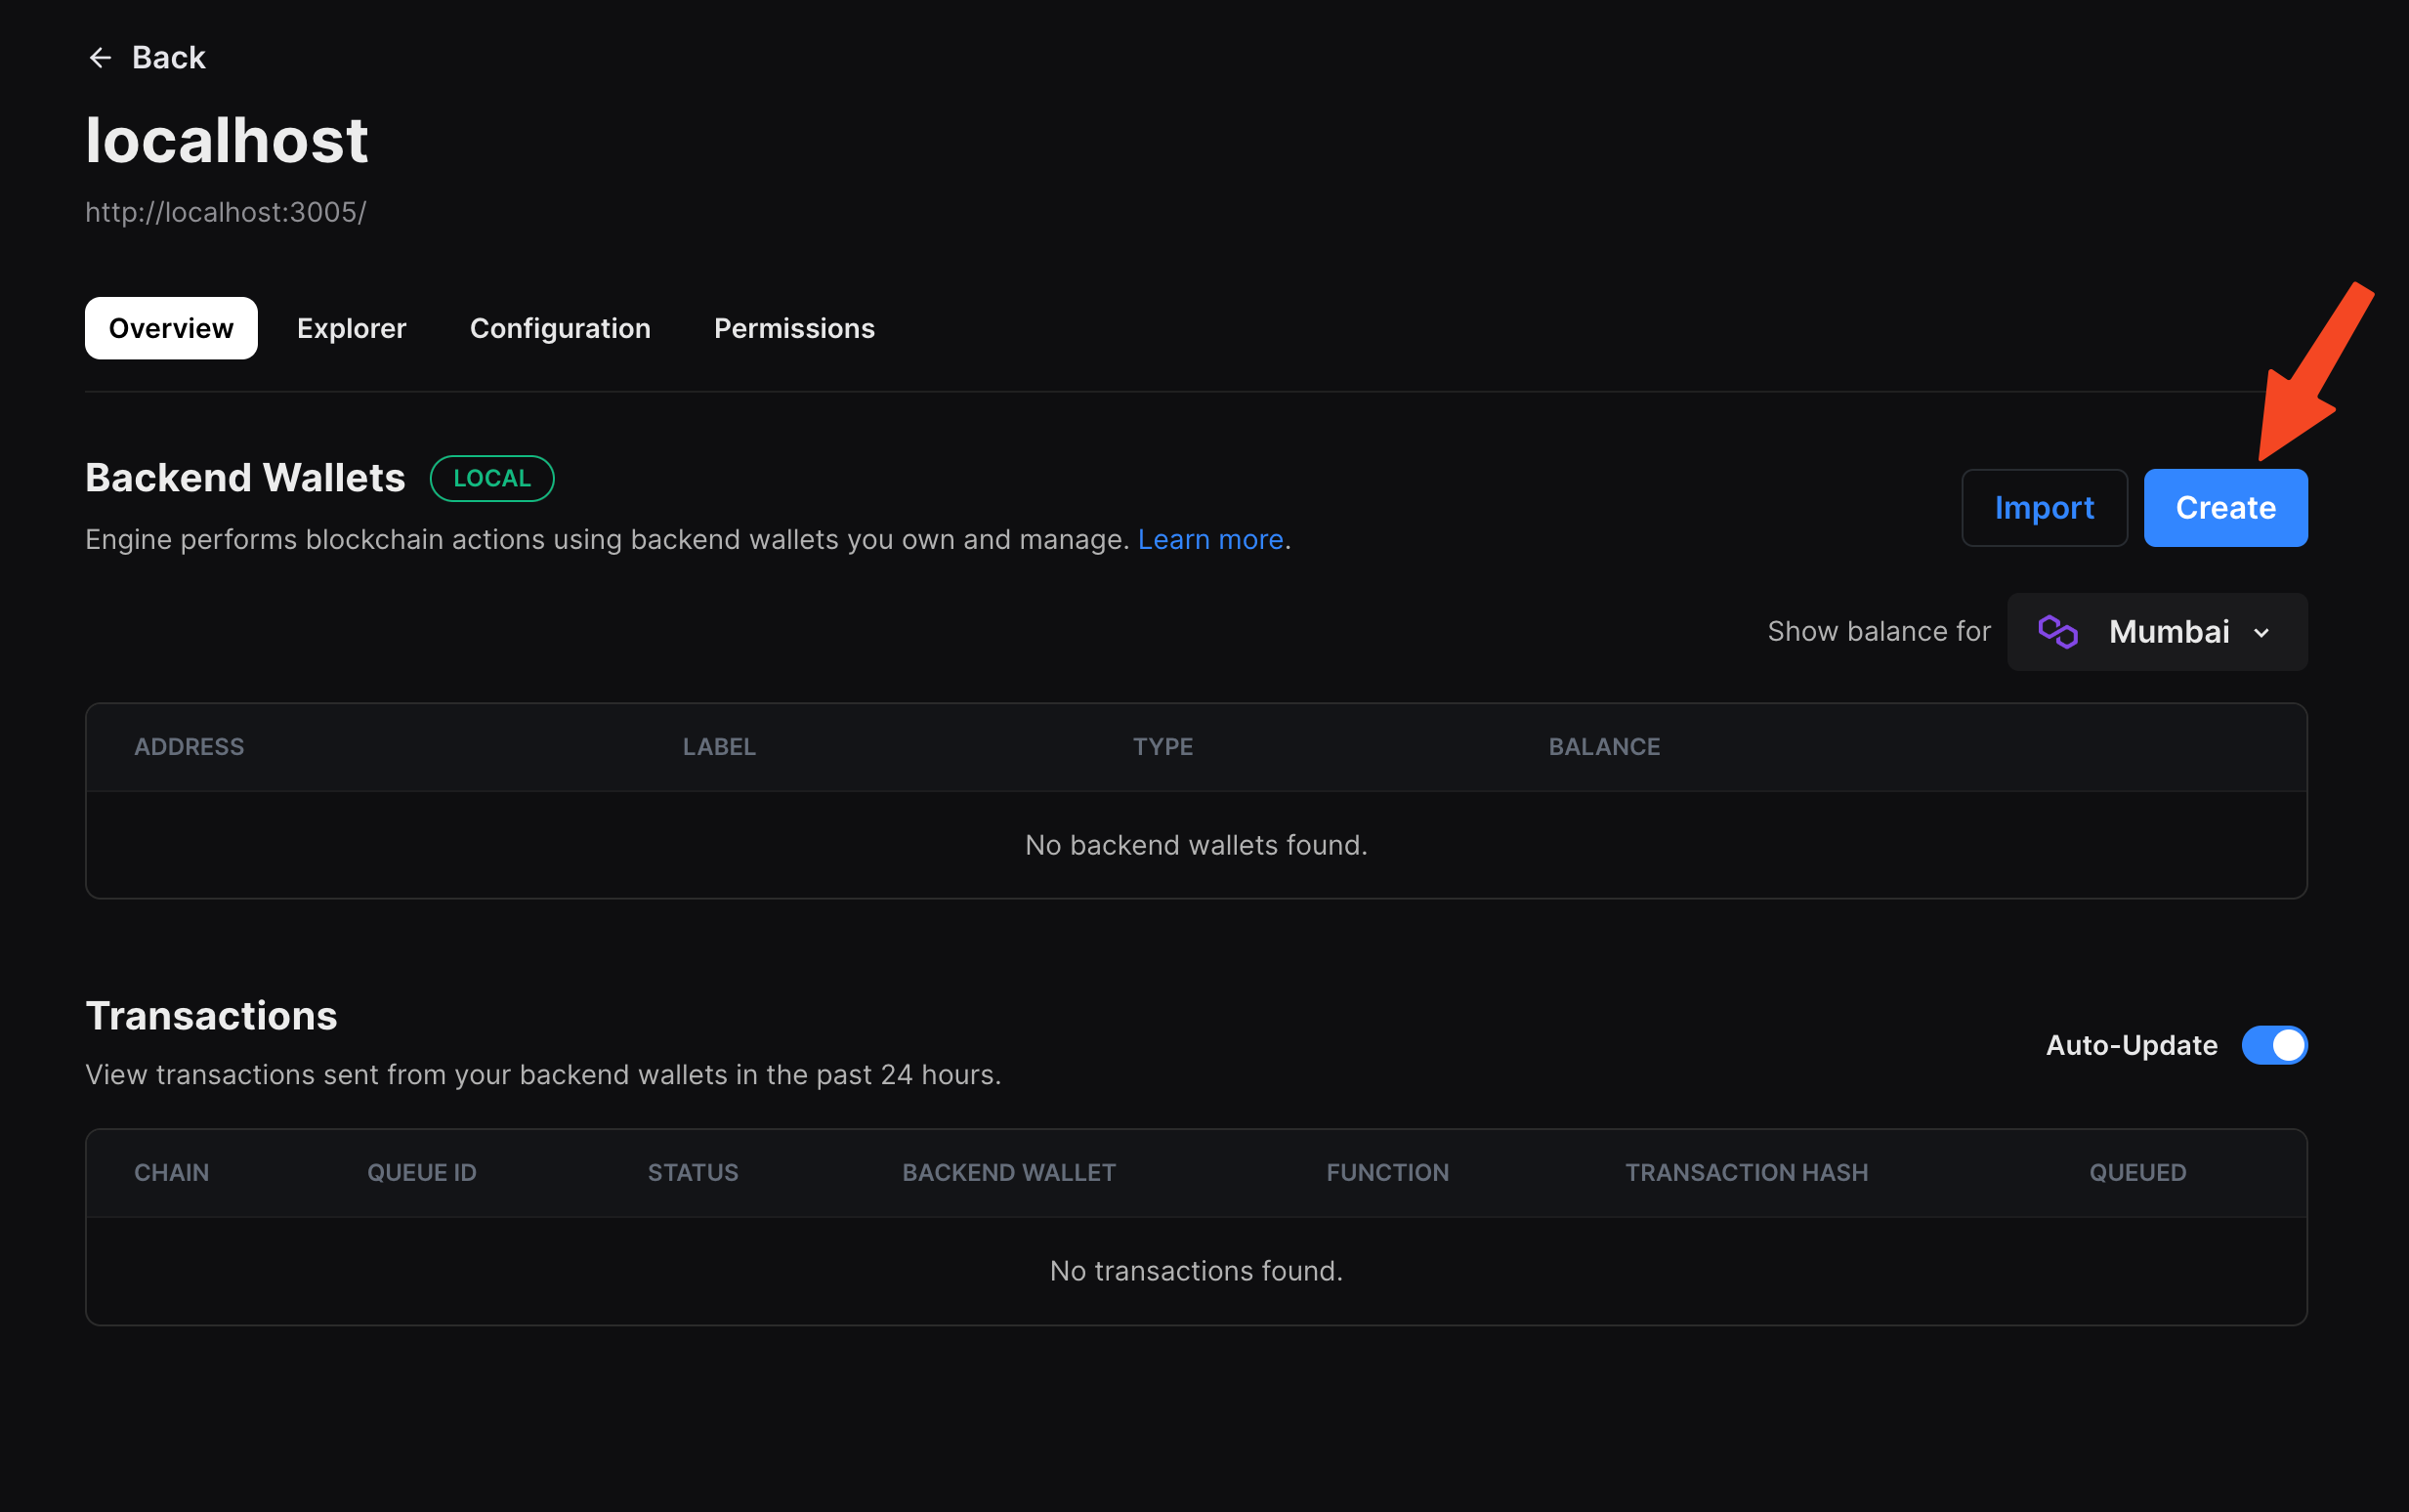
We need an NFT collection contract in which we will mint our user's NFTs. So, head over to the engine page on thirdweb dashboard and connect your engine instance. Then, click on create a backend wallet
Once the wallet is created you'll be able to see a new address:
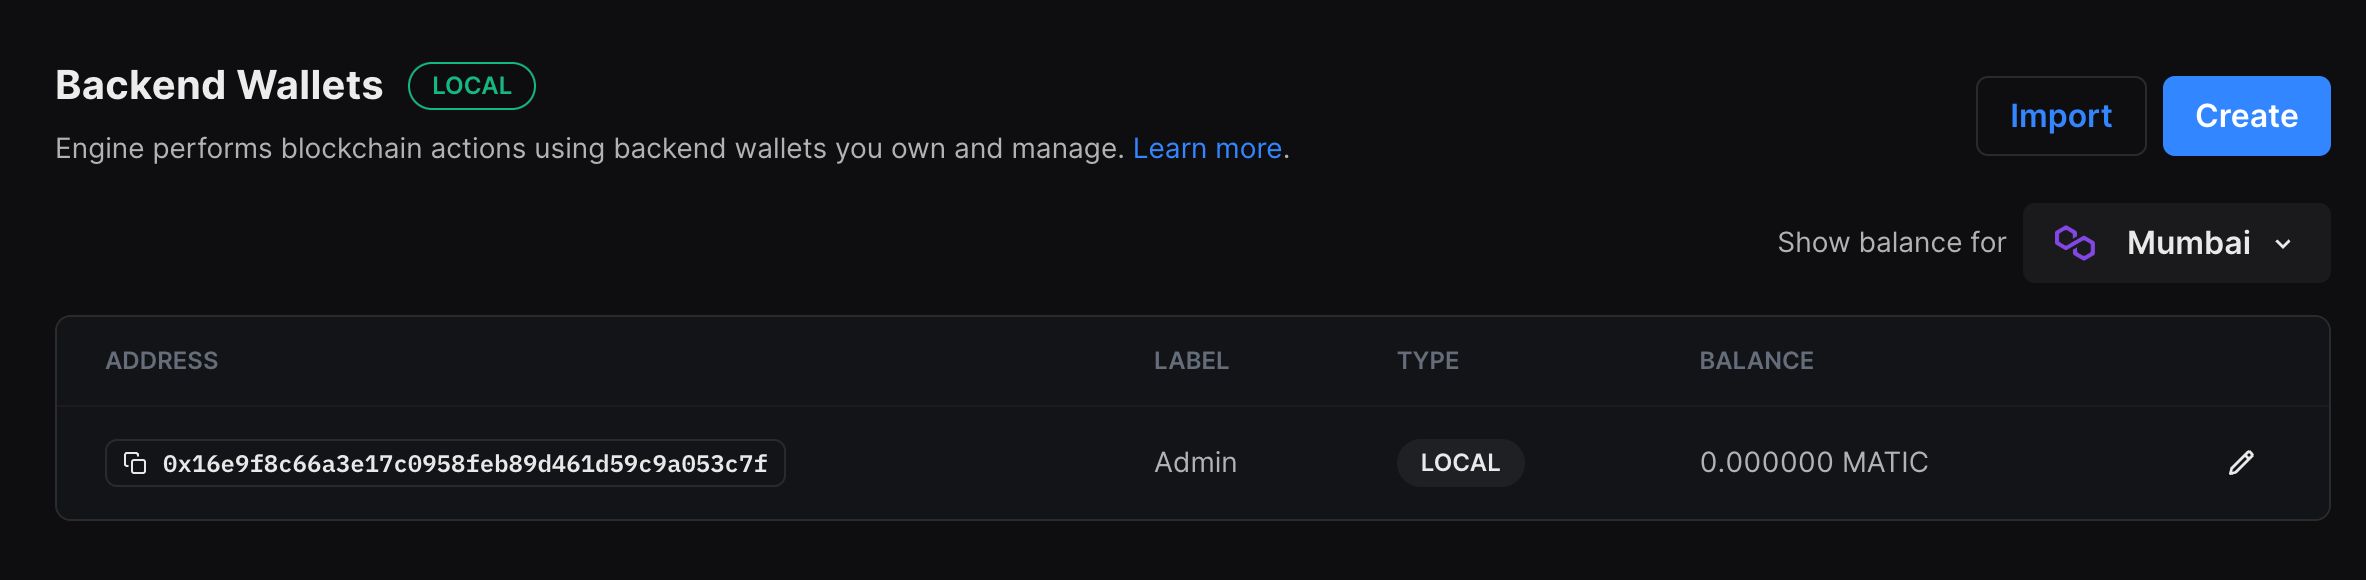
Then, choose the network you want to use and add funds to this address, since all transactions will be made via this wallet.
Once your wallet has funds, head over to explore and scroll down to Deploy and click on try it out in NFT Collection and fill in your details:
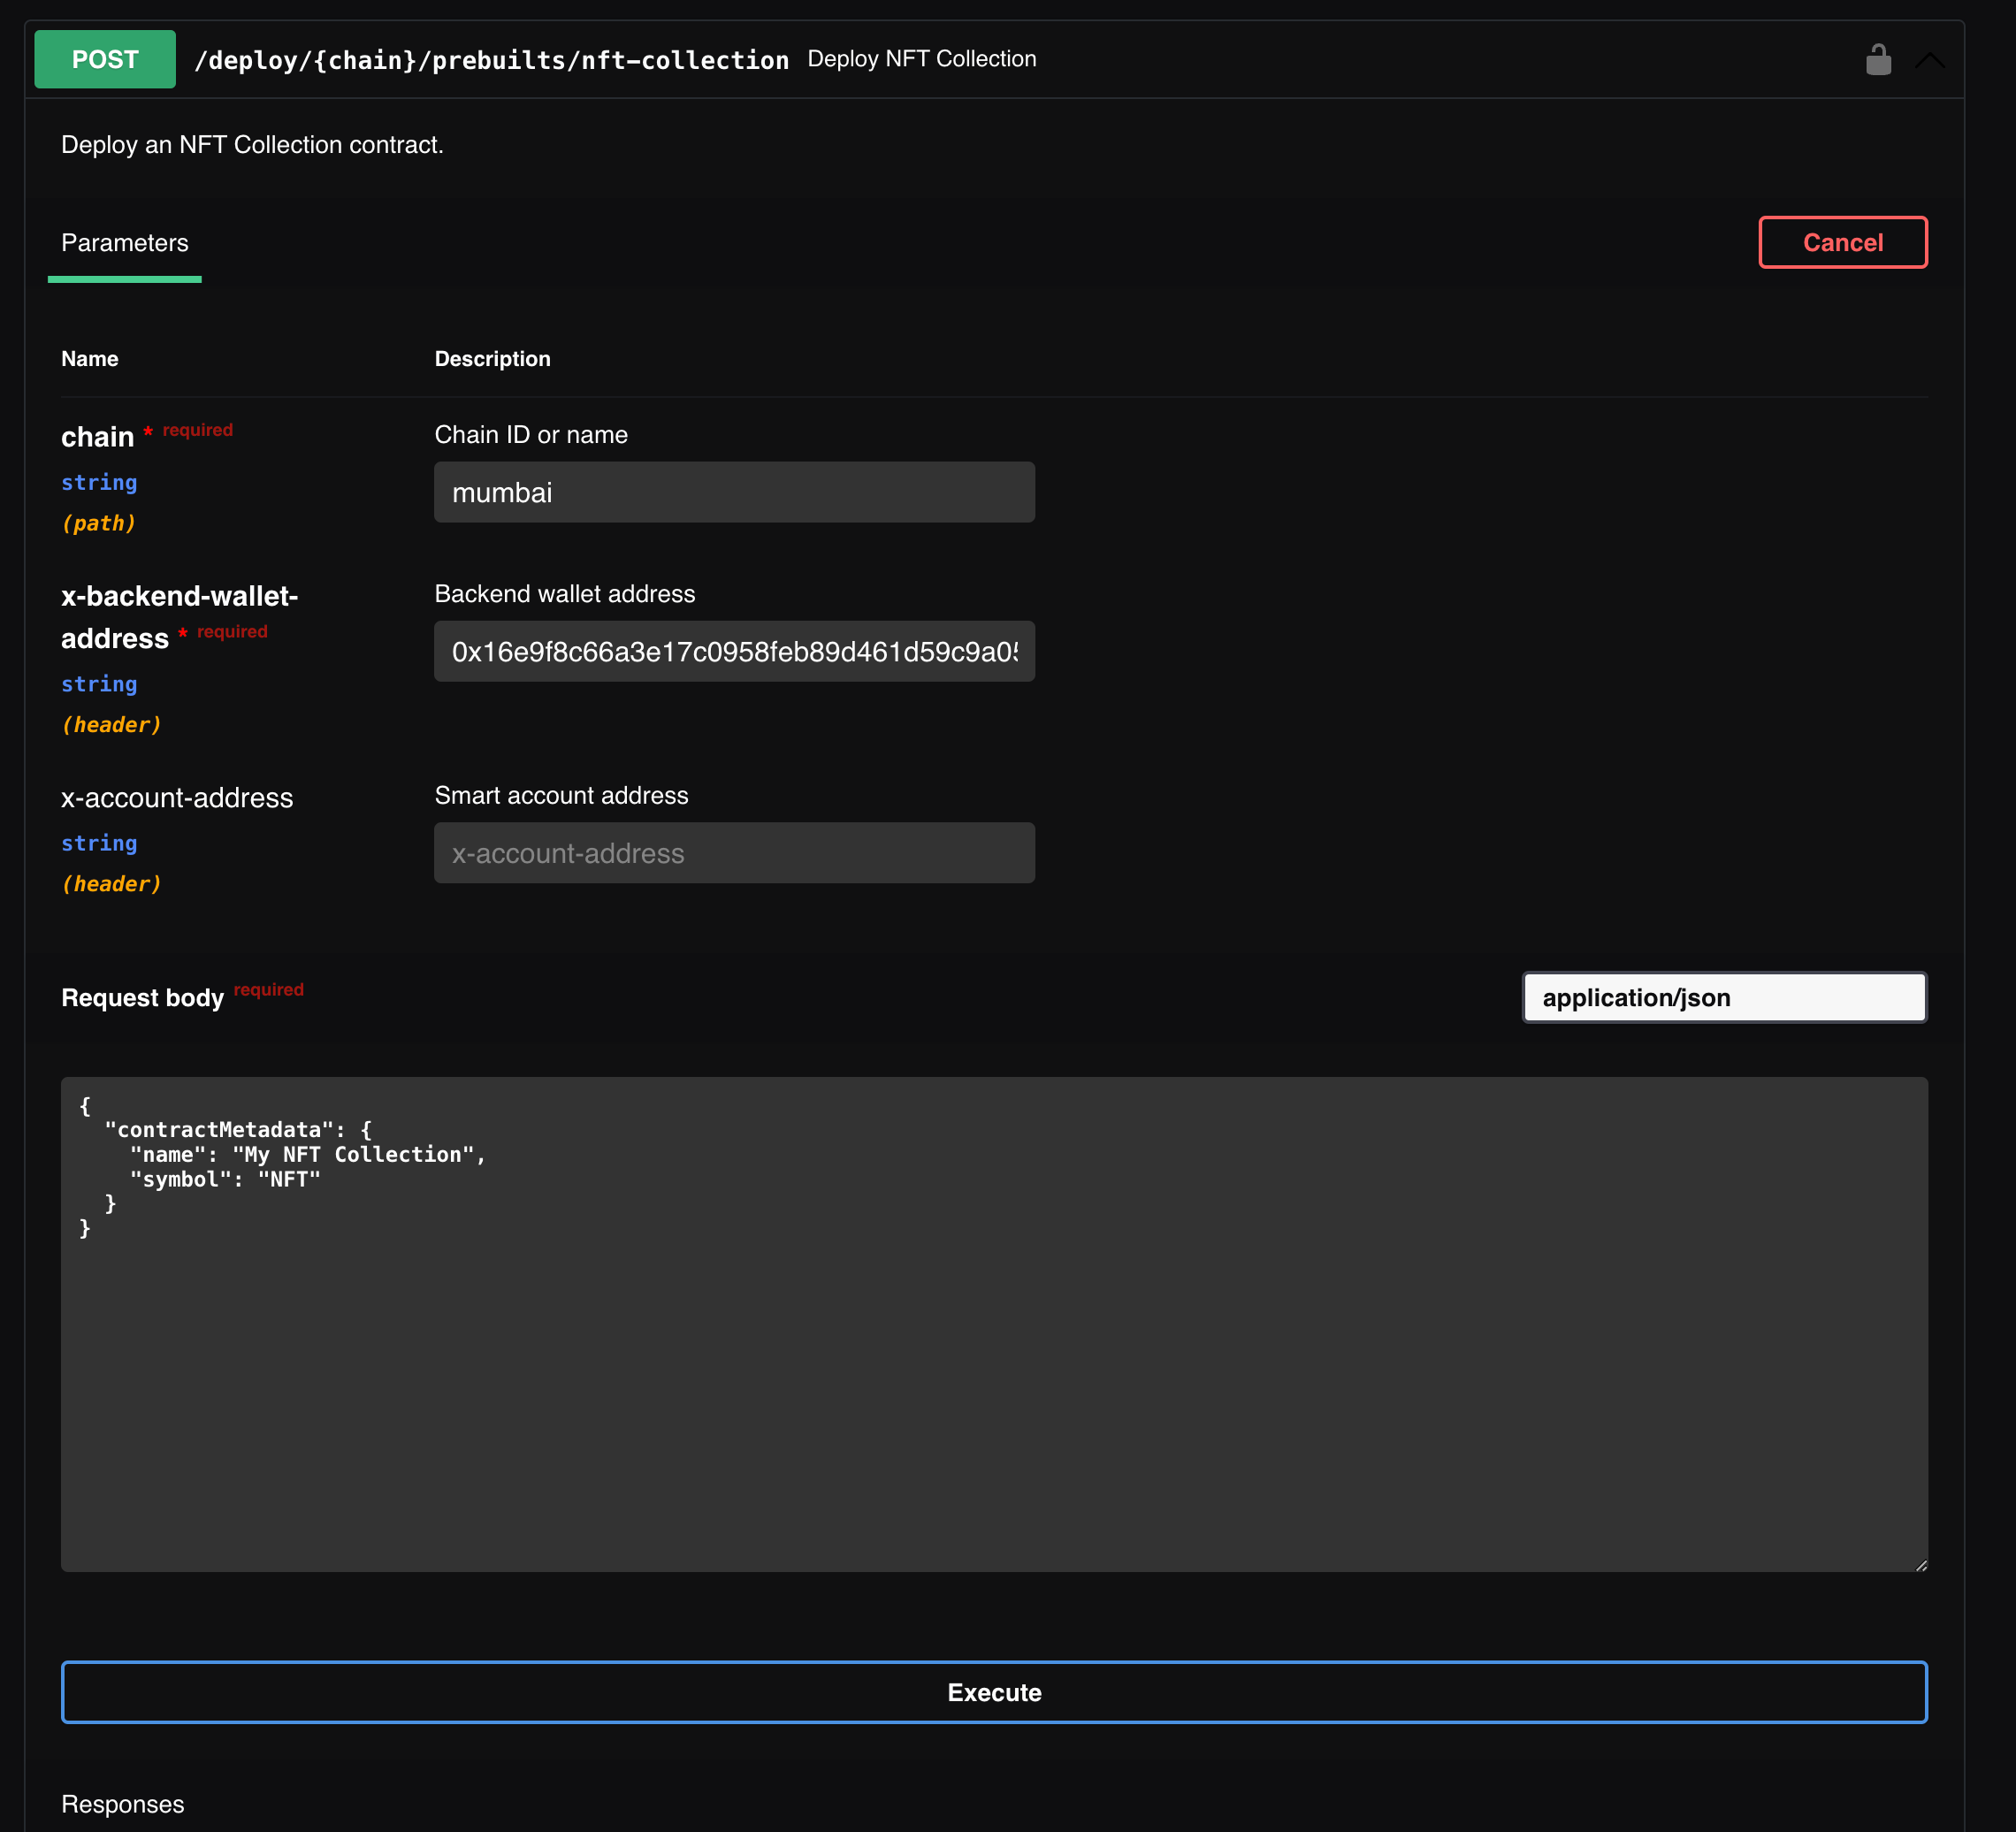
Once, you have entered the details click on Execute. You should then be able to see your contract address:

We are going to need this contract address in sometime, so make sure you save it!
Creating our app
Using the thirdweb CLI, create a new Next.js & TypeScript project with the React SDK preconfigured for you using the following command:
npx thirdweb create app --next --tsTo use an API key with the React SDK, pass the clientId to the ThirdwebProvider. The template already comes with the clientId, so you can simply create a new .env.local file and add the client id with the respective name in the .env.example file.
We are going to use app dir in this guide, so delete the pages dir and create a new dir named app.
Setting up MongoDB
We are going to need a database to store all our NFTs' metadata and later keep track of which one's have been claimed. So, I am going to use mongoDB for this, but you can use any db of your choice!
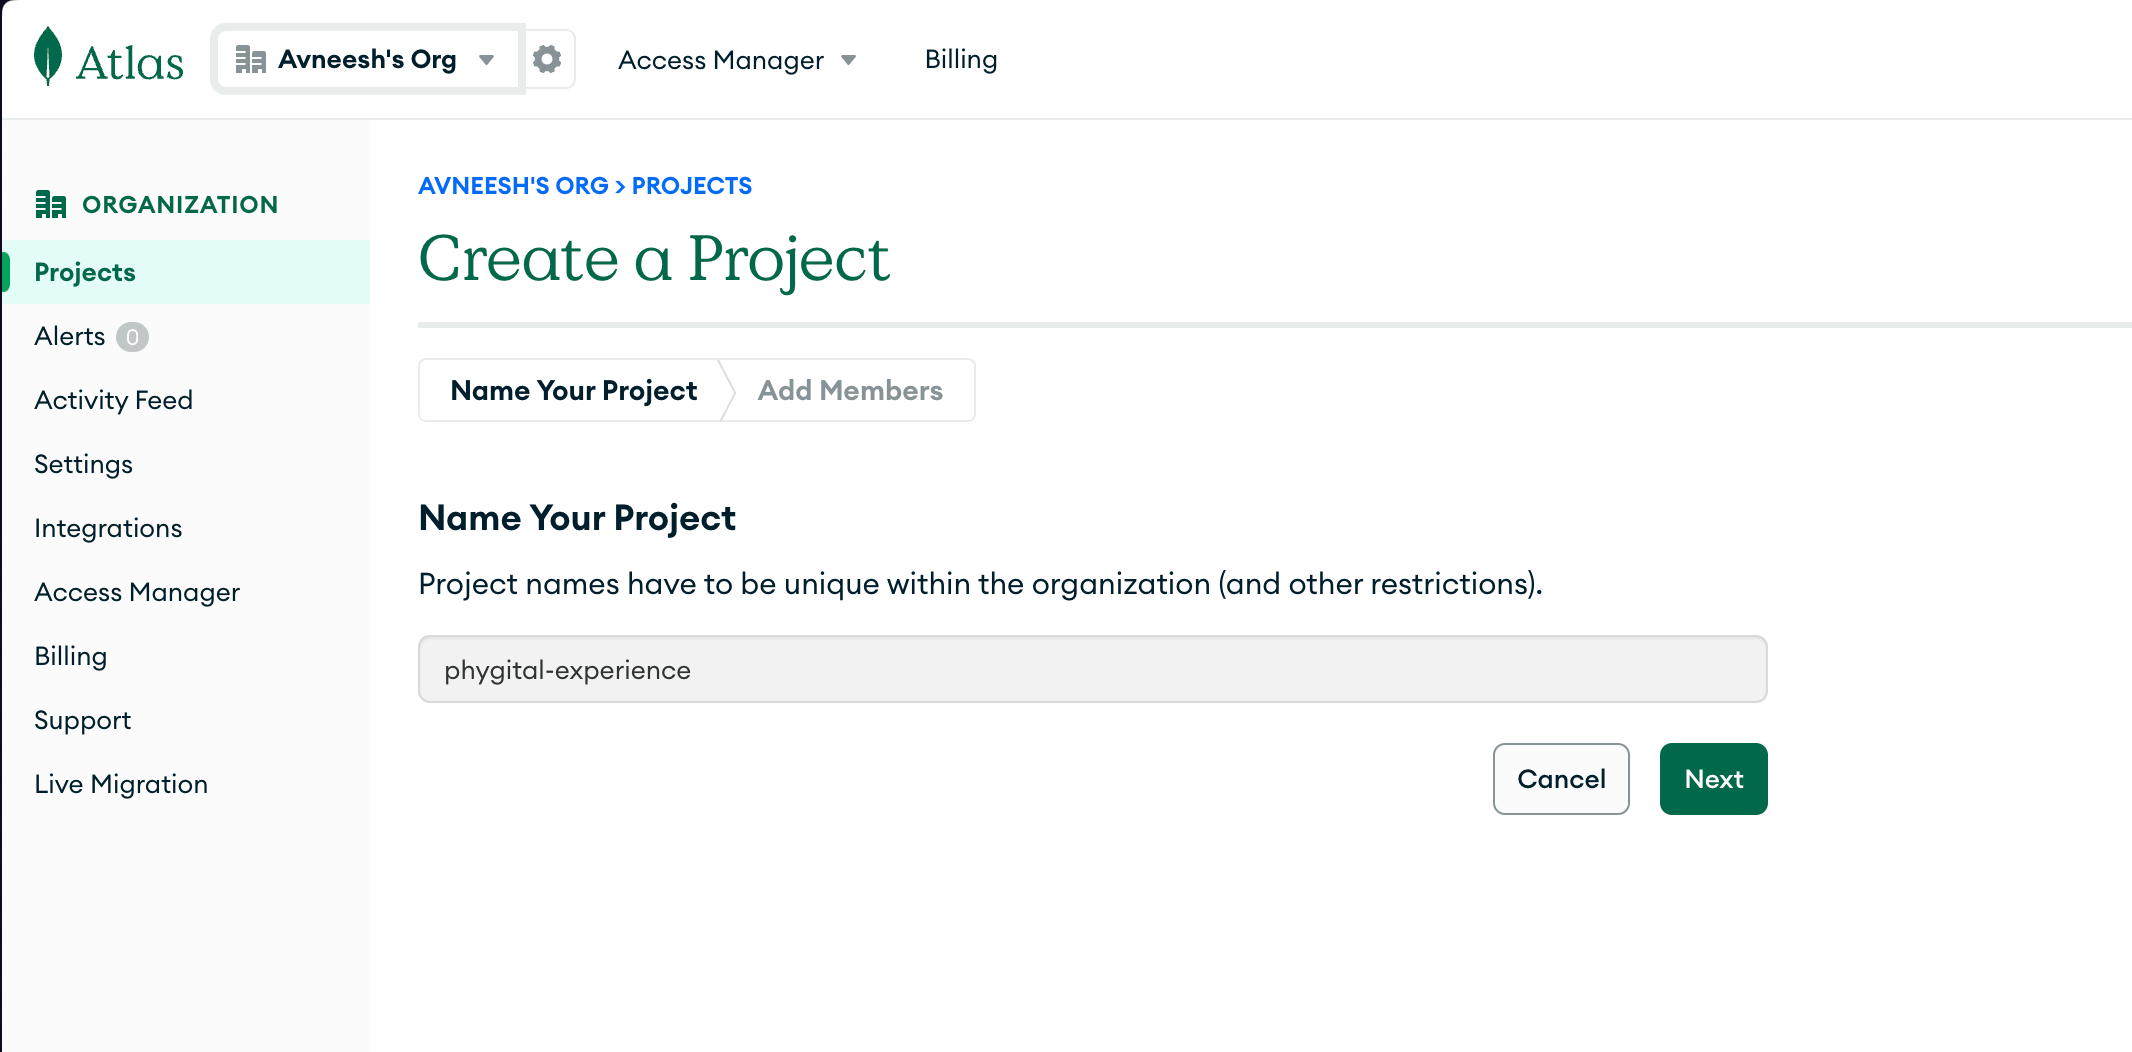
Head over to MongoDB and create an account/sign in. Once you have signed in, click on create a new project. Enter a name for your project and click on next and then Create Project:
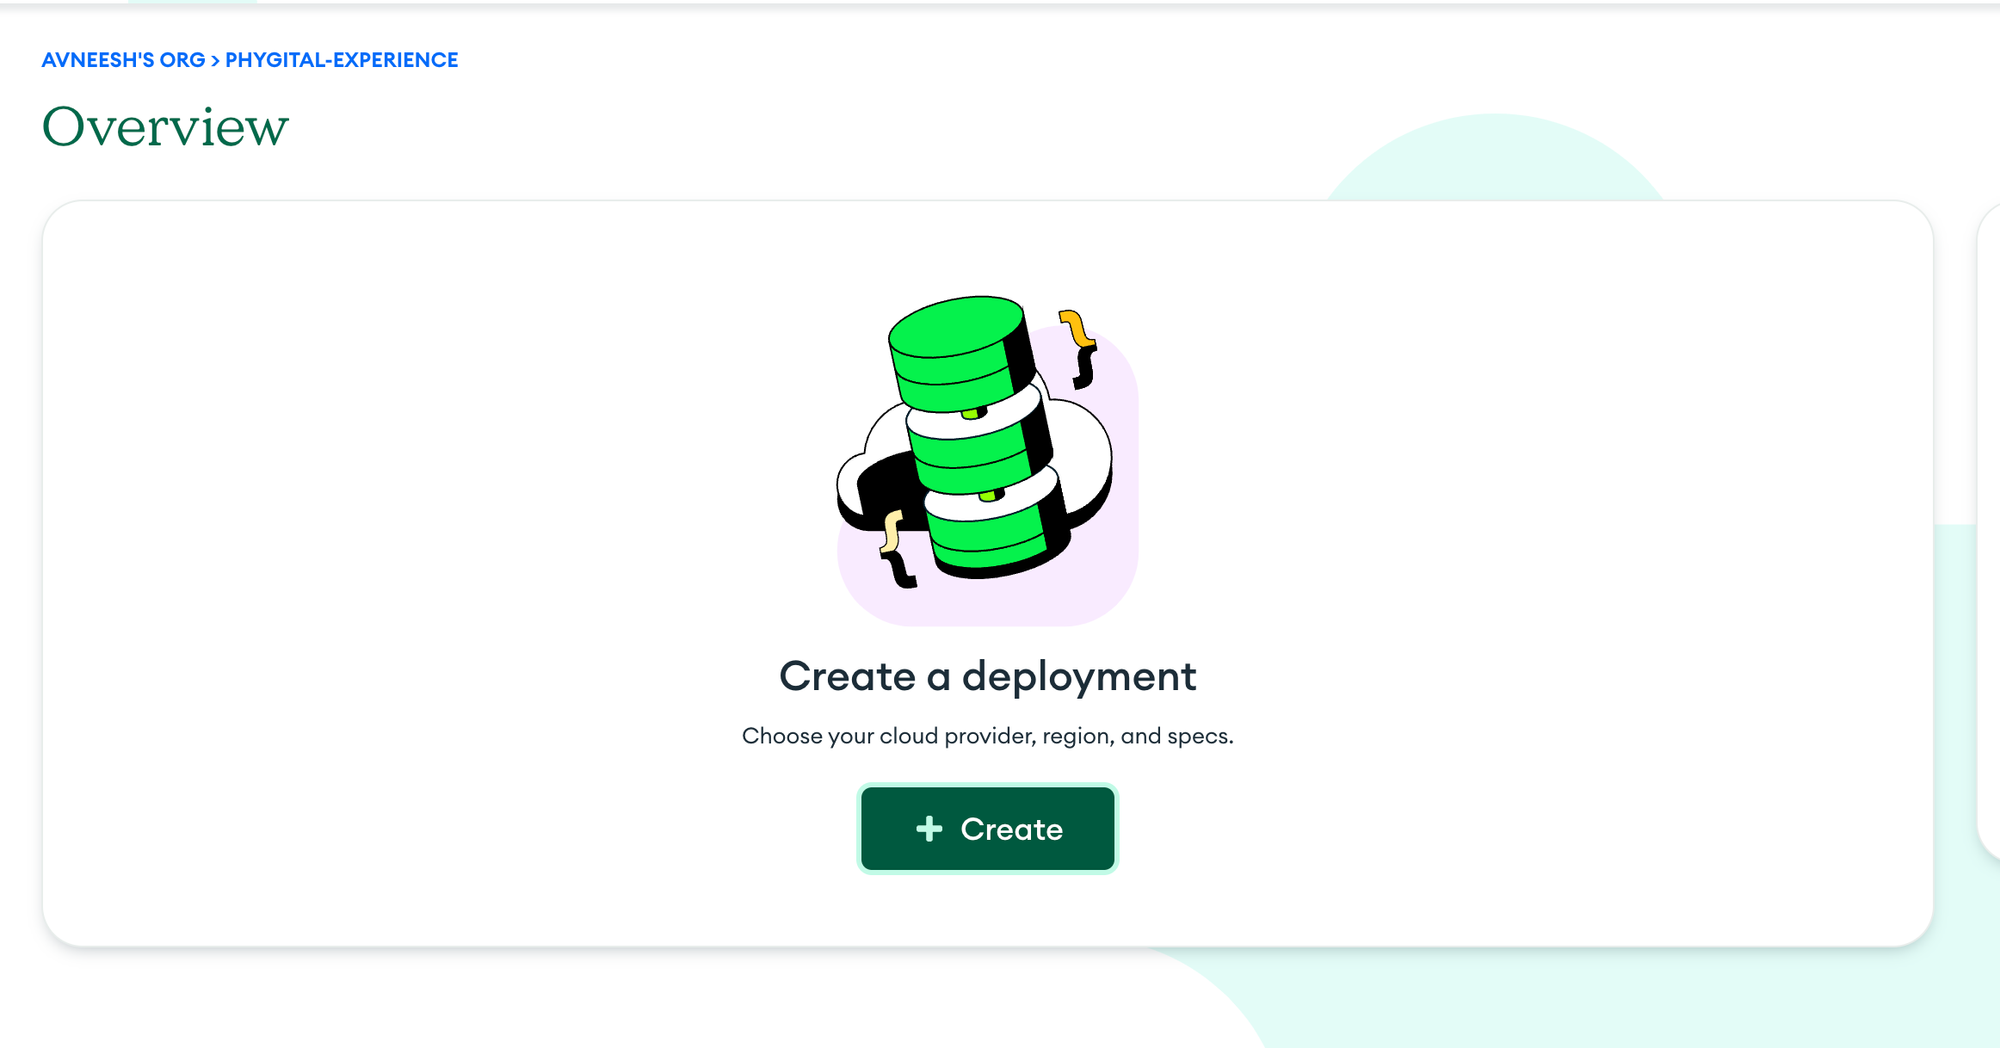
Once your project has been created, we need to create a deployment, so, click on the Create button:
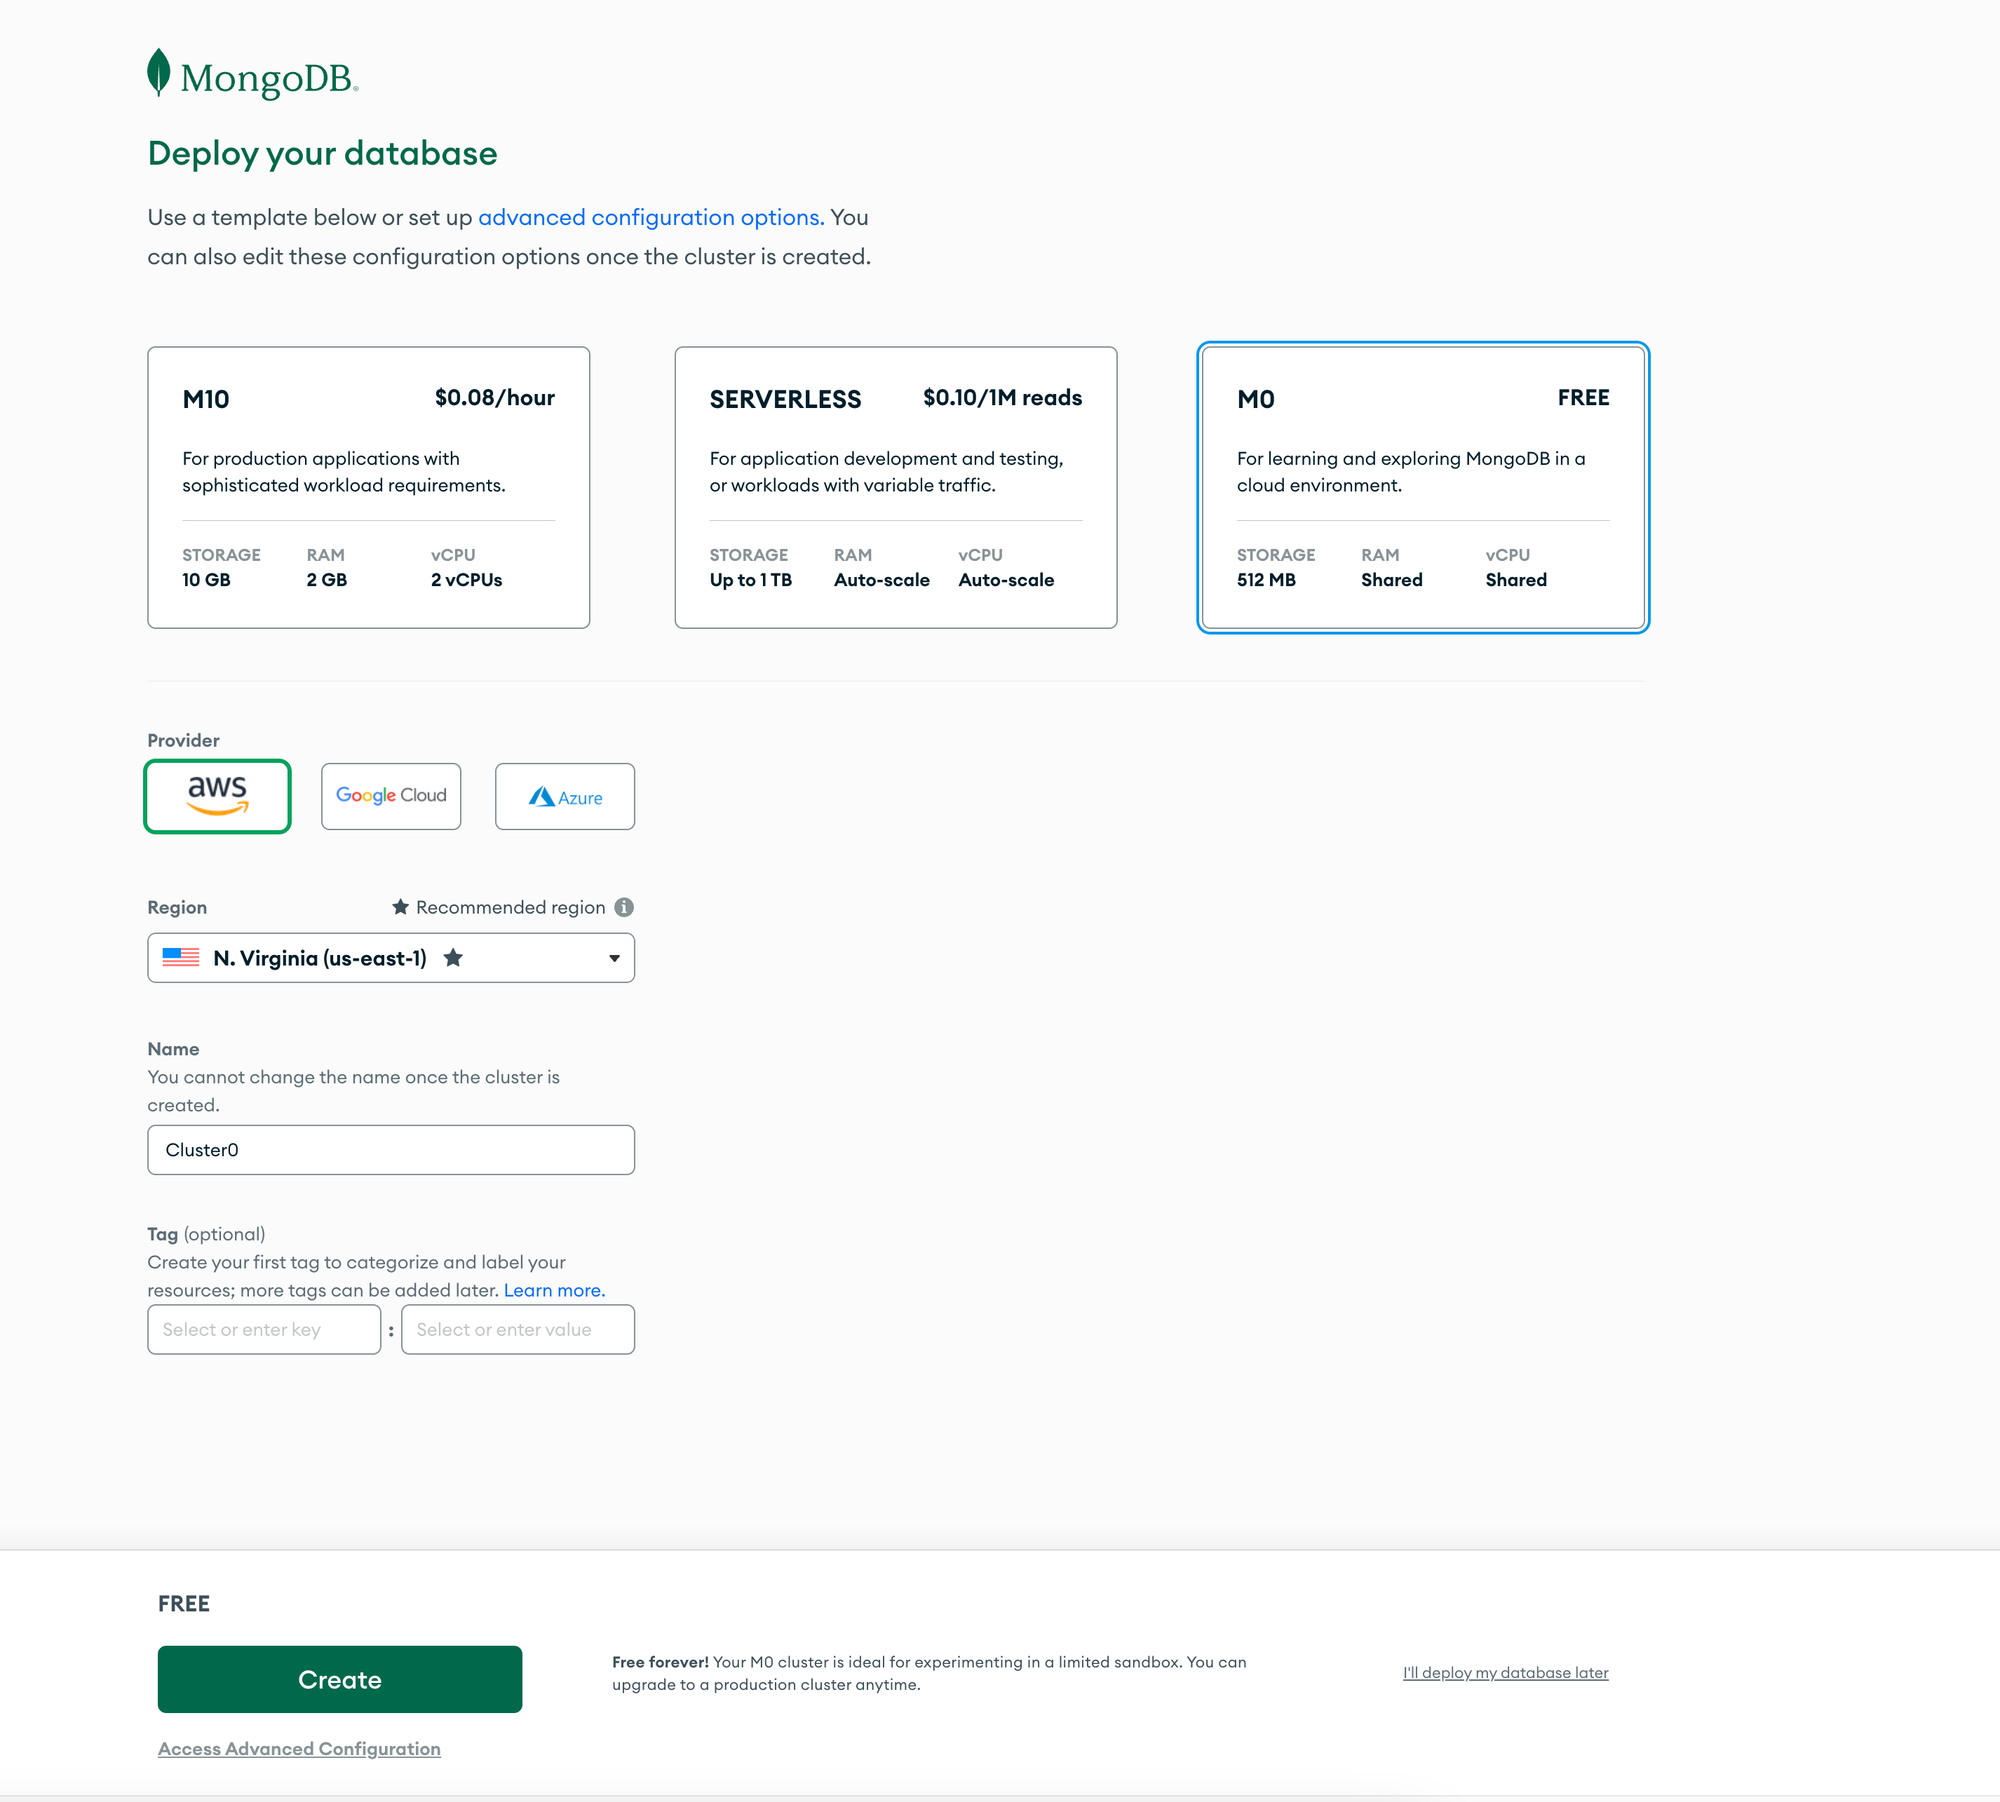
Choose the configuration options for your db here:
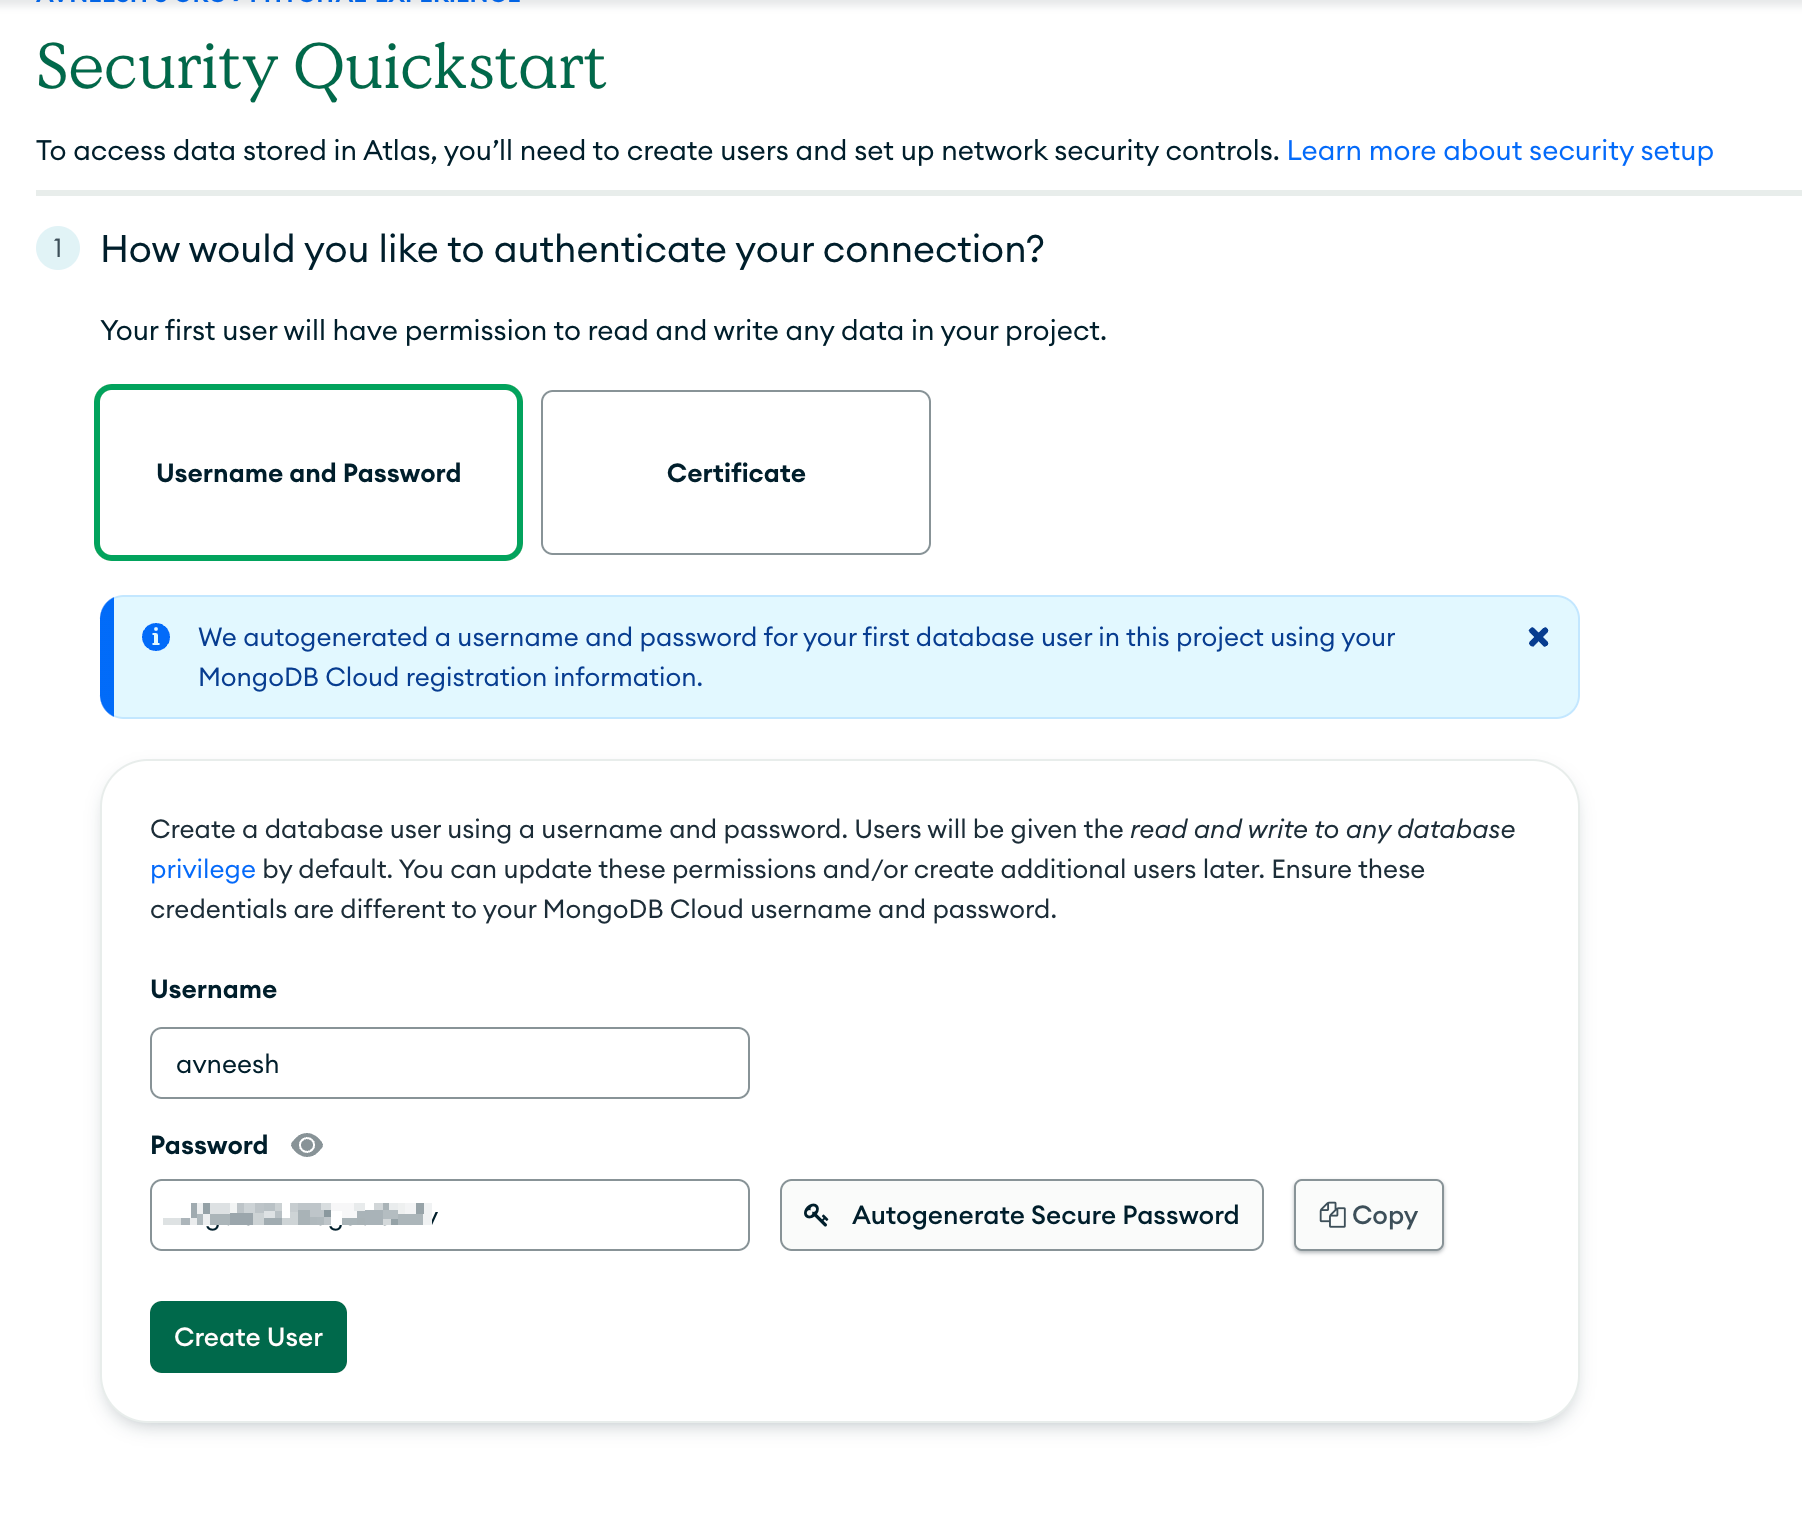
Once you have created the cluster, it will take you to the security page. You can create a user to access the db later with a username and password:
Finally, head over to the overview page and click on the Connect button:
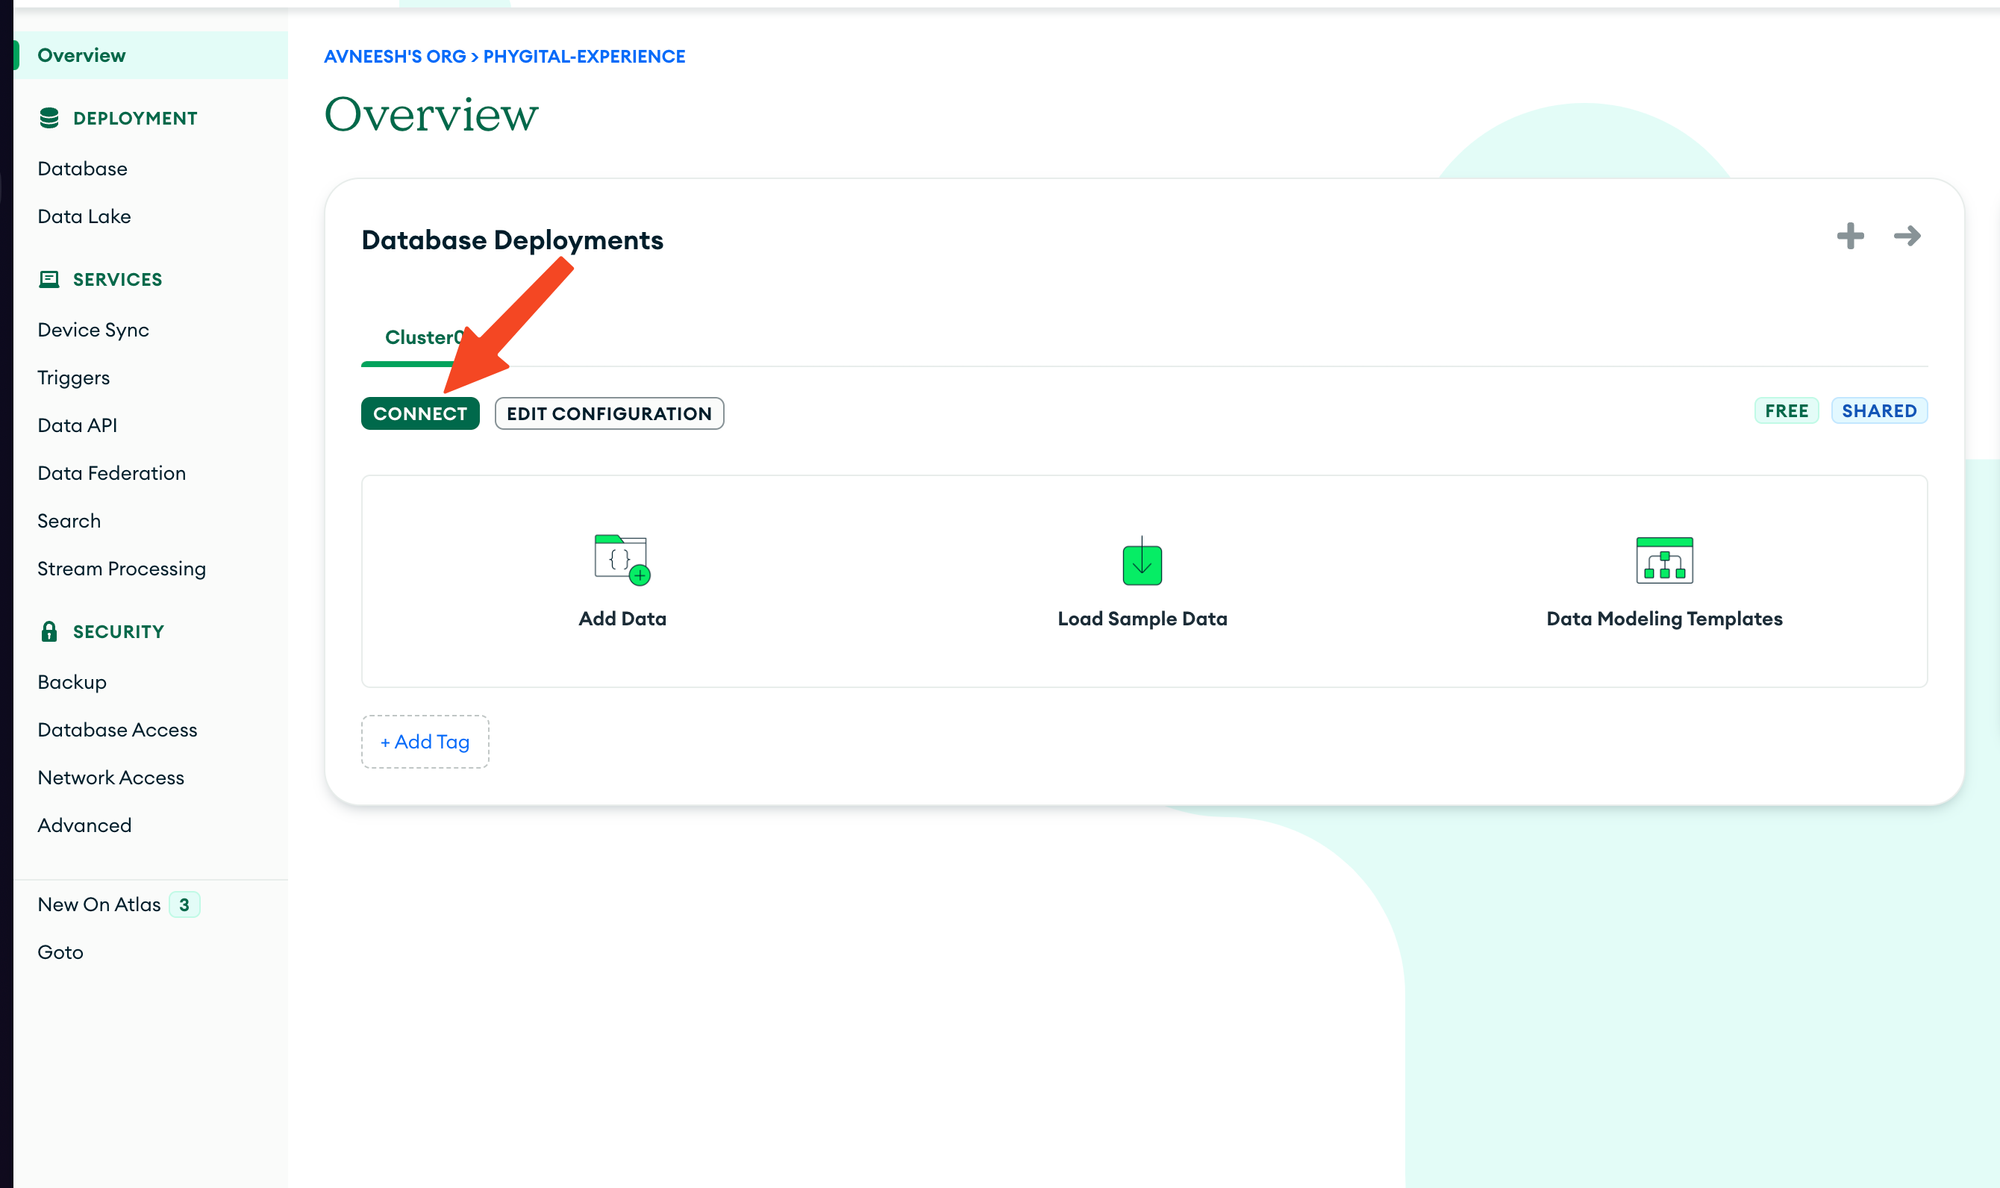
Once you click on connect, choose drivers and copy the connection url and make sure to replace the <password> with the password you used earlier to create the user:
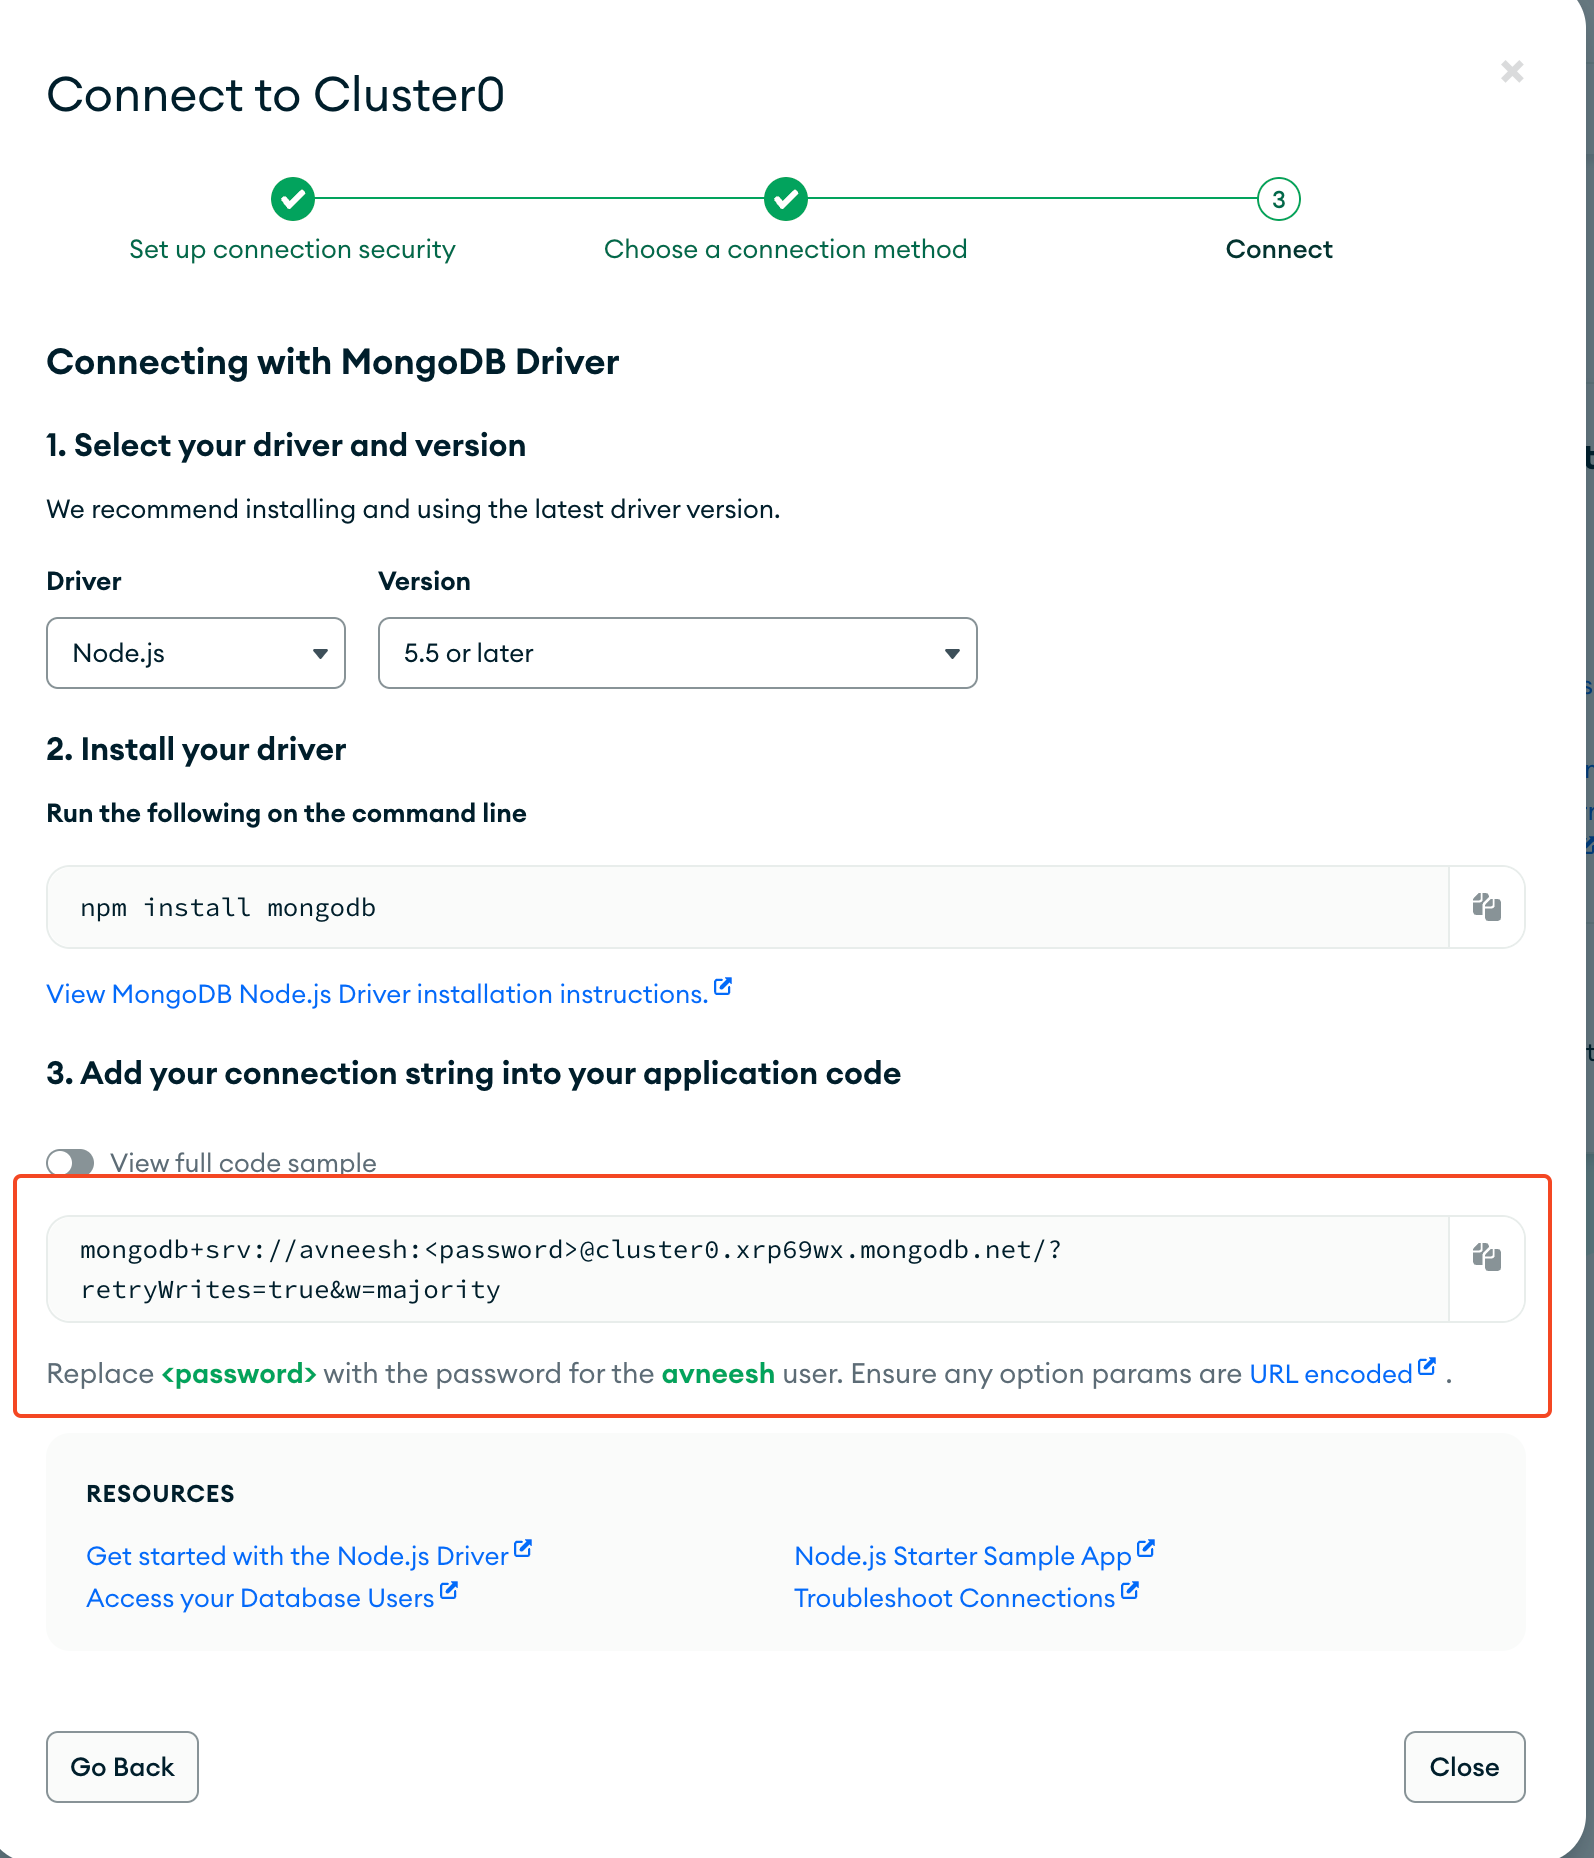
We have now completed setting up our database, keep this connection URL with you since we are going to need it soon!
Setting up Prisma
We are going to need prisma to interact with our database. So, let's setup Prisma! To setup Prisma you need to run the following command in your root dir:
npx prisma initThis will create a .env and prisma/schema.prisma file for us. In the .env file replace the database URL with the connection URL you received from mongodb.
Now, head over to schema.prisma and change the provider to mongodb since we are using that:
generator client {
  provider = "prisma-client-js"
}

datasource db {
  provider = "mongodb"
  url      = env("DATABASE_URL")
}
Now, add a NFT model for storing the NFTs:
model NFT {
  id          String   @id @default(cuid()) @map("_id")
  name        String
  description String
  minted      Boolean
  image       String
  owner       String?
  createdAt   DateTime @default(now())
  updatedAt   DateTime @updatedAt
  attributes  Json
}
Finally, run this command to create this collection in your db:
npx prisma db pushWe can now use prisma in our app to interact with our db, so, create a new utils/prisma.ts file to initialise your prisma client here:
import { PrismaClient } from "@prisma/client";

let prisma: PrismaClient;

if (process.env.NODE_ENV === "production") {
  prisma = new PrismaClient();
} else {
  const globalWithPrisma = global as typeof globalThis & {
    prisma: PrismaClient;
  };
  if (!globalWithPrisma.prisma) {
    globalWithPrisma.prisma = new PrismaClient();
  }
  prisma = globalWithPrisma.prisma;
}

export default prisma;
Adding the NFT metadata to our collection
You can either spin up the prisma studio using the npx prisma studio command and add your NFTs manually or if you have the NFTs in a json format you can create a new file script.mjs in your dir and add the following:
const NFTs = []; // Add your NFTs here

import { PrismaClient } from "@prisma/client";

if (process.env.NODE_ENV === "production") {
  prisma = new PrismaClient();
} else {
  const globalWithPrisma = global;
  if (!globalWithPrisma.prisma) {
    globalWithPrisma.prisma = new PrismaClient();
  }
  prisma = globalWithPrisma.prisma;
}

const main = async () => {
  try {
    await prisma.nFT.createMany({
      data: NFTs.map((nft) => ({
        ...nft,
        minted: false,
      })),
    });

    console.log("NFTs added to DB");
  } catch (e) {
    console.error(e);
  }
};

main();
You need to add the array of NFTs you want to add in the first line. The NFTs should be of the following structure:
const NFTs = [
  {
    name: "Blue Circle",
    description: "A blue circle NFT from the Shapes Collection",
    image:
      "ipfs://QmPL8z4axPydaRK9wq3Pso2z5gfnDVcgTjf6yx88v3amr2/blue_circle.png",
    attributes: {
      shape: "circle",
      color: "blue",
      sides: "0",
    },
  },
];
Once you have added all the NFTs, run the script:
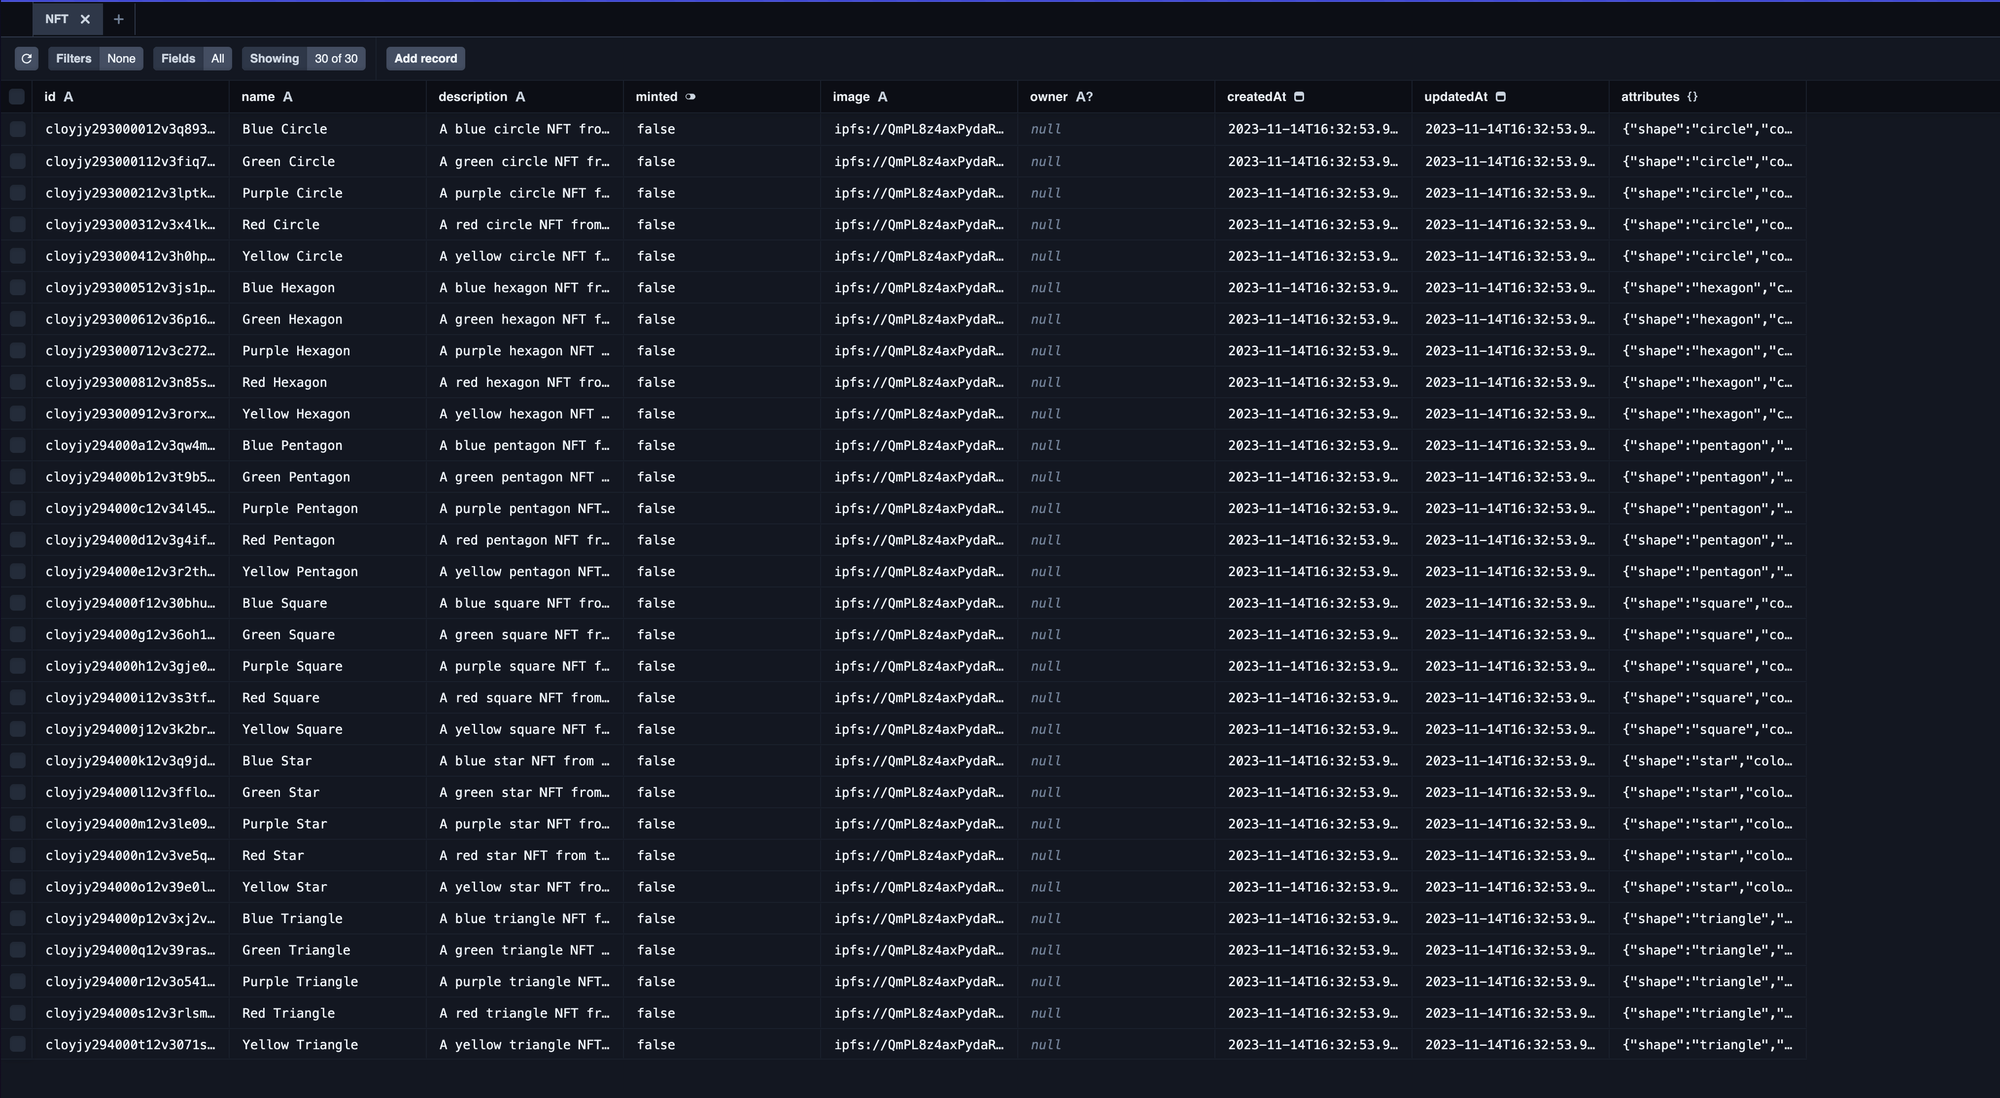
node script.mjsIf you now check your database, you will be able to see all the NFTs added to the NFT collection!
Creating the claim API
Now, we are ready to create our claim API but first we need to install the @thirdweb-dev/engine package:
yarn add @thirdweb-dev/engineNow, create a new file inside the app/api/nft folder named route.ts and add the following:
import { Engine } from "@thirdweb-dev/engine";
import { NextResponse } from "next/server";
import prisma from "../../../utils/prisma";

export async function POST(req: Request) {
  const { id, address } = await req.json();

  const BACKEND_WALLET_ADDRESS = process.env.BACKEND_WALLET_ADDRESS!;
  const NFT_CONTRACT_ADDRESS = process.env.NEXT_PUBLIC_NFT_CONTRACT_ADDRESS!;

  try {
    const nft = await prisma.nFT.findUnique({
      where: {
        id,
      },
    });

    if (!nft) {
      return NextResponse.json({ error: "NFT not found" }, { status: 404 });
    }

    if (nft.minted) {
      return NextResponse.json(
        { error: "NFT already minted" },
        { status: 400 }
      );
    }

    const engine = new Engine({
      url: process.env.ENGINE_URL!,
      accessToken: process.env.THIRDWEB_ACCESS_TOKEN!,
    });

    const tx = await engine.erc721.mintTo(
      "goerli",
      NFT_CONTRACT_ADDRESS,
      BACKEND_WALLET_ADDRESS,
      {
        metadata: {
          name: nft?.name,
          description: nft?.description,
          image: nft?.image,
        },
        receiver: address,
      }
    );

    await prisma.nFT.update({
      where: {
        id,
      },
      data: {
        owner: address,
        minted: true,
      },
    });

    return NextResponse.json(tx, { status: 200 });
  } catch (e) {
    console.error(e);
    return NextResponse.json({ error: e }, { status: 500 });
  }
}
To run this script you need these 4 environment variables:
ENGINE_URL=
THIRDWEB_ACCESS_TOKEN=
BACKEND_WALLET_ADDRESS=
NEXT_PUBLIC_NFT_CONTRACT_ADDRESS=
- For
ENGINE_URLenter the URL of your engine - For
THIRDWEB_ACCESS_TOKENgenerate a access token from thePermissionstab on the engine page - For
BACKEND_WALLET_ADDRESSenter the wallet address that you want to use for making all the minting transactions - For
NEXT_PUBLIC_NFT_CONTRACT_ADDRESSenter the contract address of the NFT collection that you just deployed.
Let's now breakdown what we are doing here.
We are creating a post route at /api/nft which takes in the NFT id and address as a parameter in the request body.
Then, we find the NFT corresponding to the id in our database. Then we check if the NFT is there at all and the NFT has not been minted yet. If it has been minted we return an error.
If the NFT is there and hasn't been minted yet we use engine to mint a new ERC721 token to our NFT collection contract and then finally updating the minted parameter of the NFT to true and adding the owner address.
Creating the NFT claim page
Now that we have the API route setup, we can create the claim page! In the claim page we will pass the NFT id as a query param. So, let's create that page, but first create a layout.tsx file in the app dir and add the following:
import type { Metadata } from "next";
import "../styles/globals.css";
import { ThirdwebProvider } from "../components/ThirdwebProvider";

export const metadata: Metadata = {
  title: "Claim NFTs via qr codes | thirdweb Engine",
};

export default function RootLayout({
  children,
}: {
  children: React.ReactNode;
}) {
  return (
    <html lang="en">
      <body>
        <ThirdwebProvider>{children}</ThirdwebProvider>
      </body>
    </html>
  );
}
You will need to create a new components/ThirdwebProvider.tsx file and add the following as well:
import type { Metadata } from "next";
import "../styles/globals.css";
import { ThirdwebProvider } from "../components/ThirdwebProvider";

export const metadata: Metadata = {
  title: "Claim NFTs via qr codes | thirdweb Engine",
};

export default function RootLayout({
  children,
}: {
  children: React.ReactNode;
}) {
  return (
    <html lang="en">
      <body>
        <ThirdwebProvider>{children}</ThirdwebProvider>
      </body>
    </html>
  );
}
Now, we can create the claim page, so, create a claim/page.tsx file in the app dir and add the following:
import prisma from "../../utils/prisma";

async function getData(id: string) {
  const nft = await prisma.nFT.findUnique({
    where: {
      id,
    },
  });

  if (!nft) {
    throw new Error("NFT does not exist");
  }

  return { nft: JSON.stringify(nft) };
}

export default async function ClaimPage({
  searchParams,
}: {
  searchParams: { id: string };
}) {
  const nft = JSON.parse((await getData(searchParams.id)).nft);

  return (
    <div>
      <h2>{nft.name}</h2>
      <p>{nft.description}</p>
      {/* @ts-ignore */}
      <div>
        {Object.keys(nft.attributes).map((key) => (
          <div key={key}>
            <p>{key}</p>
            <p>
              {/* @ts-ignore */}
              {nft.attributes[key]}
            </p>
          </div>
        ))}
      </div>
    </div>
  );
}
If you now go to http://localhost:3000/claim?id=<some_nft_id> you'll be able to see something like this:
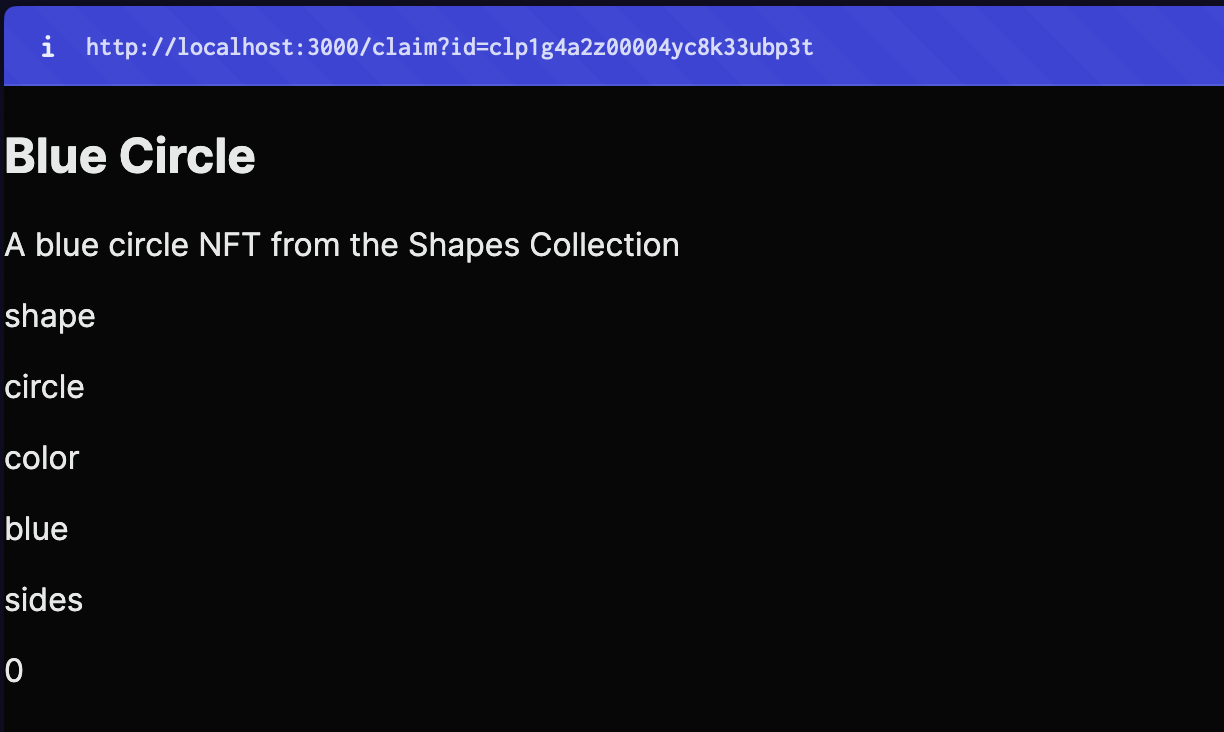
This is pretty barebones and hasn't been styled, you can use your creativity to style it as you like! If you want the same styles as the template, you can check out the Claim.module.css file.
Now, let's add a button to allow users to claim their NFTs! For this I am going to use a client component, so, create a new file named Button.tsx in the components folder and add the following:
"use client";

import { useState, type FC } from "react";
import axios from "axios";
import { ConnectWallet, useAddress } from "@thirdweb-dev/react";
import styles from "../styles/Claim.module.css";

const Button: FC<{ id: string }> = ({ id }) => {
  const address = useAddress();
  const [loading, setLoading] = useState(false);

  const claim = async () => {
    setLoading(true);
    try {
      await axios.post("/api/nft", {
        id: id,
        address,
      });

      alert("NFT claimed!");
    } catch (err) {
      alert(`Error claiming NFT: ${err}`);
    } finally {
      setLoading(false);
    }
  };

  return (
    <>
      {address && (
        <button
          className={styles.claimButton}
          onClick={() => claim()}
          disabled={loading}
        >
          {loading ? "Claiming..." : "Claim"}
        </button>
      )}
      <ConnectWallet className={styles.connectBtn} />
    </>
  );
};

export default Button;
Here, we show a ConnectWallet button to allow users to connect their wallets, and if they have connected their wallet we also show a button which calls the /api/nft api to claim the NFT!
Add the button in the claim/page.tsx file like this:
{!nft.minted && <Button id={searchParams.id} />}
If you now try claiming your NFT, you should get an alert saying "NFT claimed!".
We'll now check if the NFT has already been minted and if it has been then we'll show a text showing NFT already minted:
{nft.minted && <h1 className={styles.title}>NFT has already been claimed</h1>}
Let's now build our inventory so users can see the NFTs that they own!
Creating the inventory
Create a new file page.tsx in the app dir and add the following:
"use client";

import {
  ConnectWallet,
  ThirdwebNftMedia,
  useAddress,
  useContract,
  useNFTBalance,
  useOwnedNFTs,
} from "@thirdweb-dev/react";
import Link from "next/link";
import styles from "../styles/Home.module.css";

export default function Home() {
  const NFT_CONTRACT_ADDRESS = process.env.NEXT_PUBLIC_NFT_CONTRACT_ADDRESS!;
  const { data: contract } = useContract(NFT_CONTRACT_ADDRESS);
  const address = useAddress();
  const { data: nfts, isLoading } = useOwnedNFTs(contract, address);
  const { data: nftBalance } = useNFTBalance(contract, address);

  if (isLoading) {
    return (
      <div className={styles.loadingContainer}>
        <h1>Loading your assets...</h1>
        <div className={styles.loader}>Loading...</div>
      </div>
    );
  }

  return (
    <div className={styles.container}>
      <ConnectWallet />
      <h1 className={styles.title}>Your Assets</h1>
      <h2>
        TOTAL ITEMS: <span>{nftBalance?.toNumber()}</span>
      </h2>

      {!address && <h1>Connect your wallet</h1>}
      {address && isLoading && <h1>Loading...</h1>}
      {address && !isLoading && !nfts?.length && <h1>You have no NFTs :(</h1>}
      <div className={styles.nfts}>
        {nfts?.map(({ metadata }) => (
          <Link
            href={`https://thirdweb.com/mumbai/${process.env.NEXT_PUBLIC_NFT_CONTRACT_ADDRESS}/nfts/0/${metadata.id}`}
            target="_blank"
            rel="noopener noreferrer"
            key={metadata.id}
          >
            <div key={metadata.id} className={styles.nft}>
              <ThirdwebNftMedia
                metadata={metadata}
                width="140px"
                height="140px"
              />
              <h2>{metadata.name}</h2>
            </div>
          </Link>
        ))}
      </div>
    </div>
  );
}
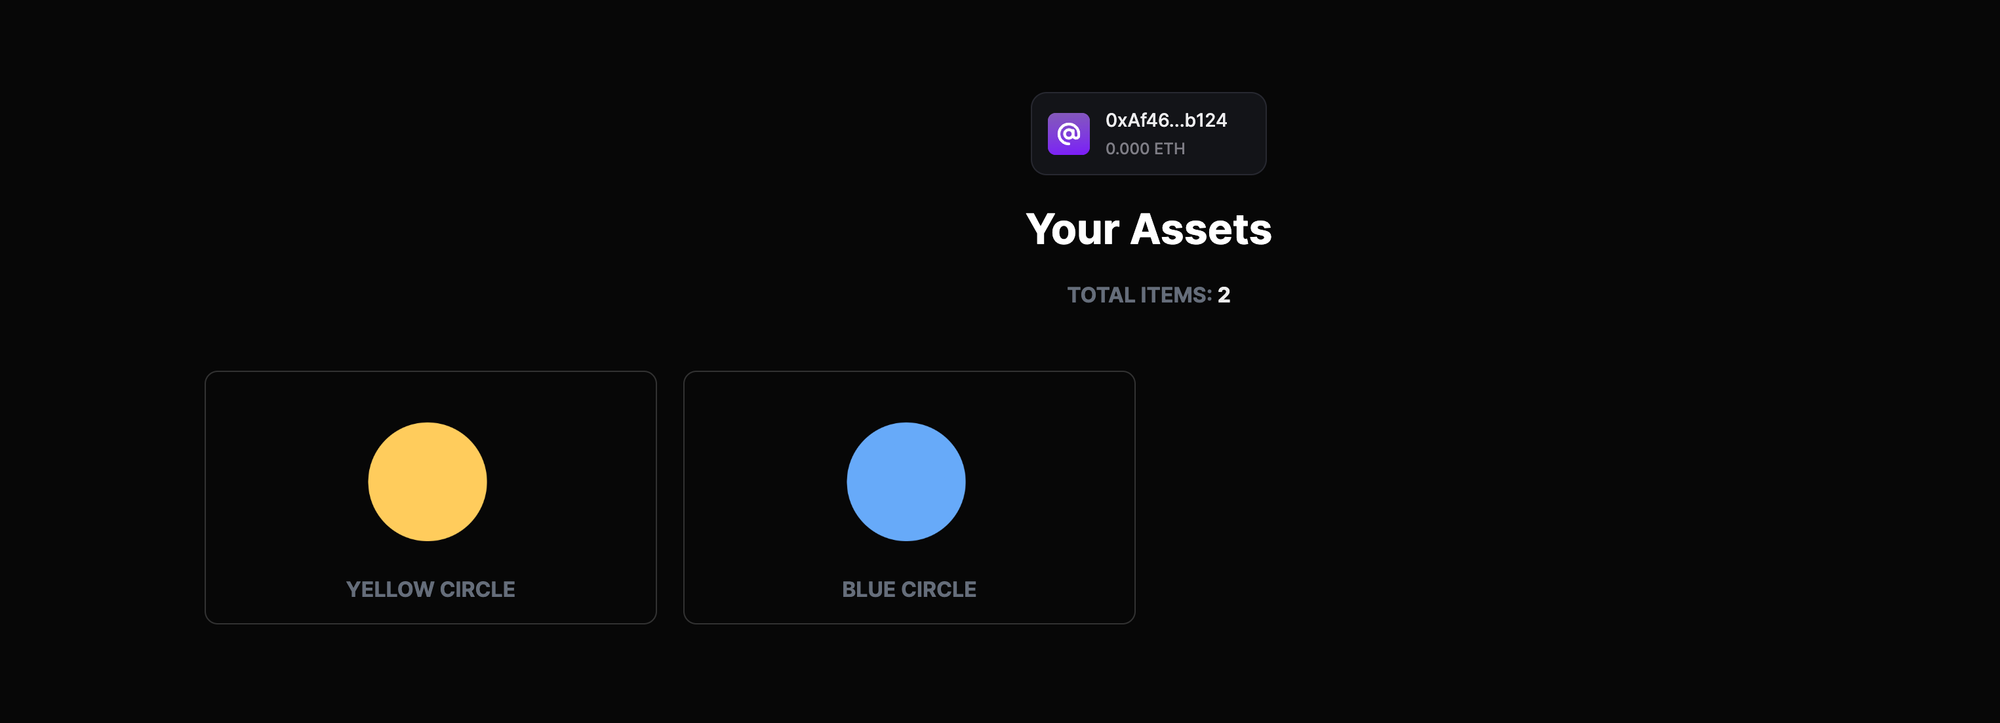
This fetches all the NFTs of the contract in the users' wallet using the useOwnedNFTs hook and displays the NFTs. Like previously you can either write your own styles or copy it from here. If you go to the homepage and connect your wallet you should be able to see something like this:
Generating the QR codes
You can generate the QR codes based on how you wish to distribute them. For demoing, I am going to write a script which saves images of all the QR codes to a file. So, create a new file qrs.mjs and add the following:
import { PrismaClient } from "@prisma/client";
import qrcode from "qrcode";

if (process.env.NODE_ENV === "production") {
  prisma = new PrismaClient();
} else {
  const globalWithPrisma = global;
  if (!globalWithPrisma.prisma) {
    globalWithPrisma.prisma = new PrismaClient();
  }
  prisma = globalWithPrisma.prisma;
}

const main = async () => {
  try {
    const nfts = await prisma.nFT.findMany({
      where: {
        minted: false,
      },
    });

    for (const nft of nfts) {
      await qrcode.toFile(
        `./qrs/${nft.id}.png`,
        `https://engine-phygital.vercel.app/claim?id=${nft.id}`
      );
    }
  } catch (e) {
    console.error(e);
  }
};

main();
You also need to install the qrcode package:
yarn add qrcodeCreate a new folder named qrs in the root dir and run the script by running the command:
node qrs.mjsIf you take a look at the qrs folder you will see a bunch of new images with unique QR codes! You can share these QR codes with anyone you want and they'll be able to claim an NFT via it!
Conclusion
This guide taught us how to use the thirdweb engine, to create a phygital experience where users can claim NFTs via QR codes.
You learned a lot, now pat yourself on the back and share your amazing apps with us on the thirdweb discord! If you want to look at the code, check out the GitHub Repository.
Need help?
For support, join the official thirdweb Discord server or share your thoughts on our feedback board.