Getting Started with Local Wallet
Learn what a local wallet is, what its use cases are, and how you can use them to create invisible wallet experiences for users.

⚠️ Warning: This guide currently uses v4 of the Connect SDK. For v5 (latest) code snippets, please check out our documentation while this guide is being updated. ⚠️
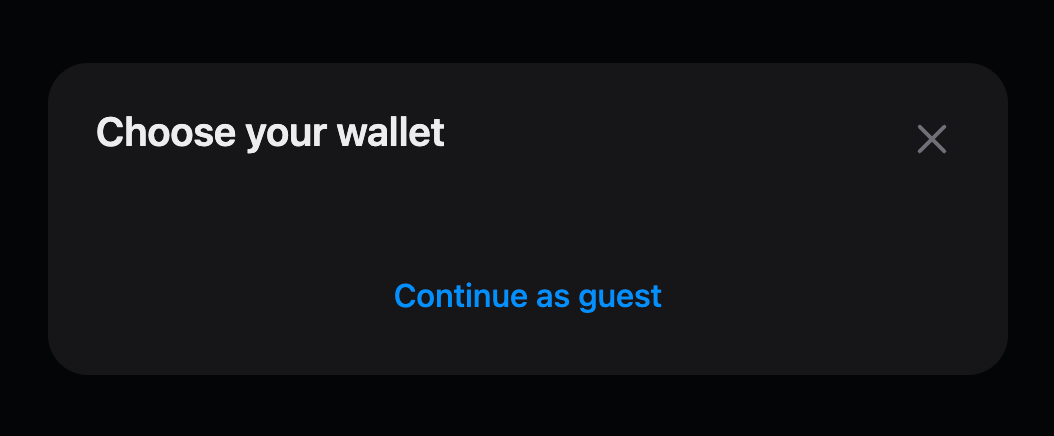
In this guide, you will learn how to integrate a local wallet into your own projects to create a simple "guest checkout" experience for your users. One of the major issues that dApps face when onboarding users is that they require the user to have a preexisting externally owned account, otherwise known as an EOA. Local wallet solves this issue by automatically generating a wallet for each user upon selecting the "Local Wallet" option from the connect wallet button.
View the full source code for how to create a local wallet in a React app or script on GitHub.
What is a Local Wallet?
A local wallet is a low-level wallet that allows you to create wallets within your application or project. It is a non-custodial solution that simplifies the onboarding process by offering a "checkout as guest" experience. This improves the user experience for web3 apps in two ways:
- It enables non-web3 native users to get started easily without having to create a wallet with an external provider like MetaMask.
- It hides transaction confirmations from users. With a local wallet, you can generate wallets on the backend. These wallets are app-scoped meaning that each user has one wallet per app.
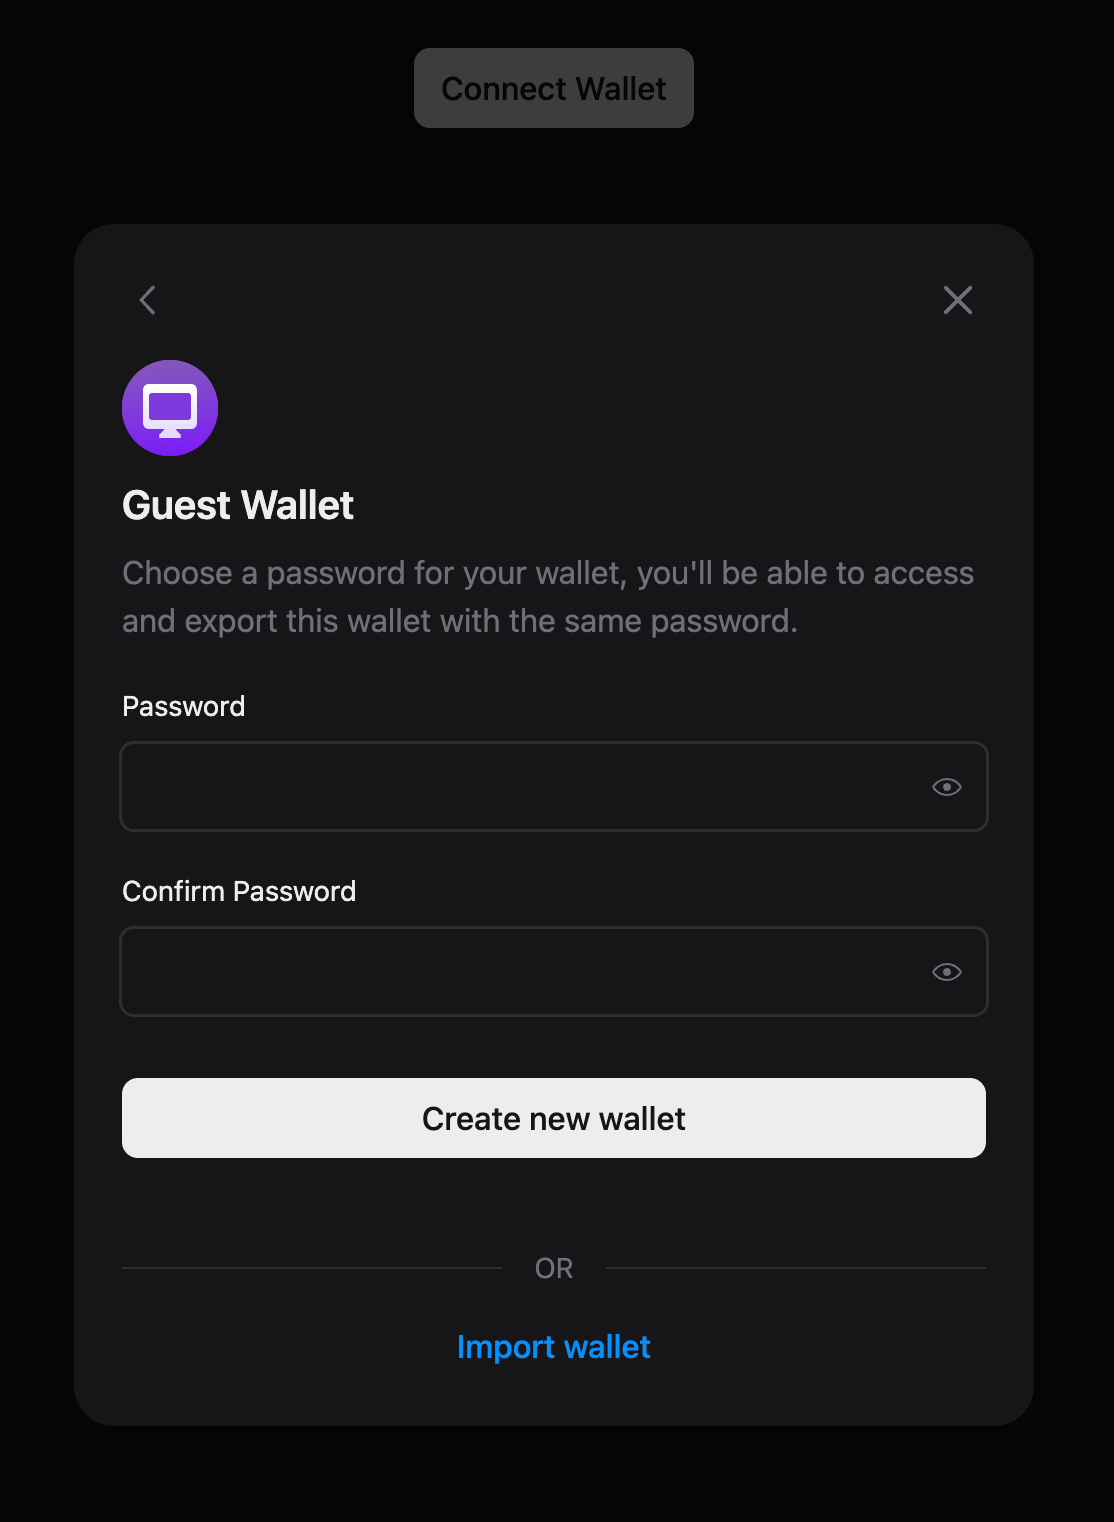
Additionally, the local wallet has UI functionality, available within the React and React Native SDKs, that allows users to export and optionally store the encrypted key for the local wallet on their browser, mobile, or other devices.
Use cases for Local Wallets
The local wallet is a low-level wallet, so can be modified to suit the use case making it extremely versatile. Here are a few interesting use cases for the local wallet:
- Guest checkout experience for users who do not own a wallet.
- As an admin wallet for a Smart Wallet.
- Creating your own MetaMask or Coinbase Wallet EOA app.
- Deploy & interact with contracts using scripts without having to use a private key.
- Automatically generating a wallet for every user to conceal the intricacies of the wallet feature of web3 applications, such as web3 games or commerce sites.
How do Local Wallets work?
Let's imagine you are using a local wallet as part of your web3 application. When a user interacts with your app, they will need already to have their own EOA to connect to the app and sign transactions. This creates a barrier to onboarding new users to your application, particularly for users who are not familiar with Web3 user flows, such as connecting a wallet, signing transactions, and obtaining funds. Local wallet provides the solution by creating a wallet for your users in a way that works for your application by either allowing them to create a "guest" wallet or by creating a local wallet for each user automatically upon visiting the app.
Using Local Wallet in a Front End
Using a local wallet as an option to allow your users to connect to your front end is simple using our Connect Wallet UI component.
clientId to the ThirdwebProvider.To add a local wallet as an option, all you need to do is import localWallet from the React SDK package and provide it to the supportedWallets object in the ThirdwebProvider component in your app.ts file as follows:
import type { AppProps } from "next/app";
import { ThirdwebProvider, localWallet } from "@thirdweb-dev/react";
import "../styles/globals.css";

// This is the chain your dApp will work on.
// Change this to the chain your app is built for.
// You can also import additional chains from `@thirdweb-dev/chains` and pass them directly.
const activeChain = "mumbai";

function MyApp({ Component, pageProps }: AppProps) {
  return (
    <ThirdwebProvider
      clientId={process.env.CLIENT_ID}
      activeChain={activeChain}
      supportedWallets={[localWallet()]}
    >
      <Component {...pageProps} />
    </ThirdwebProvider>
  );
}

export default MyApp;
Here, we have pre-configured all of the settings for your local wallet. This includes setting the connector and the storage for the wallet's password and private key, which is automatically set to be the browser credential storage i.e., your browser keychain. The setting can be configured for your use case, more details of which can be found in the local wallet docs.
Combining the local wallet with gasless transactions can further improve your application's UX by not requiring that users have funds in their newly created wallet.
Once you have set up your relayer, add the gasless option to the ThirdwebProvider along with the localWallet:
import type { AppProps } from "next/app";
import { ThirdwebProvider, localWallet } from "@thirdweb-dev/react";
import "../styles/globals.css";

// This is the chain your dApp will work on.
// Change this to the chain your app is built for.
// You can also import additional chains from `@thirdweb-dev/chains` and pass them directly.
const activeChain = "mumbai";

function MyApp({ Component, pageProps }: AppProps) {
  return (
    <ThirdwebProvider
      clientId={process.env.CLIENT_ID}
      activeChain={activeChain}
      supportedWallets={[localWallet()]}
      sdkOptions={{
        gasless: {
          // By specifying a gasless configuration - all transactions will get forwarded to enable gasless transactions
          biconomy: {
            apiId: "biconomy-api-id", // your Biconomy API Id
            apiKey: "biconomy-api-key", // your Biconomy API Key
            deadlineSeconds: 123, // your Biconomy timeout preference
          },
        },
      }}
    >
      <Component {...pageProps} />
    </ThirdwebProvider>
  );
}

export default MyApp;
Finally, in index.tsx add a ConnectWallet button, making sure you import it from the React SDK package, and local wallet will now appear as an option!
import { ConnectWallet } from "@thirdweb-dev/react";
import type { NextPage } from "next";
import styles from "../styles/Home.module.css";

const Home: NextPage = () => {
  return (
    <div className={styles.container}>
      <div className={styles.connect}>
        <ConnectWallet />
      </div>
    </div>
  );
};

export default Home;
Using Local Wallet in a Script or Backend
To use a local wallet in a node script, we need to import LocalWallet from the Wallet SDK package. Again, the settings have all been preconfigured to keep this simple. But, if you wish to override these defaults, details of the configurable settings can be found in the local wallets docs.
Let's use a local wallet to deploy a smart contract template, an NFT drop, and create (or lazy mint) a batch of NFTs.
In this example, we will set up gasless transactions so that we do not need to send funds to our newly created wallet, requiring us to use another wallet or faucet.
Firstly, we need to set up a LocalWallet instance on the desired chain, in this example Mumbai, which we will need to import from the @thirdweb-dev/chains package.
We then need to call the generate function on the wallet object to create an instance of the wallet. generate returns a Promise object which resolves to a string containing the newly created wallet address.
Finally, we need to call the method connect to connect our new wallet to our application:
import { Mumbai } from "@thirdweb-dev/chains";
import { LocalWallet } from "@thirdweb-dev/wallets";

const main = async () => {
  const wallet = new LocalWallet({
    chain: Mumbai,
  });
  const walletAddress = await wallet.generate();
  await wallet.connect();
  console.log("Wallet address: ", walletAddress);
};

main();secretKey to the ThirdwebSDK.Now that we have a local wallet set up, we need to create a ThirdwebSDK instance, using the ThirdwebSDK.fromWallet method:
import { ThirdwebSDK } from "@thirdweb-dev/sdk";

 const sdk = await ThirdwebSDK.fromWallet(wallet, "mumbai",{
   secretKey: process.env.TW_SECRET_KEY
   gasless: {
      // By specifying a gasless configuration - all transactions will get forwarded to enable gasless transactions
     openzeppelin: {
       relayerUrl: "<your-relayer-url>", // your OZ Defender relayer URL
     },
   },
 }
 );
To setup gasless transactions to avoid having to send funds to your local wallet, paste in the relayer URL that you created earlier, into the relayerUrl option, as a string. Again, in this example, we are using OpenZeppelin Defender to relay the transactions, but you could also use Biconomy.
Now that we have an SDK instance, we can deploy an NFT Drop contract by calling deployBuiltInContract
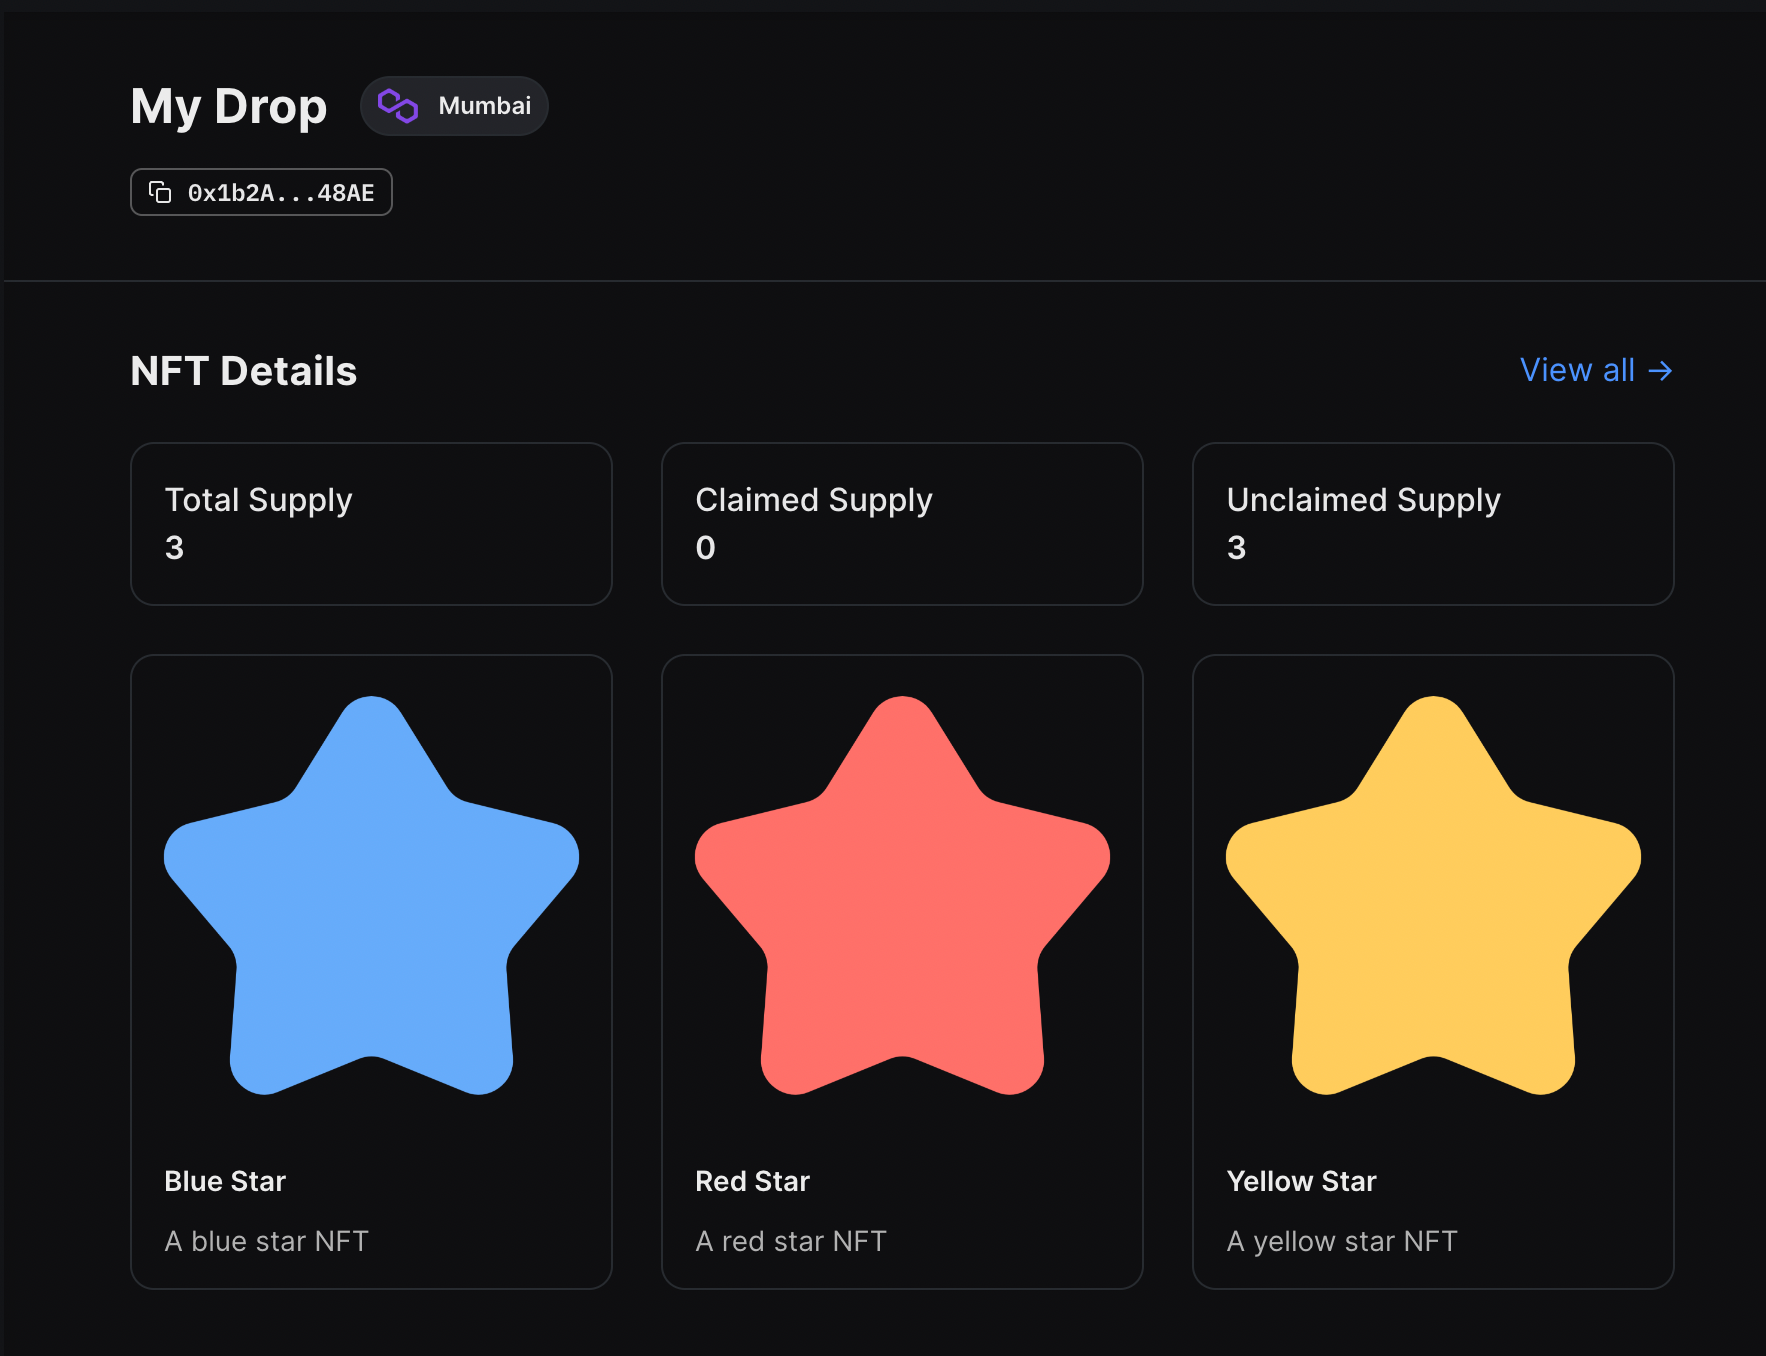
const contractAddress = await sdk.deployer.deployBuiltInContract("nft-drop", {
   name: "My Drop",
   primary_sale_recipient: walletAddress,
 });

 console.log("Contract address: ", contractAddress);
Finally, let's batch-mint some NFTs using createBatch:
import { readFileSync } from "fs";

const metadatas = [
    {
      name: "Blue Star",
      description: "A blue star NFT",
      image: readFileSync("assets/blue-star.png"),
    },
    {
      name: "Red Star",
      description: "A red star NFT",
      image: readFileSync("assets/red-star.png"),
    },
    {
      name: "Yellow Star",
      description: "A yellow star NFT",
      image: readFileSync("assets/yellow-star.png"),
    },
  ];

  await contract.createBatch(metadatas);
  console.log("Created batch successfully!");
Run this code using the command node index.mjs and you should see the following output:

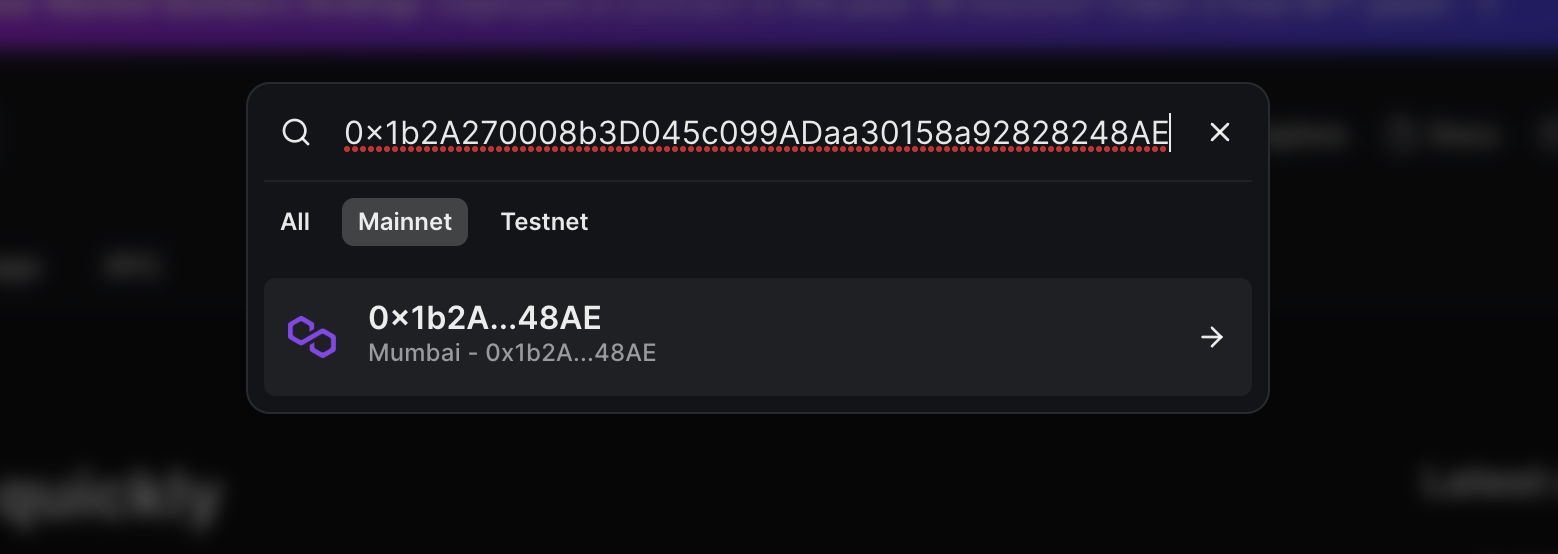
We can now view this contract on the Dashboard by searching for the contract address in the search bar and importing the contract to your Dashboard:
Now, you will be able to view the NFTs that we batch-minted!
Amazing! We have successfully used a local wallet to deploy and interact with a contract from a node script gaslessly!
save which will save the wallet to storage as either an encrypted JSON object, a mnemonic, or a private key.To use that same wallet again in a future script, use the load method to initialize the wallet from storage.Wrapping Up
In this guide, we have learned what a local wallet is and how to use it in two examples:
- A front-end application to create a "checkout as guest" experience.
- A backend application to gaslessly deploy and interact with a contract without having to use a private key or create an EOA and obtain funds but instead using a temporary, local wallet.
If you have any questions jump into the thirdweb Discord and join 32,000+ other builders! Please let us know if you have any feature requests or guide requests here.