How to Deploy & Use Smart Wallets in Your Application (ERC-4337)
Learn what a smart wallet is, what its use cases are, and how you can use them to create powerful wallet experiences for users.


⚠️ Warning: This guide currently uses v4 of the Connect SDK. For v5 (latest) code snippets, please check out our documentation while this guide is being updated. ⚠️
In this guide, we will go through how to create smart wallets (smart contract wallets) for your users that are fully ERC-4337 compliant with built-in account abstraction infrastructure. We will then learn how to integrate smart wallets into both a front-end React project and a Node back-end script.
We will be covering the most simple implementation of smart wallets. We will use a local wallet as the personal wallet key for a smart wallet account. Using the smart wallet, we will claim an NFT from an Edition Drop contract – completely gaslessly and transactionless!
By the end of this guide, you should be able to create Web3 apps and node scripts that use smart wallets to enable a gasless and transactionless experience for your users!
Why use Smart Wallets?
The user experience (UX) of traditional Web3 that involves wallets can be quite cumbersome. It requires installing a wallet, remembering a seed phrase, acquiring funds through a faucet, and more. This process can be incredibly daunting for someone new to the web3 space. It often leads to questions like, "Why do I need to install a wallet to claim my ticket?". This valid concern highlights the need for a massive improvement in Web3 UX.
Smart wallets address this issue by allowing developers to create app-linked smart wallets for users and incorporate additional features such as spending limits, multi-signature functionality, permissions, account recovery, and more. These capabilities are not available using EOAs (externally owned accounts). Smart wallets are essentially smart contracts with customizable logic. The best part is that users don't need to know that a smart contract manages everything behind the scenes!
For more information on what a smart wallet is and how it is, visit the portal!
How does a Smart Wallet work?
For every app, there needs to be a factory contract that deploys multiple smart wallets for your users on-demand. You can deploy this factory contract through our Explore page.
Each wallet can unlock one smart account per account factory. The user's smart wallet contract is deployed once a transaction is initiated from the smart wallet. The smart wallet address is deterministic, meaning that the address of the smart wallet is known prior to deployment.
Due to this feature, we are able to provide users with their smart wallet address without having to deploy their smart wallet contract until they perform their first transaction. This is beneficial because it removes potentially unnecessary costs of deploying a smart contract on-chain until you're sure the user needs to perform an on-chain action.
For each smart wallet, there needs to be a personal wallet that acts as a "key" for the smart wallet. This personal wallet is able to perform transactions on the smart wallet, such as adding additional signers to the account. To create a seamless experience, you can use local wallet (a wallet created and stored on a device) or a Paper wallet which allows your users to log in with email (or Google) and create non-custodial wallets that you can use as a key for your user's smart wallets.
How to deploy the Account Factory
Head to the Account Factory contract page, fill in the contract parameters, Select your desired network and click on Deploy Now:
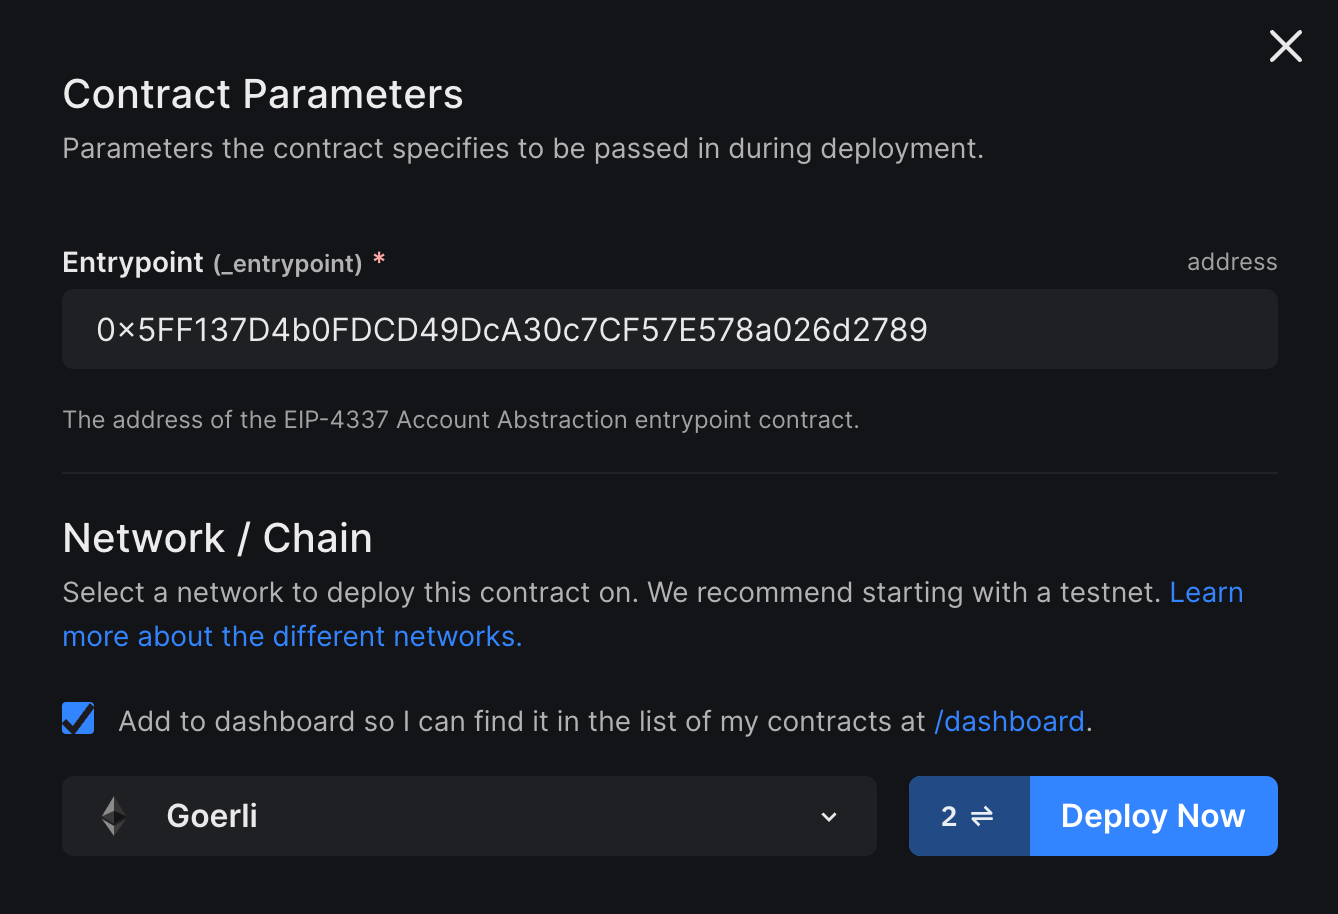
Once the AccountFactory contract is deployed, you will be redirected to the deployed contracts page. Copy the address for this contract – we will need it when we write code!
Creating a thirdweb API key
An API key is required to use thirdweb's infrastructure services, such as storage, RPCs, and Smart Wallet infrastructure, such as bundler and paymaster, from within the wallet, React and Typescript SDKs. If you haven't created a key yet, you can do so from the thirdweb dashboard.
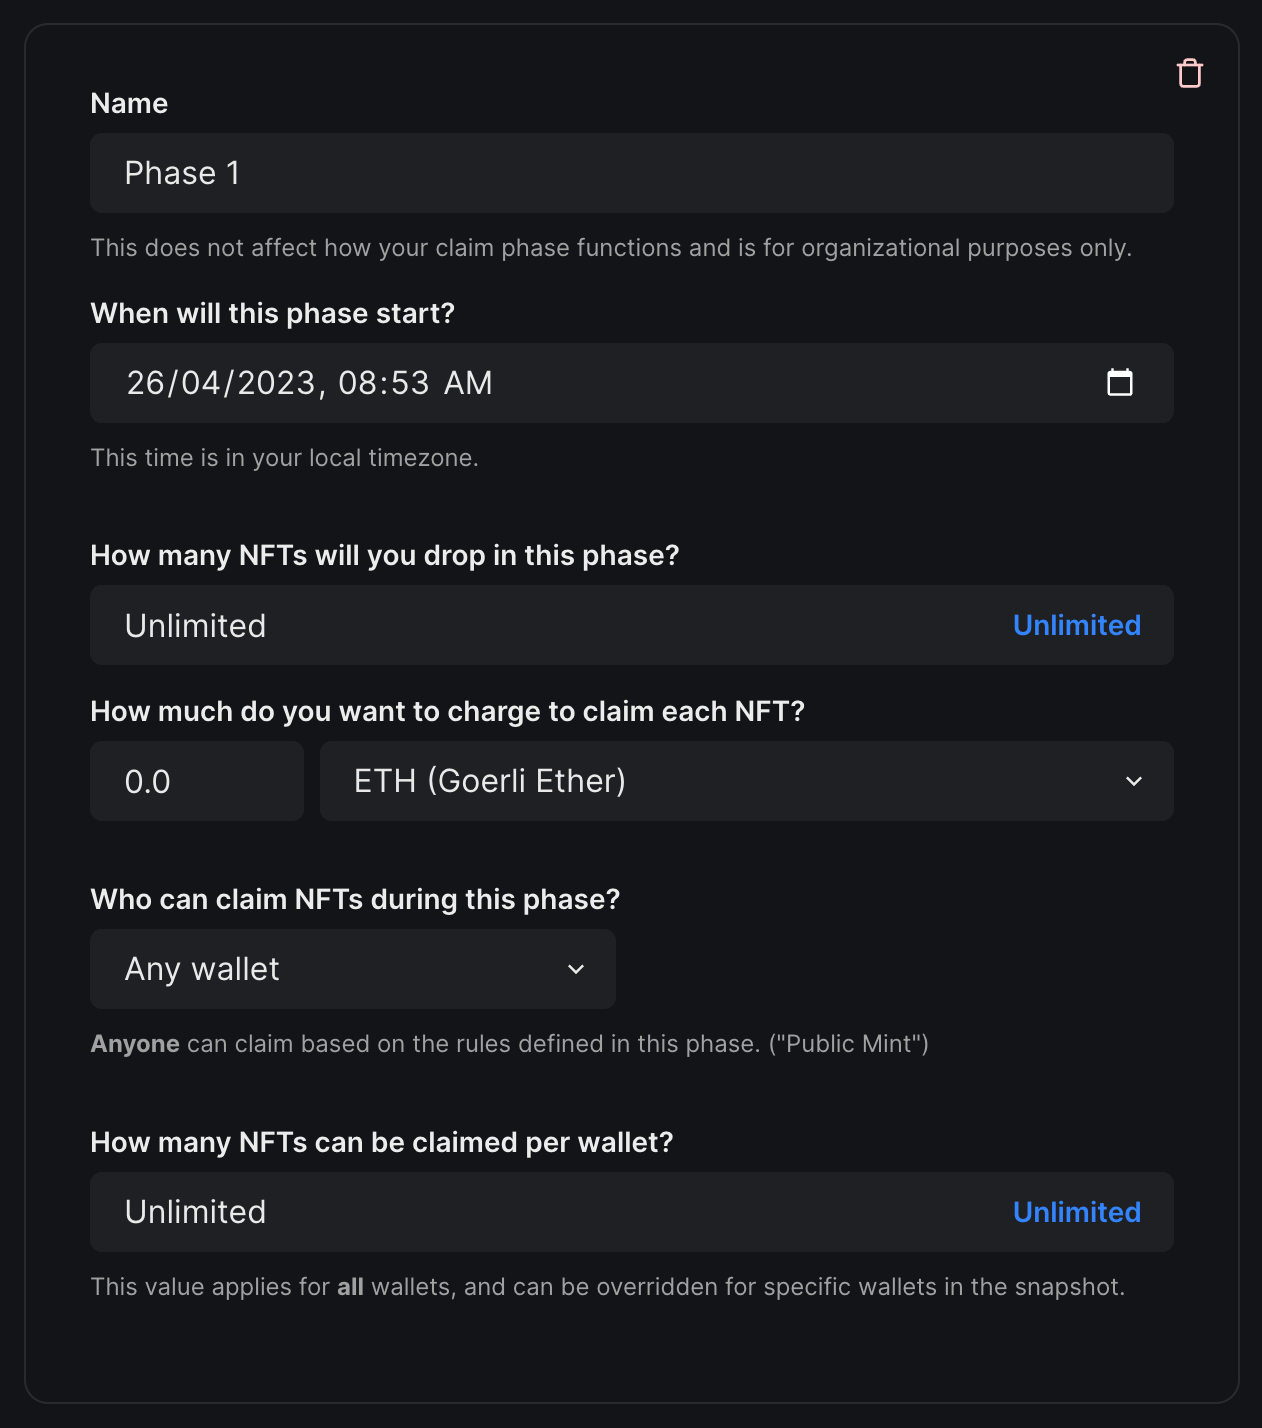
Deploying an Edition Drop contract
Now, head to the Edition Drop page on the Explore page and deploy the contract. Lazy mint an NFT and set an initial claim phase. We recommend using a public free mint for this tutorial as we will be creating smart wallets in the Node.js script.
Using Smart Wallets in Node scripts
Start by creating a node project by running the following command:
# npm
npm init -y

# yarn
yarn init -y
Then, run the following commands in your project to install the required dependencies:
# npm
npm install @thirdweb-dev/sdk @thirdweb-dev/wallets @thirdweb-dev/chains ethers@5

# yarn
yarn add @thirdweb-dev/sdk @thirdweb-dev/wallets @thirdweb-dev/chains ethers@5
This should install all the dependencies required to implement smart wallets in our node script. Add the following property in package.json file to enable importing files using import:
"type": "module",Now, create a new folder called const and create yourDetails.js inside this folder. In this file, import the chain that your smart wallet contract exists on. For this guide, we will be using Goerli testnet which you can import from the @thirdweb-dev/chains package. This file will contain all of the variables required by our script.
import { Goerli } from "@thirdweb-dev/chains";

export const TWFactoryAddress = "0xe448A5878866dD47F61C6654Ee297631eEb98966";
export const activeChain = Goerli;

export const editionDropAddress = "0x8D9919db3CD6aF84e8A12CedC3c5A694Bf026aB8";
export const editionDropTokenId = "0";
Make sure you add a TW_SECRET_KEY to your .env file so that we can use a thirdweb API key to instantiate the SDK so that we can use thirdweb's infrastructure and services: bundler and paymaster.
Now, let's proceed with writing the script:
(async () => {

})();
This is an empty Promise function script that allows us to await promise resolutions within our script.
Now, let's create a local wallet that we will use as our personal wallet, which acts as a 'key' to unlock our smart wallet account.
(async () => {
  // Create a local wallet to be a key for smart wallet
  const localWallet = new LocalWallet();

  await localWallet.generate();

  const localWalletAddress = await localWallet.getAddress();
  console.log(`✨ Local wallet address: ${localWalletAddress}`);
})();
In the above snippet, we are using LocalWallet (imported from @thirdweb-dev/wallets) to create a personal wallet for this script, you can use any other wallet from the package if you wish to do so, for example MetaMask. If you run the above script, a new wallet address will be printed in your terminal for each run.
Now, let's use this newly generated wallet as a key for our smart wallet:
// Create a smart wallet using the local wallet as the key
const smartWallet = new SmartWallet({
  chain: activeChain,
  factoryAddress: TWFactoryAddress,
  secretKey: process.env.TW_SECRET_KEY,
  gasless: true,
});

await smartWallet.connect({
  personalWallet: localWallet,
});

const smartWalletAddress = await smartWallet.getAddress();
console.log(`✨ Smart wallet address: ${smartWalletAddress}`);
In the above snippet, we are using SmartWallet (imported from @thirdweb-dev/wallets) to create a new smart wallet. While initializing, we provide the details we added to the yourDetails.js file as well as the local wallet we created in the previous step to use as a key.
Now, we can instantiate thirdweb SDK with the smart wallet to perform any actions. We will need to pass our secretKey to the SDK in order to use the thirdweb infrastructure. We could also have instantiated the SDK fromSigner by getting the wallet signer by using smartWallet.getSigner().
// Instantiate thirdweb SDK with the smart wallet
// (or you can get signer using smartWallet.getSigner())
const sdk = await ThirdwebSDK.fromWallet(smartWallet, {
    secretKey: process.env.TW_SECRET_KEY
});

try {
  // Claiming access NFT
  const contract = await sdk.getContract(editionDropAddress);
  const claimTxn = await contract.erc1155.claim(editionDropTokenId, 1);
  console.log(
      `🪄 Access NFT claimed! Txn hash: ${claimTxn.receipt.transactionHash}`
  );
} catch (error) {
  console.error(`❌ Error claiming NFT: ${error.message}`);
}
In the above snippet, we are initializing the thirdweb SDK with the smart wallet using the fromWallet() function from ThirdwebSDK. Then, we retrieve the Edition Drop contract deployed in the previous steps using the getContract() function. Now, we can use the claim() function to claim the NFT. Finally, we log the transaction hash for the NFT claim. We also catch any errors in case something goes wrong while claiming.
Run your script by using the following command:
node index.jsThis will do the following:
- Create a local wallet.
- Create a smart wallet by using the previously created local wallet as a key.
- Initialize the thirdweb SDK and get the contract.
- Claim the NFT in the smart wallet.
The following ise an example output for the script:
✨ Local wallet address: 0x7186d208Cb3F0DCe91A9e3C455f253244DF0D89C
✨ Smart wallet address: 0x3A7B11e40D17E01dA53c4ef69E1B8Fa03a60697a
AccountAPI - Creating account via factory
Cost to create account:  {
  ether: '0.000001431776012568',
  wei: BigNumber { _hex: '0x014d5c802918', _isBigNumber: true }
}
🪄 Access NFT claimed! Txn hash: 0xd5750e1c36b0da52ad71bbbf2ef1da65f61c88d373a96cf986408d65069c49f4
If you check the Events tab for your Edition Drop contract, you can see the NFT being claimed by the smart wallet. The best part is that the entire script is gasless because we set the gasless property to true while creating the smart wallet. This means the local wallet doesn't need funds to deploy the smart wallet.
Now, let's see how you can use smart wallets in React.
Using Smart Wallets in React apps
If you don't already have a React app set up, you can use the following CLI command to create one:
npx thirdweb create appFeel free to choose your own configuration. For this tutorial, we will be using Vite with JavaScript:
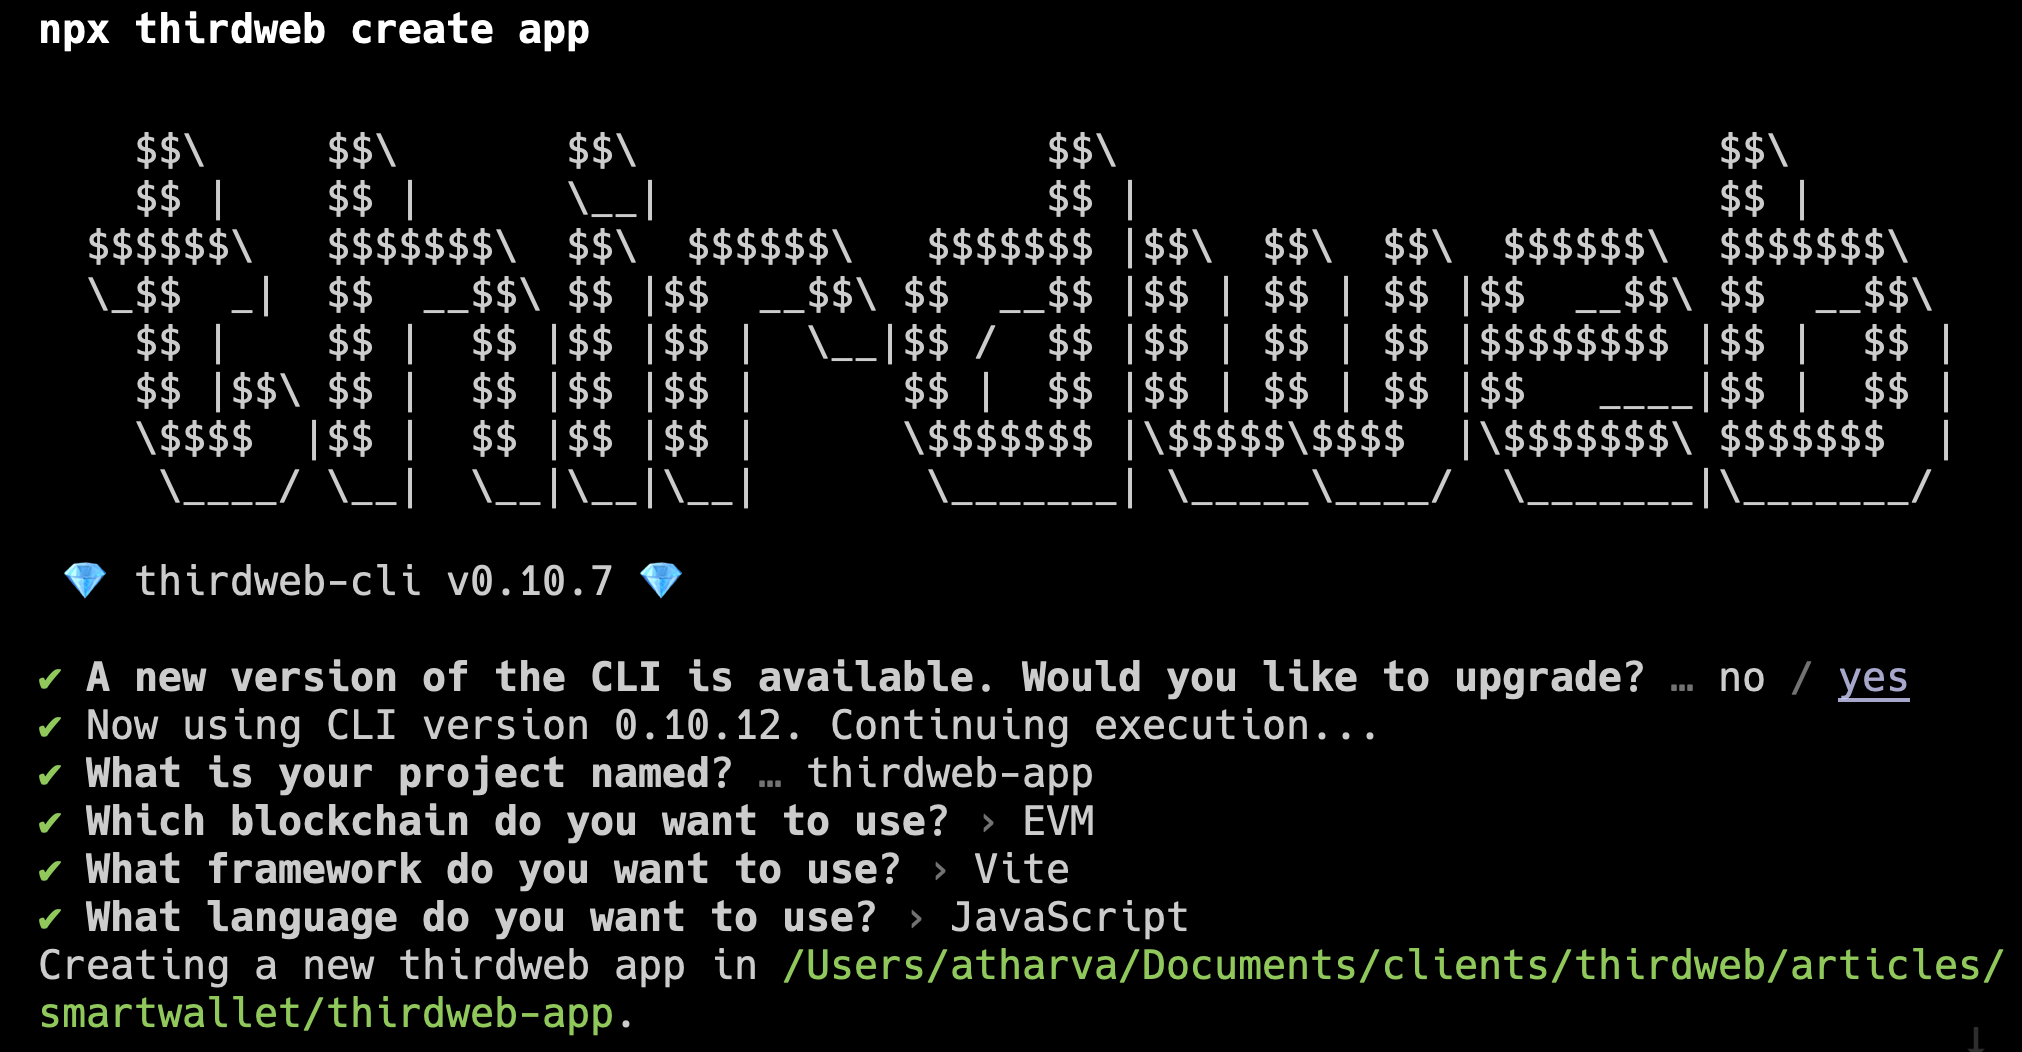
When the app has been created, as before, create a new file yourDetails.js under a new folder named const. You can use the same file for the node script, as we will use similar details for the React app.
clientId. If you haven't created a key yet, you can do so for free from the thirdweb dashboard.Now, in main.jsx (assuming you're using Vite), you should see the ThirdwebProvider component. Make sure that you add your clientId to your .env file so that it can be passed to the provider. Update the file to look like this:
import React from "react";
import { createRoot } from "react-dom/client";
import App from "./App";
import {
  ThirdwebProvider,
  localWallet,
  metamaskWallet,
  smartWallet,
} from "@thirdweb-dev/react";
import "./styles/globals.css";
import { TWApiKey, TWFactoryAddress, activeChain } from "../const/yourDetails";

const container = document.getElementById("root");
const root = createRoot(container);
root.render(
  <React.StrictMode>
    <ThirdwebProvider
      clientId={process.env.VITE_TEMPLATE_CLIENT_ID}
      activeChain={activeChain}
      supportedWallets={[
        smartWallet({
          factoryAddress: TWFactoryAddress,
          thirdwebApiKey: TWApiKey,
          gasless: true,
          personalWallets: [metamaskWallet(), localWallet({ persist: true })],
        }),
      ]}
    >
      <App />
    </ThirdwebProvider>
  </React.StrictMode>
);
In the above code snippet, we are importing activeChain from the yourDetails.js file and adding it to the activeChain prop of ThirdwebProvider. We are also adding smartWallet to the supportedWallets prop with the relevant smart wallet details, indicating that our dApp will use smart wallets. We also provide a list of personalWallets in the smart wallet indicating the wallets that can be used as personal wallets for the smart accounts. Now, you should be able to use everything else as usual throughout the app.
Now in App.jsx file, use the following:
import {
  ConnectWallet,
  Web3Button,
  useAddress,
  useContract,
  useNFT,
  useOwnedNFTs,
} from "@thirdweb-dev/react";
import "./styles/Home.css";
import { editionDropAddress, editionDropTokenId } from "../const/yourDetails";

export default function Home() {
  const address = useAddress();

  const { contract: editionDropContract } = useContract(
    editionDropAddress,
  );
  const { data: nft, isLoading: isNftLoading } = useNFT(
    editionDropContract,
    editionDropTokenId
  );
  const { data: ownedNfts, refetch: refetchOwnedNfts } = useOwnedNFTs(
    editionDropContract,
    address
  );

  return (
    <div className="container">
      <main className="main">
        <h1 className="title">
          Welcome to <a href="https://thirdweb.com/">thirdweb</a>!
        </h1>

        <p className="description">
          Claim your test access pass by creating an account!
        </p>

        <div className="connect">
          <ConnectWallet
            dropdownPosition={{
              align: "center",
              side: "bottom",
            }}
            btnTitle="Login"
          />
        </div>

        {isNftLoading ? (
          "Loading..."
        ) : (
          <div className="card">
            <img
              className="nftImage"
              src={nft.metadata.image}
              alt={nft.metadata.description}
            />
            {address ? (
              <>
                <p>You own {ownedNfts?.[0]?.quantityOwned || "0"}</p>
                <Web3Button
                  contractAddress={editionDropAddress}
                  action={(contract) =>
                    contract.erc1155.claim(editionDropTokenId, 1)
                  }
                  onSuccess={async () => {
                    await refetchOwnedNfts();
                    alert("Claim successful!");
                  }}
                  style={{ width: "100%", marginTop: "10px" }}
                >
                  Claim!
                </Web3Button>
              </>
            ) : (
              <p>Login to claim!</p>
            )}
          </div>
        )}
      </main>
    </div>
  );
}
In the above code, we are doing the following:
- Getting the previously deployed Edition Drop contract using the
useContract()hook. - Getting the NFT metadata using the token ID from the
yourDetails.jsfile and rendering the NFT image on the screen. - Creating a Connect Wallet button that now supports connecting t0 smart wallet (as we configured it in
ThirdwebProvider). - Creating a
Web3Buttonto claim the NFT.
Now, use the following command to run the development server:
# npm
npm run dev

# yarn
yarn dev
Now, once you visit the local deployment, you should be able to see a connect wallet button, which after clicking, you should be prompted to choose a wallet or continue as guest:
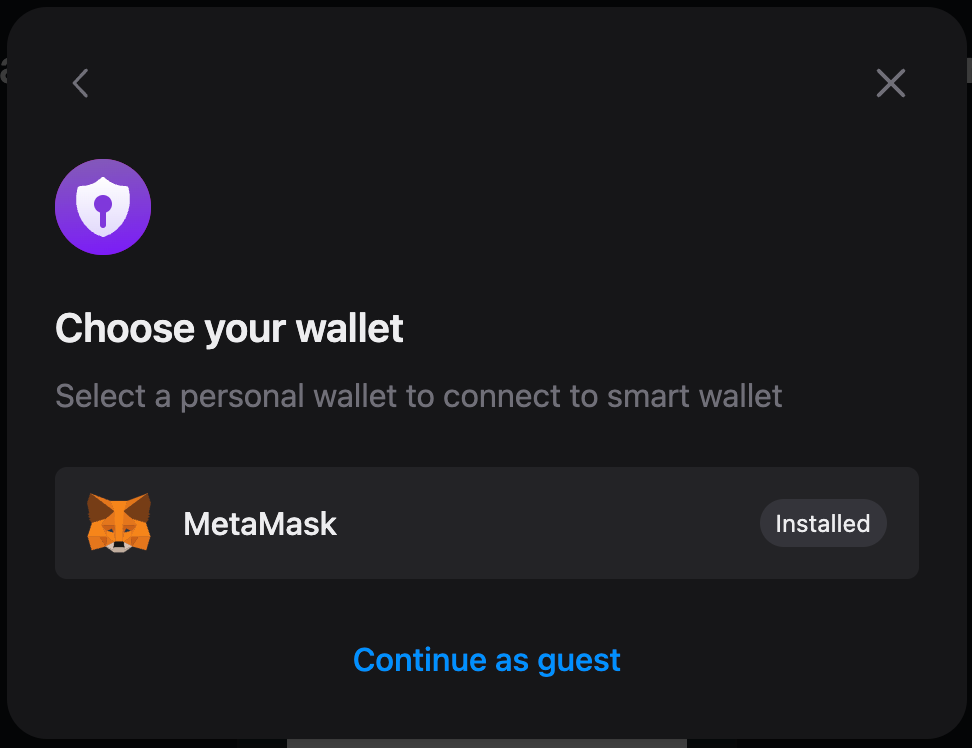
By choosing Continue as guest, a local wallet will be used and you would be prompted to choose a password for that wallet. After you have connected your personal wallet, your smart wallet should get connected:
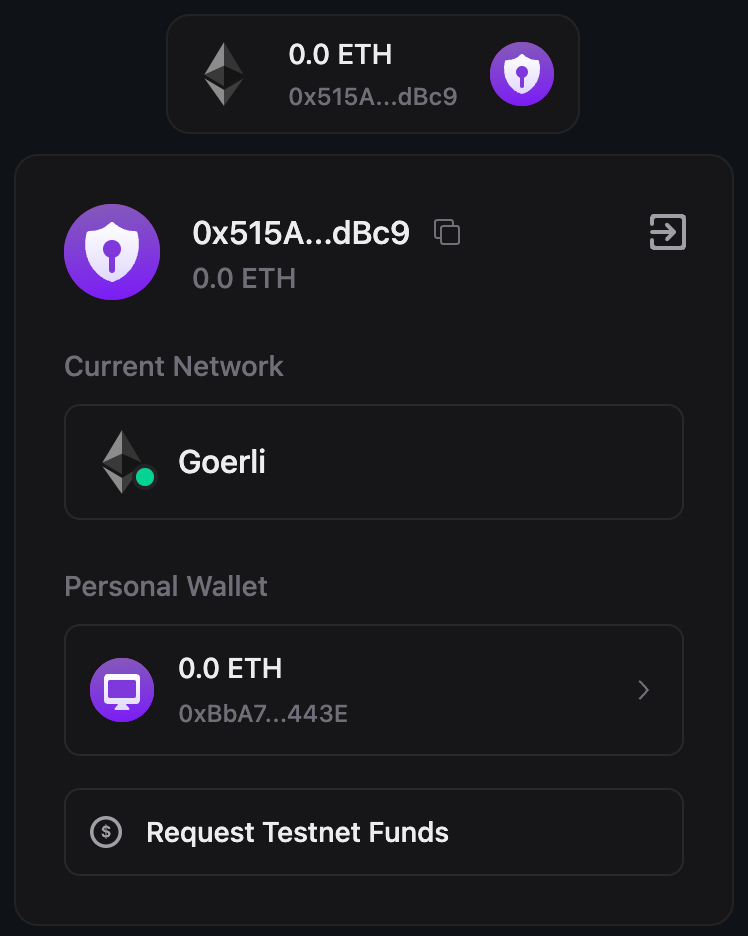
Now, you can use the claim button to claim the NFT in a completely gasless manner! You can copy the smart wallet address from the connect wallet button and cross-check with the Events tab of your Edition Drop contract.
Wrapping up
In this tutorial, we demonstrated how to use smart wallets in both Node.js and React environments to enable smart wallet functionality in any app you desire.
Smart wallets offer a more accessible and seamless web3 experience and are poised to play a significant role in the future.
For more information on smart wallets and our wallet SDK, visit the portal, and for the full source code, visit the GitHub repo.
Join our community on Discord if you wish to connect with the team or if you want to ask any questions. For any feedback, please leave a comment on our feedback board!