How to Create an AI NFT Generator with DALL-E (OpenAI)

In this guide, learn how to create a website where people can enter a prompt, generate an image using DALL-E, and mint it as an NFT.
If you prefer watching videos over reading guides, you can check out this video below:
We'll walk through the following:
- Setting up engine
- Deploying smart contract
- Generating images using prompt
- Mint images to NFT collection
Before we begin, you can access the complete source code for this template on GitHub.
Let's get started!
Setting up thirdweb Engine
We are going to need Docker to set up thirdweb Engine, so make sure you have it installed. If not, go ahead and install it.
Once docker has been installed on your machine, run this command to create a postgres database:
docker run -p 5432:5432 -e POSTGRES_PASSWORD=postgres -d postgresThen, to run engine locally run this command:
docker run \
  -e THIRDWEB_API_SECRET_KEY="<thirdweb_secret_key>" \
  -e ADMIN_WALLET_ADDRESS="<admin_wallet_address>" \
  -e POSTGRES_CONNECTION_URL="postgresql://postgres:postgres@host.docker.internal:5432/postgres?sslmode=disable" \
   -e ENCRYPTION_PASSWORD="<thirdweb_secret_key>" \
  -p 3005:3005 \
  --pull=always \
  --cpus="0.5" \
  thirdweb/engine:latest
Replace <thirdweb_secret_key> with the secret key generated with your API key. If you haven't created one yet, create it for free on the dashboard. And, replace <admin_wallet_address> with your wallet address which will be the admin wallet of your engine instance.
Your server is running when this log line appears:
Server listening on: http://0.0.0.0:3005Deploying an NFT collection contract
We need an NFT collection contract in which we will mint our user's NFTs. So, head over to the engine page on thirdweb dashboard and connect your engine instance. Then, click on create a backend wallet
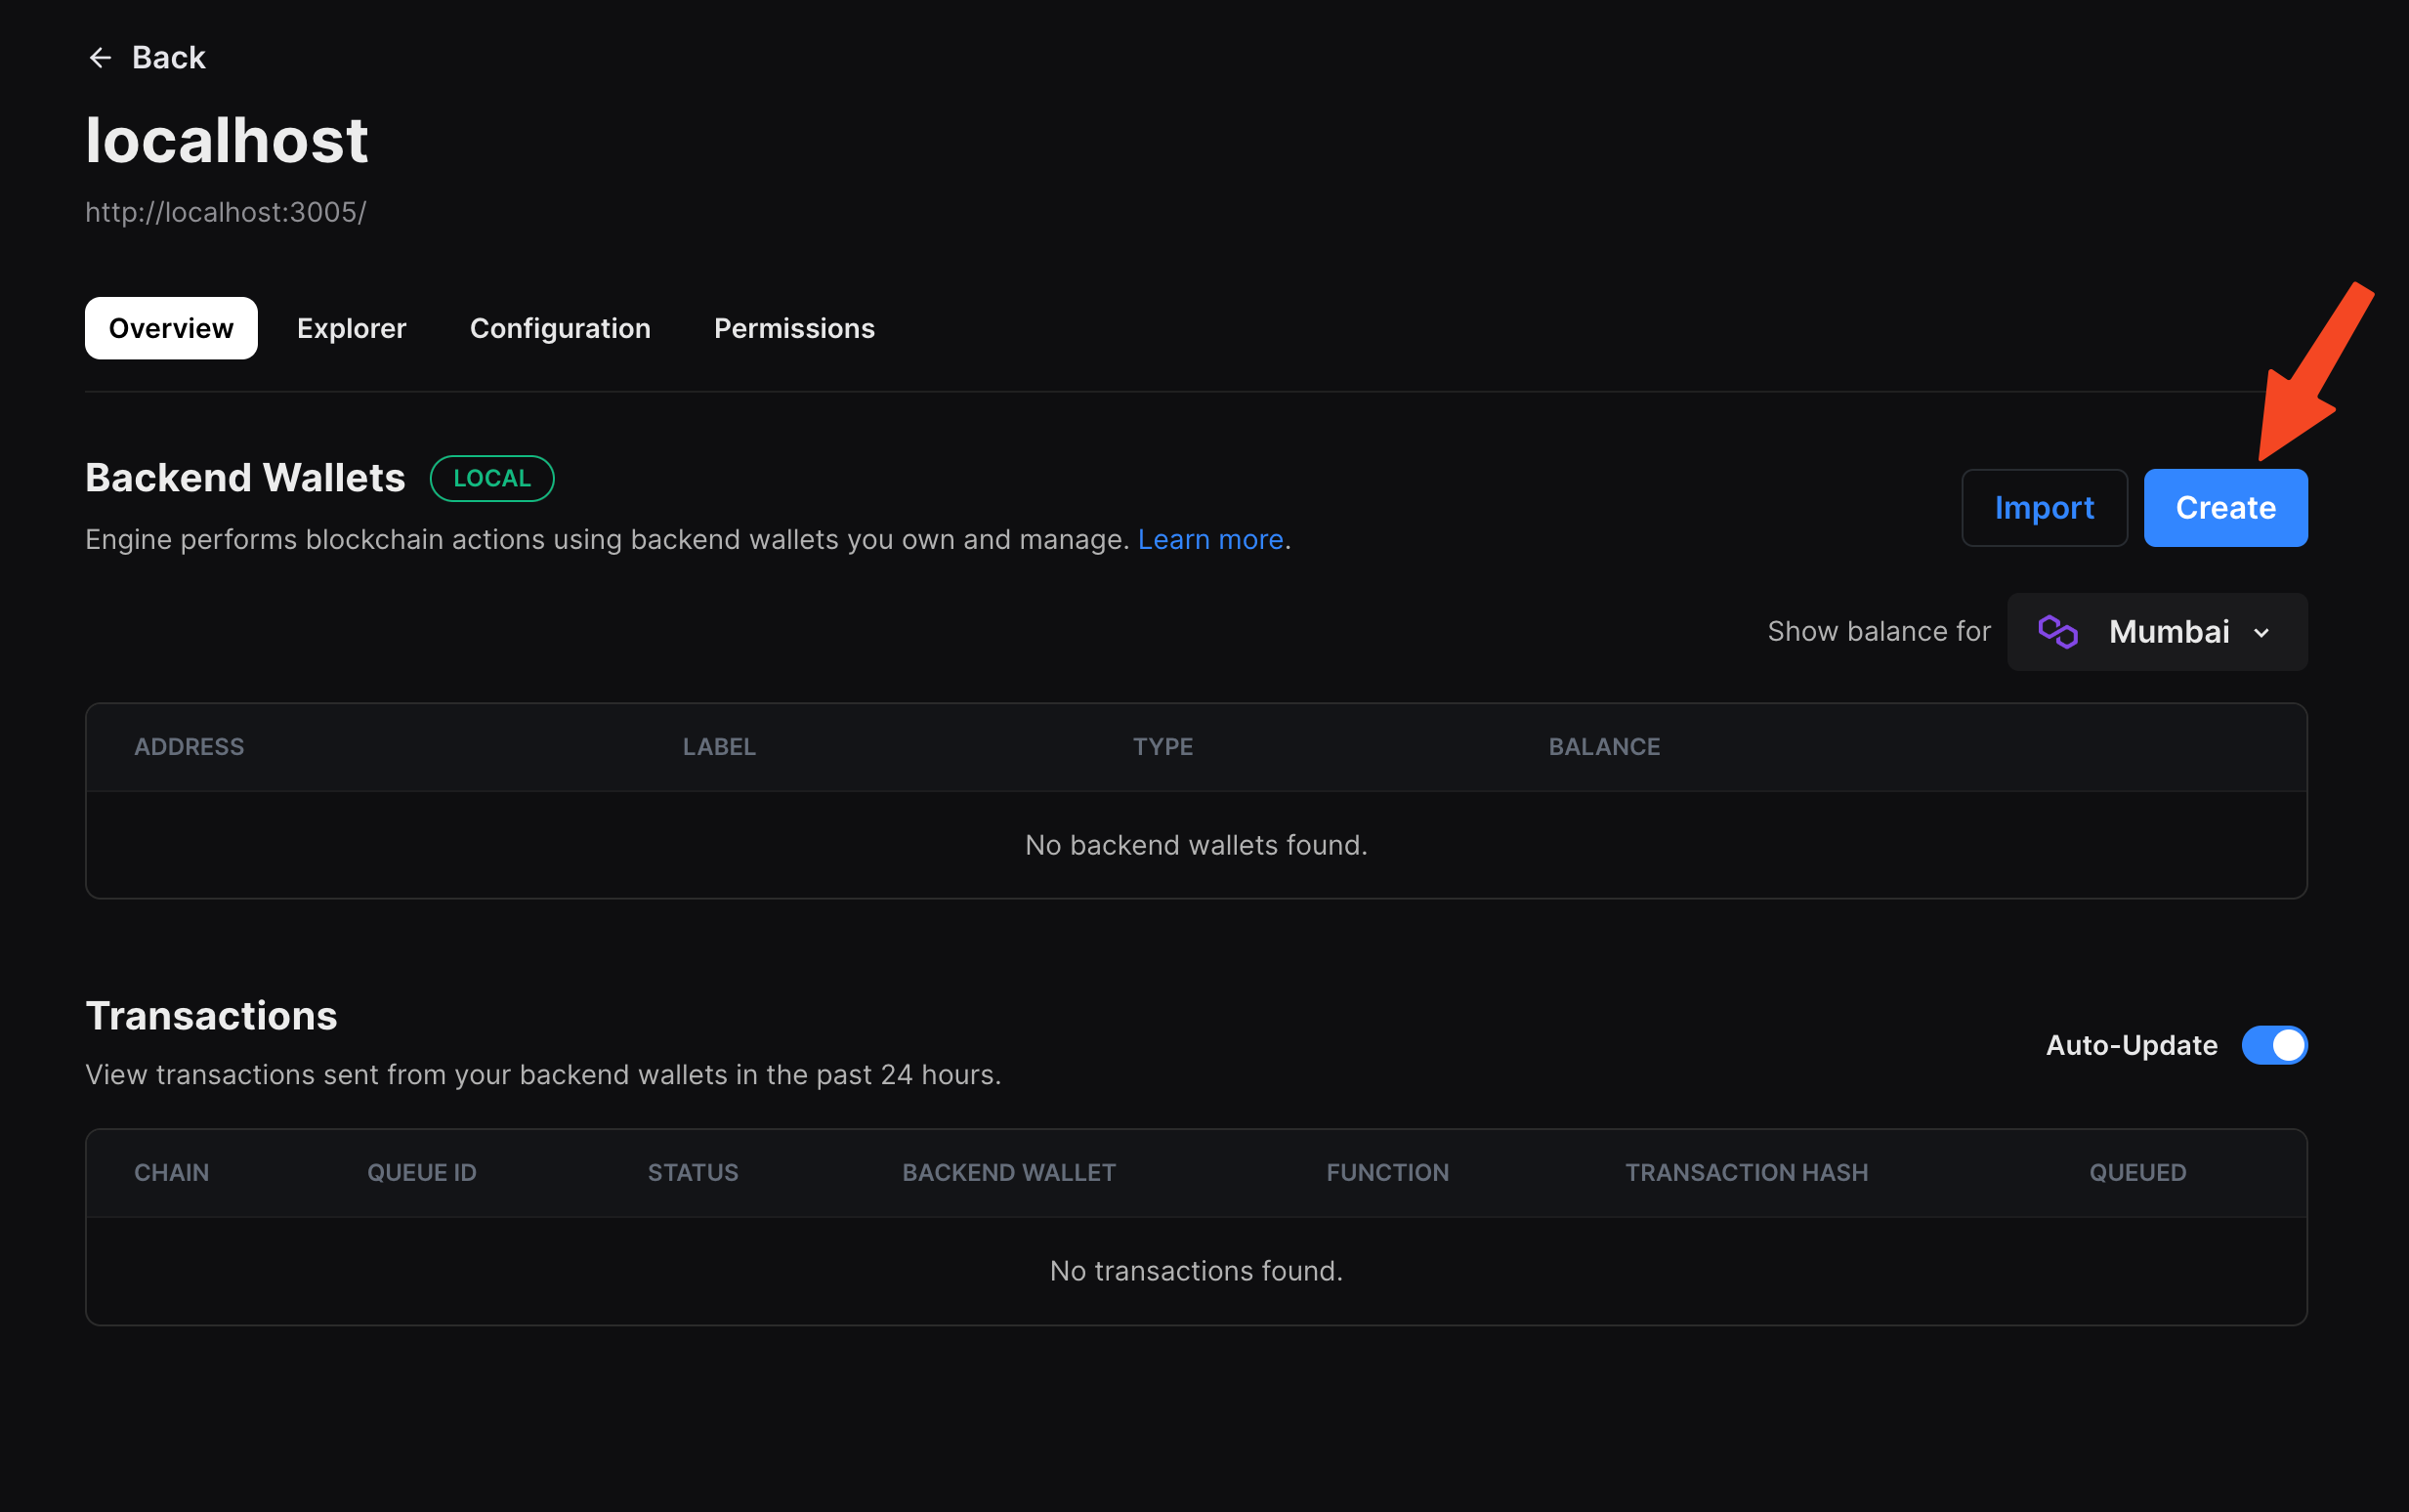
Once the wallet is created you'll be able to see a new address:
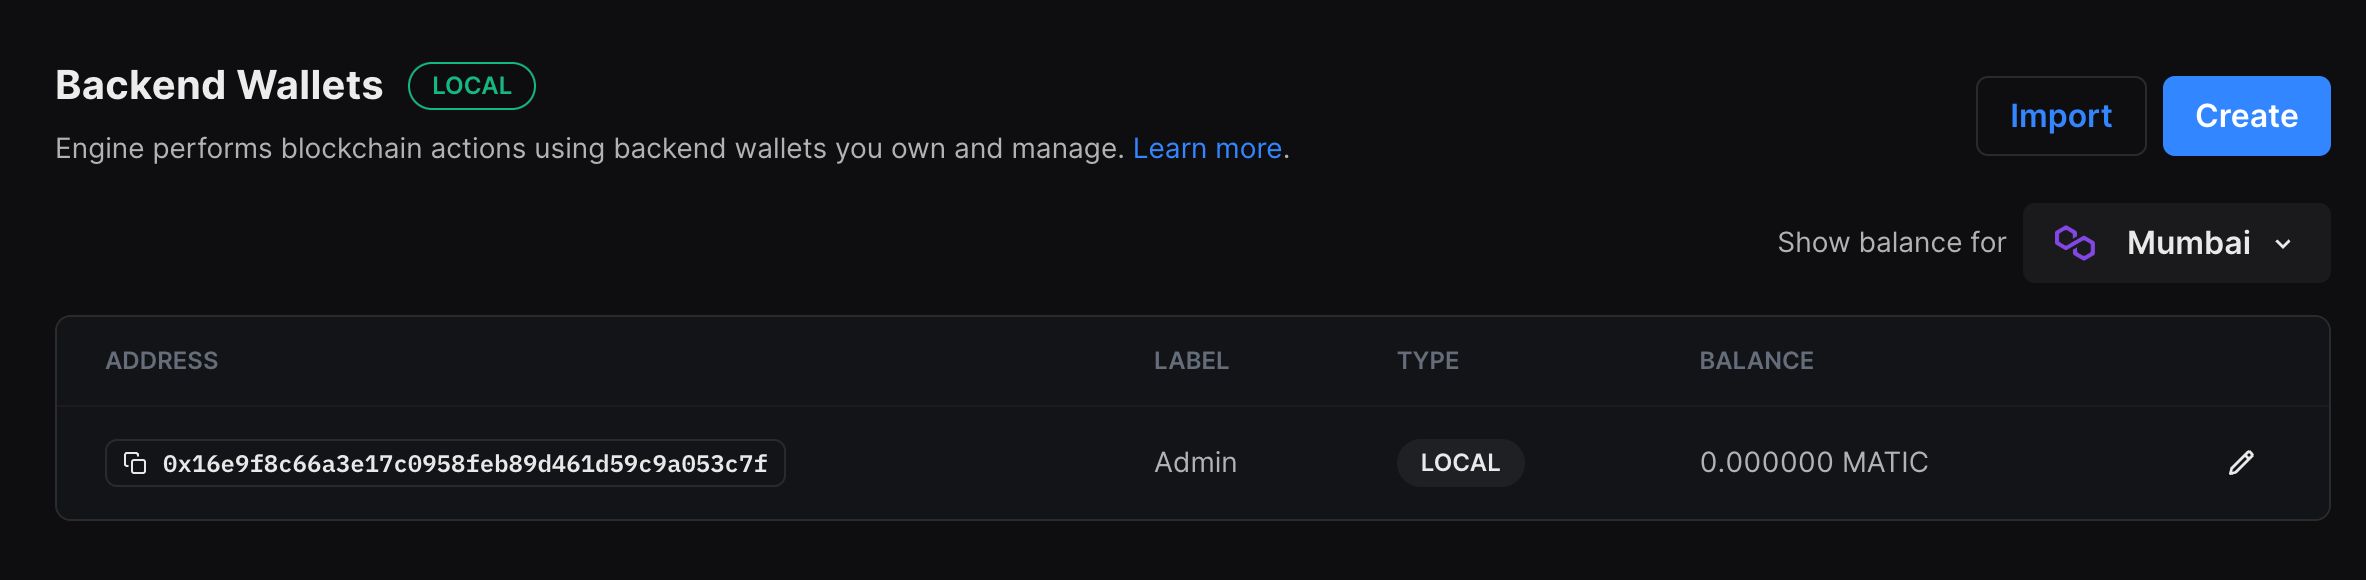
Then, choose the network you want to use and add funds to this address, since all transactions will be made via this wallet.
Once your wallet has funds, head over to explore and scroll down to Deploy and click on try it out in NFT Collection and fill in your details:
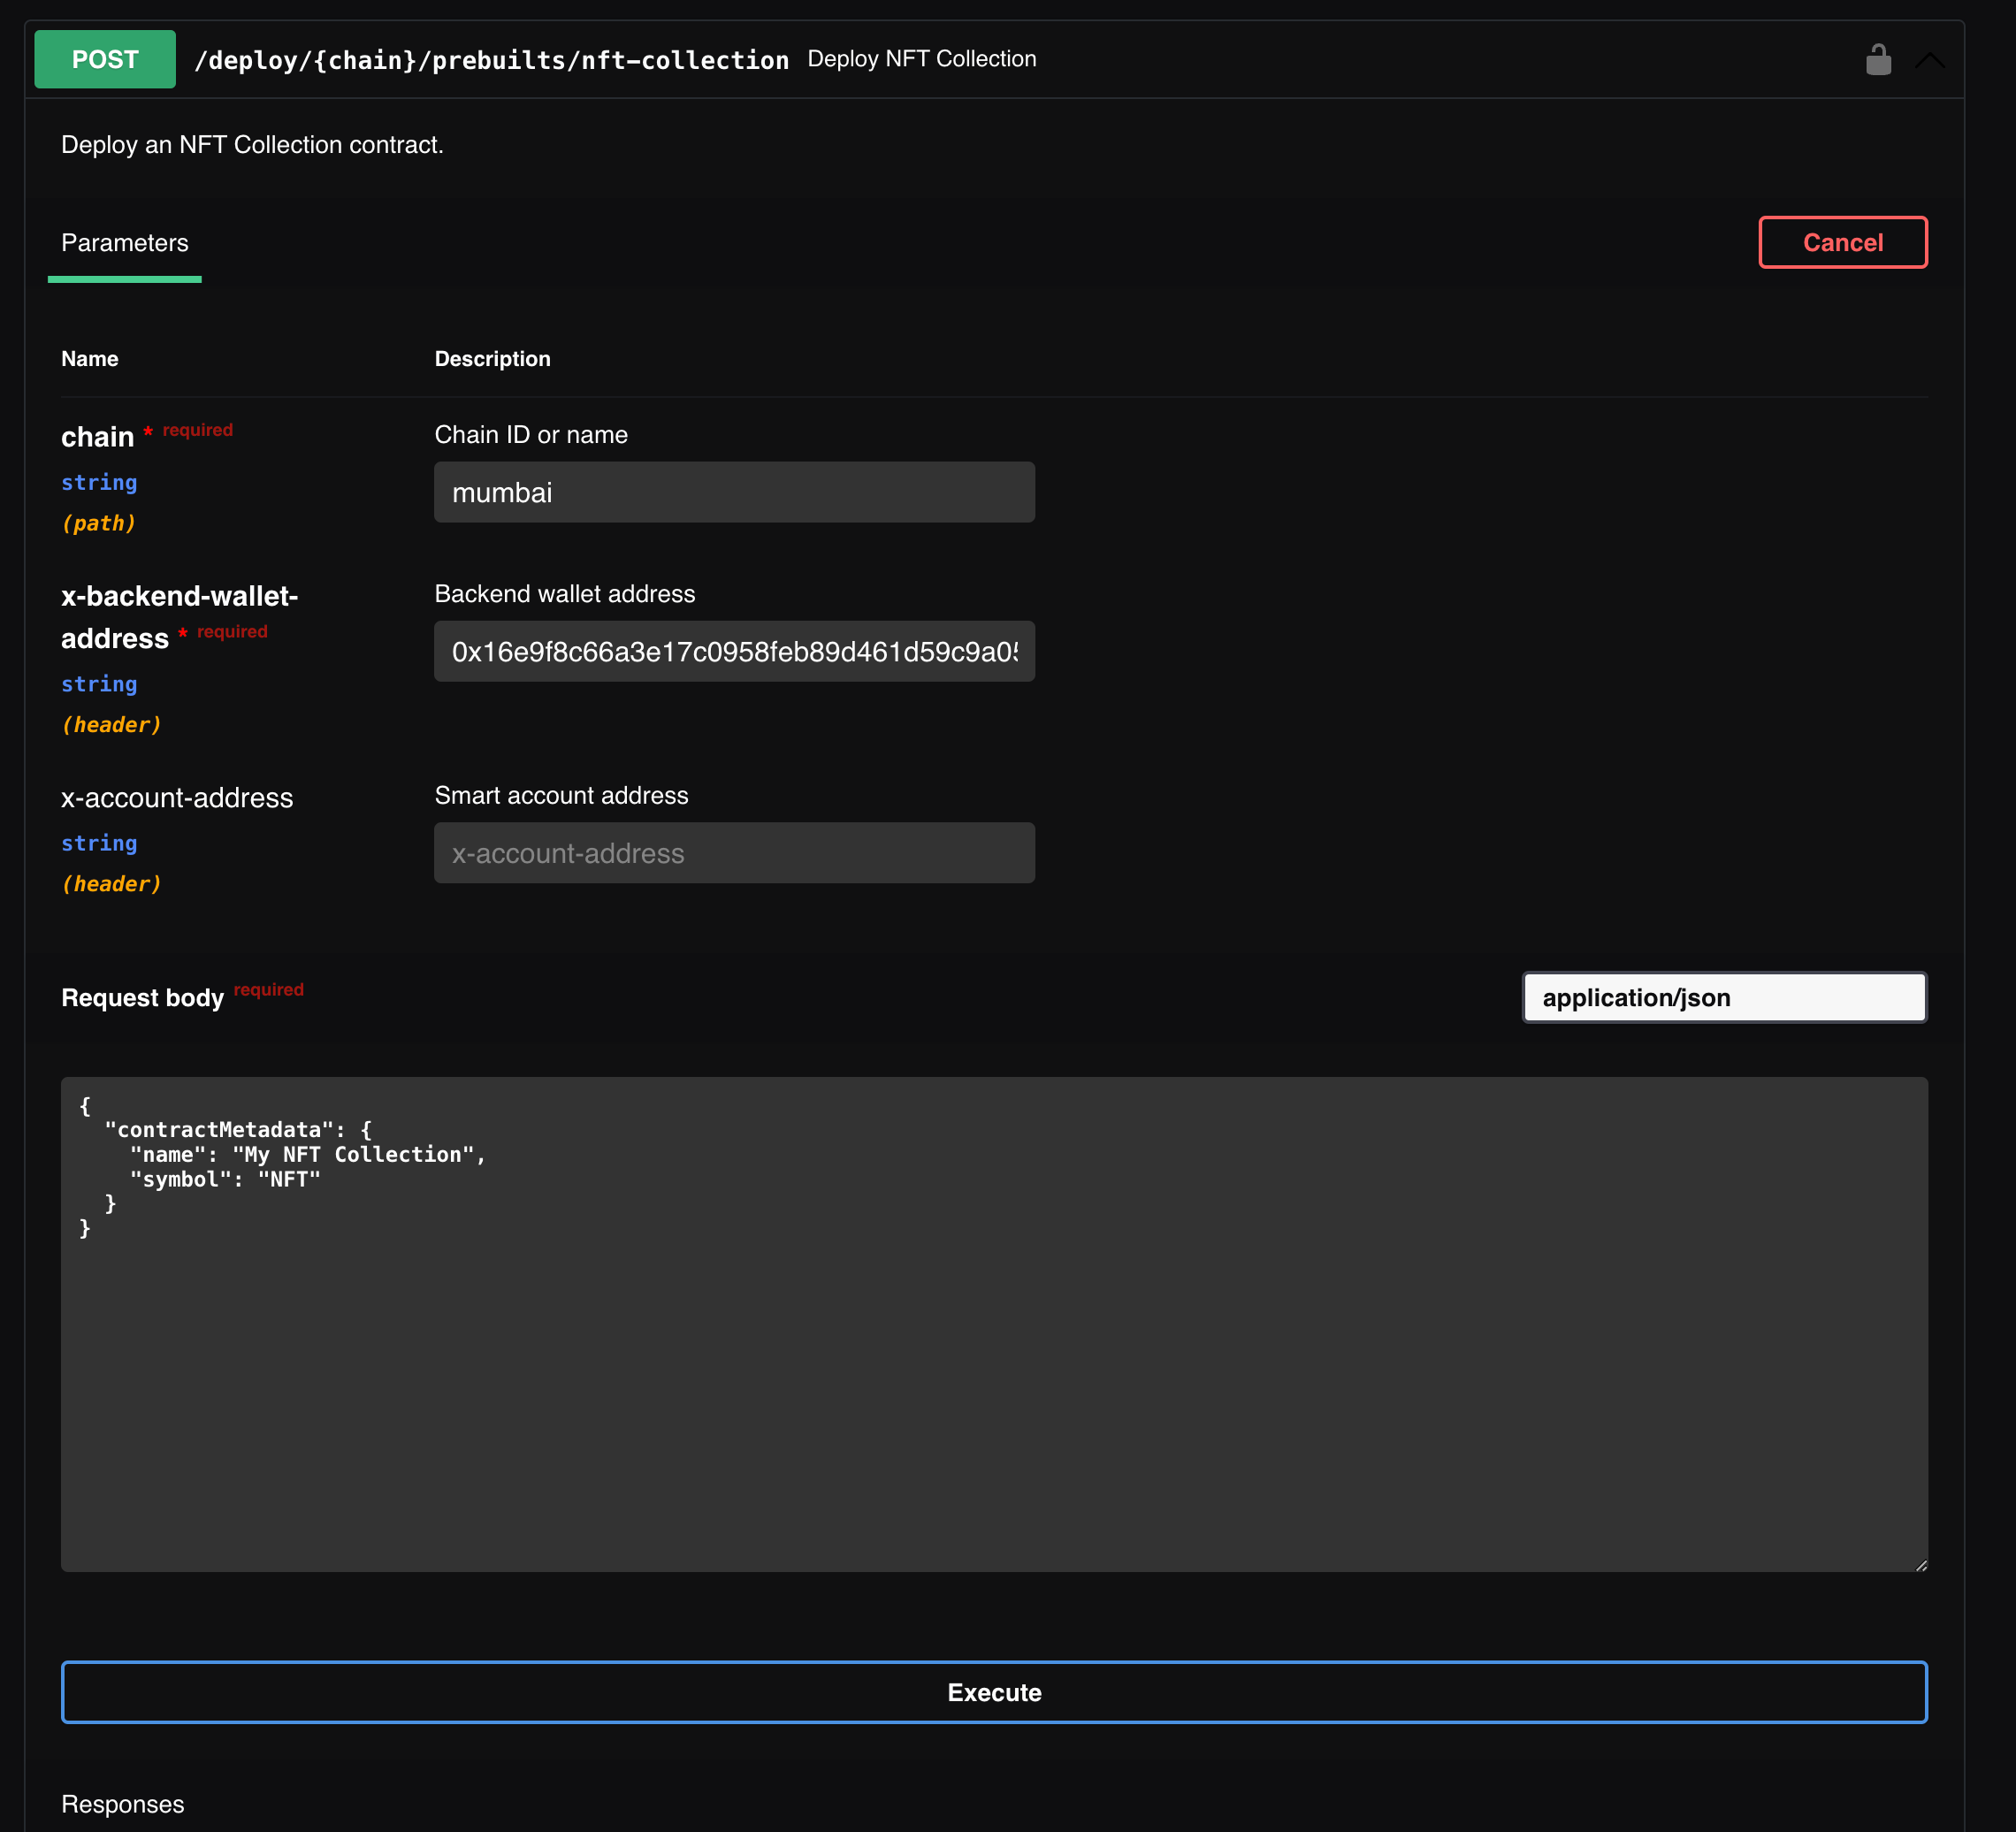
Once, you have entered the details click on Execute. You should then be able to see your contract address:

We are going to need this contract address in sometime, so make sure you save it!
Creating our app
Using the thirdweb CLI, create a new Next.js & TypeScript project with the React SDK preconfigured for you using the following command:
npx thirdweb create app --next --tsTo use an API key with the React SDK, pass the clientId to the ThirdwebProvider. The template already comes with the clientId, so you can simply create a new .env.local file and add the client id with the name NEXT_PUBLIC_CLIENT_ID.
We are going to use app dir in this guide, so delete the pages dir and create a new dir named app.
In the app folder create a new file layout.tsx and the following:
import type { Metadata } from "next";
import { Inter } from "next/font/google";
import "./globals.css";

const inter = Inter({ subsets: ["latin"] });

export const metadata: Metadata = {
  title: "AI-generated NFTs",
  description: "AI-generated NFTs using Engine and DALL-E",
};

export default function RootLayout({
  children,
}: {
  children: React.ReactNode;
}) {
  return (
    <html lang="en">
      <body className={inter.className}>{children}</body>
    </html>
  );
}
Now, let's create the page where the user generates and mints the NFTs! Create a new file called page.tsx in the app dir and add the following:
"use client";

import {
  ConnectWallet,
  ThirdwebProvider,
  embeddedWallet,
} from "@thirdweb-dev/react";

export default function Home() {
  return (
    <ThirdwebProvider
      activeChain="mumbai"
      clientId={process.env.NEXT_PUBLIC_CLIENT_ID}
      supportedWallets={[embeddedWallet()]}
    >
      <MintPage />
    </ThirdwebProvider>
  );
}

const MintPage = () => {
  return (
    <div>
      <ConnectWallet btnTitle="Login" />
    </div>
  );
};
This is a simple page rendered on the client side that's why we are using "use client" on the top.
We are also initialising the ThirdwebProvider, so, make sure to update the activeChain to the chain you are using for your app and add the thirdweb client Id as NEXT_PUBLIC_CLIENT_ID in the .env.local . Now, let's build the image generation functionality.
Building the image generation functionality
We'll first create the api route for generating the image via openAI. So, create a new file in app/api/generate named route.ts and add the following:
import OpenAI from "openai";
import { NextRequest } from "next/server";

const openai = new OpenAI({
  apiKey: process.env.OPENAI_SECRET_KEY,
});

export async function POST(req: NextRequest) {
  const { userPrompt } = await req.json();

  if (!userPrompt) {
    return new Response(JSON.stringify({ error: "No prompt provided" }), {
      status: 400,
    });
  }

  const response = await openai.images.generate({
    model: "dall-e-3",
    prompt: userPrompt,
    n: 1,
    size: "1024x1024",
    response_format: "b64_json",
  });

  return new Response(JSON.stringify({ data: response.data }));
}
Here, we are using the openAI library which you need to install:
yarn add openaiWe then get the user prompt from the req body and use it to generate an image using the dall-e-3 model present in openAI.
Now that we have our api created we can head back to our frontend and use the api route!
Head over to page.tsx and, add these useState hooks:
  const [imagePrompt, setImagePrompt] = useState("");
  const [generatedImage, setGeneratedImage] = useState("");
  const [isImageGenerated, setIsImageGenerated] = useState(false);
  const [isLoading, setIsLoading] = useState(false);
Then, we will create a function which calls an api (we are yet to create it), then receives an image based on the prompt, finally we update the value of the useState hooks:
const handleGenerate = async () => {
    setIsLoading(true);
    try {
      const res = await fetch("/api/generate", {
        method: "POST",
        headers: {
          "Content-Type": "application/json",
        },
        body: JSON.stringify({ userPrompt: imagePrompt }),
      });

      if (!res.ok) {
        throw new Error("Error generating image");
      }

      const data = await res.json();
      const b64json = `{"imageData":"data:image/png;base64,${data.data[0].b64_json}"}`;
      const obj = JSON.parse(b64json);
      const base64ImageData = obj.imageData;

      setGeneratedImage(base64ImageData);
      setImagePrompt("");
      setIsLoading(false);
      setIsImageGenerated(true);
    } catch (error) {
      console.log(error);
      setIsLoading(false);
    }
  };
Now, add the following in the return statement:
<div className={styles.container}>
  <ConnectWallet />
  {!isImageGenerated ? (
    <div className={styles.imagePlaceholder}>
      <h3>
        {isLoading
          ? "Generating..."
          : "Enter a prompt below and click generate"}
      </h3>
    </div>
  ) : (
    <MediaRenderer
      src={generatedImage}
      alt={imagePrompt}
      width="512px"
      height="512px"
      style={{
        borderRadius: "10px",
        margin: "40px 0px",
      }}
    />
  )}
  {isImageGenerated ? (
    <button
      onClick={() => {
        setIsImageGenerated(false);
        setGeneratedImage("");
        setIsImageGenerated(false);
      }}
      className={styles.btn}
    >
      Re-Generate
    </button>
  ) : (
    <>
      <input
        type="text"
        placeholder="Image Prompt"
        value={imagePrompt}
        onChange={(e) => setImagePrompt(e.target.value)}
        className={styles.input}
      />
      <button
        onClick={handleGenerate}
        disabled={isLoading}
        className={styles.btn}
      >
        {isLoading ? "Generating..." : "Generate"}
      </button>
    </>
  )}
</div>
This will add a box, an input, and a button in case the image hasn't been generated yet and the generate button calls the function that we just created. Once the image has been generated we swap out the box with the image and the input+button with a regenerate button.
I have also added some basic stylings to it, you can copy the same styles me or write your own css in the page.module.css:
.container {
  display: flex;
  flex-direction: column;
  align-items: center;
  justify-content: center;
  height: 100vh;
}

.imagePlaceholder {
  width: 512px;
  height: 512px;
  border: 1px solid #222;
  display: flex;
  align-items: center;
  justify-content: center;
  border-radius: 10px;
  margin: 40px 0px;
}

.input {
  background: #1a1a1a;
  border: 1px solid #222;
  border-radius: 5px;
  padding: 10px;
  color: #e7e8e8;
  font-size: 16px;
  outline: none;
}

.btn {
  background: #e7e8e8;
  border: 1px solid #222;
  border-radius: 5px;
  padding: 10px;
  color: #070707;
  font-size: 16px;
  outline: none;
  cursor: pointer;
  margin-top: 20px;
}
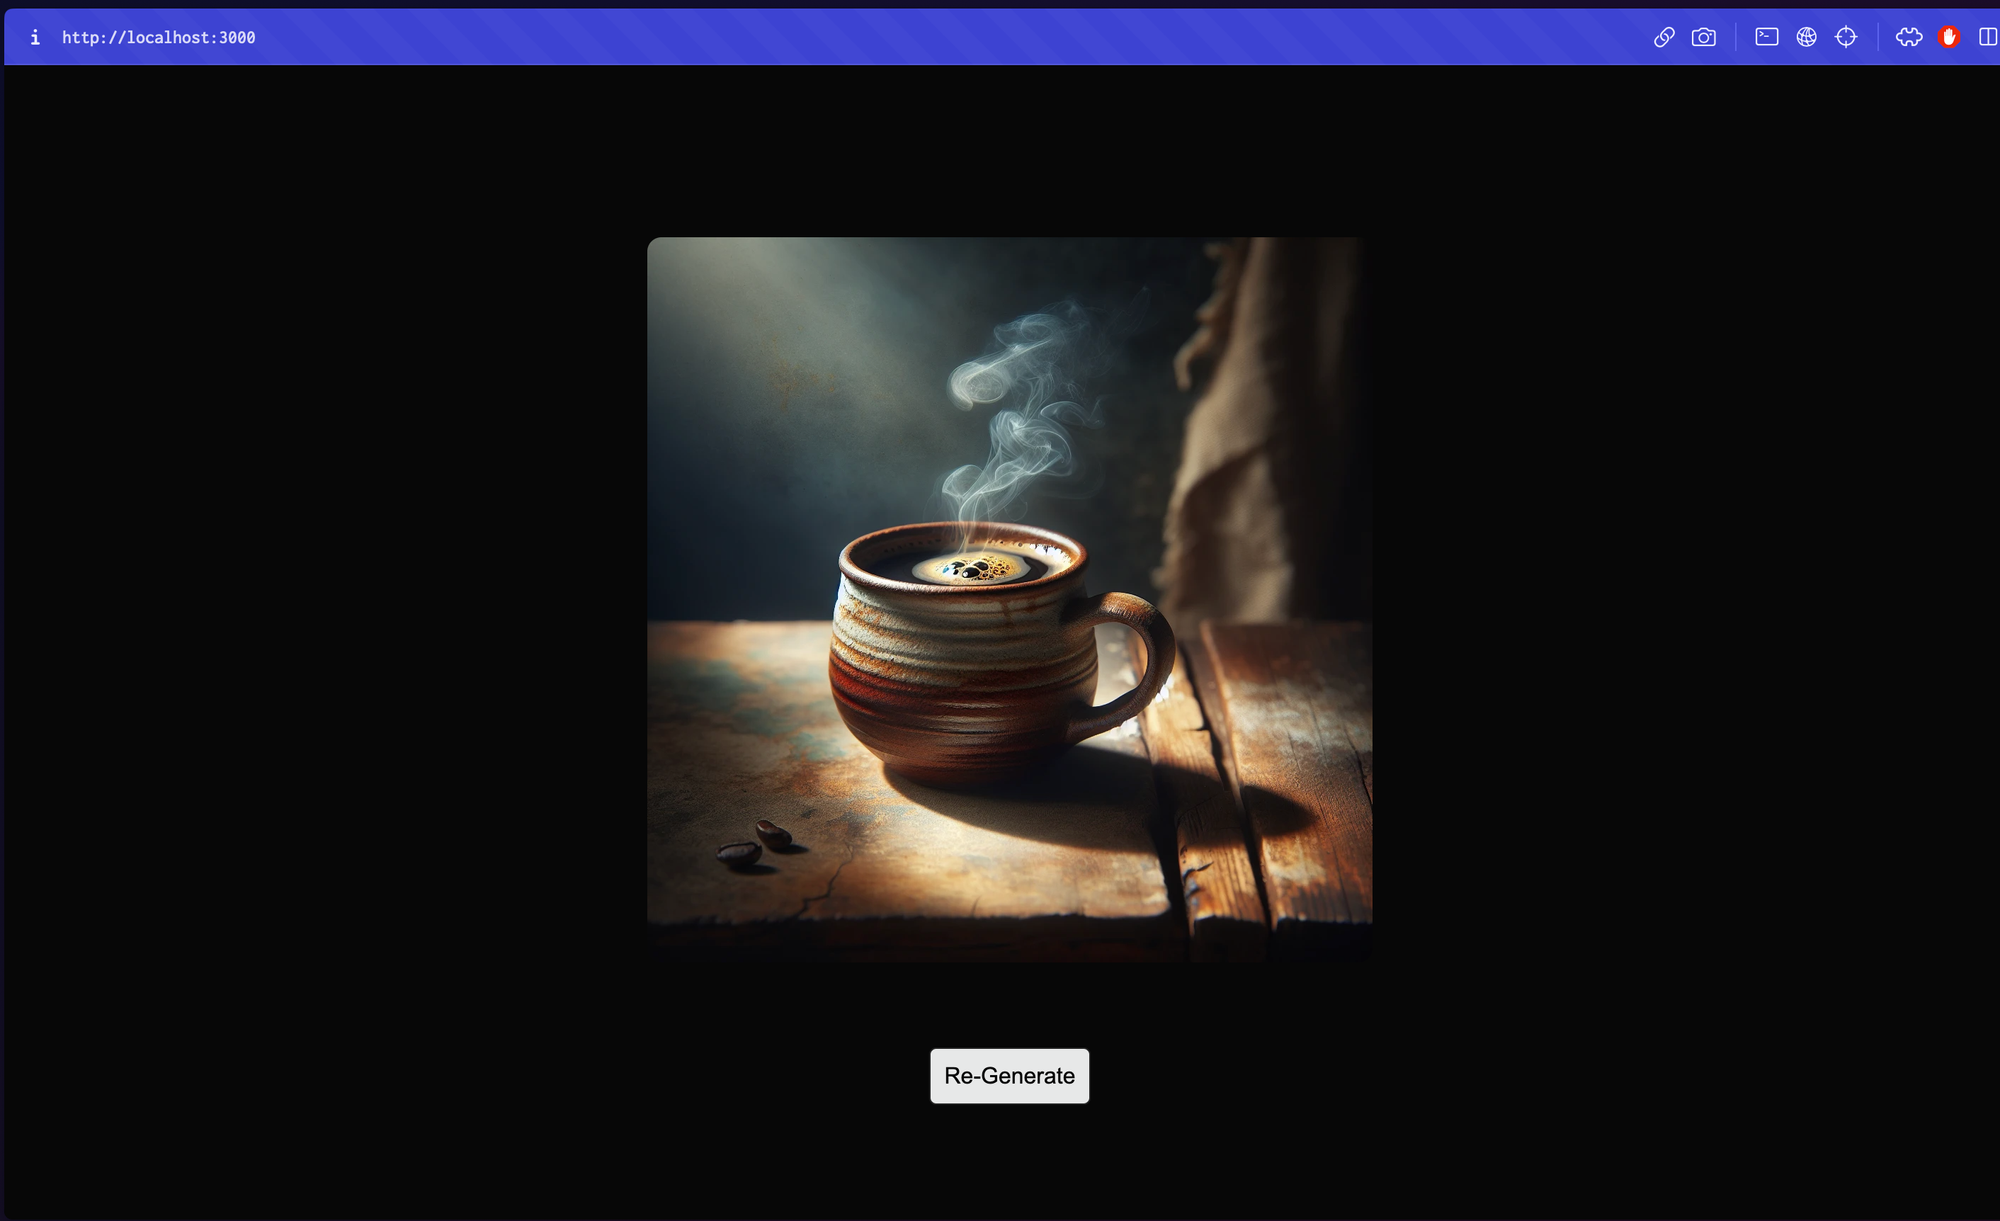
You can now try generating an image on your localhost and you should be able to see an image generated like this:
Building minting functionality
Now that we can generate images successfully, let's allow our users to connect their wallets and mint NFTs via engine!
We'll need to create two more useState hooks to check if the NFT is being minted or has already been minted:
const [isMinting, setIsMinting] = useState(false);
const [isMinted, setIsMinted] = useState(false);
Now, in the isImageGenerated check we will use the isMinted state and conditionally render the mint button/NFT minted text like this:
<>
  {isMinted ? (
    <p>NFT Minted!</p>
  ) : (
    <button
      className={styles.btn}
      disabled={isMinting}
      onClick={() => mintNFT(generatedImage)}
    >
      {isMinting ? "Minting..." : "Mint NFT"}
    </button>
  )}

  <button
    onClick={() => {
      setIsImageGenerated(false);
      setGeneratedImage("");
      setIsImageGenerated(false);
    }}
    className={styles.btn}
  >
    Re-Generate
  </button>
</>
As you can see we are using a mintNFT function here but we haven't created it yet. So, let's create that function now!
  const mintNFT = async (imageData: any) => {
    setIsMinting(true);
    try {
      const fetchResponse = await fetch(imageData);
      const blob = await fetchResponse.blob();

      const file = new File([blob], "image.png", { type: "image/png" });
      const imageUri = await sdk?.storage.upload(file);

      if (!imageUri) {
        throw new Error("Error uploading image");
      }

      const res = await fetch("/api/mintNFT", {
        method: "POST",
        headers: {
          "Content-Type": "application/json",
        },
        body: JSON.stringify({
          userImage: imageUri,
          address: address,
        }),
      });

      if (res.ok) {
        alert("NFT Minted!");
        setIsMinted(true);
      } else {
        const errorData = await res.json();
        console.error("Error minting NFT:", errorData);
        alert("Error minting NFT: " + (errorData.message || "Unknown error"));
      }
    } catch (error: any) {
      console.error(error);
      alert("An error occurred: " + error.message);
    } finally {
      setIsMinting(false);
    }
  };
In this function we are firstly creating the image and uploading it to ipfs using the thirdweb sdk. Then, we are calling a mint api to mint the NFT and based on the response we are changing some states and alerting with respective messages.
We need to firstly get the sdk and the user address from the useSDK and the useAddress hooks respectively:
const address = useAddress();
const sdk = useSDK();
Next, we will create the api route that we are calling to mint an NFT to the user's wallet. So, create a new file in app/api/mintNFT named route.ts and add the following:
import { NextResponse } from "next/server";

const {
  ENGINE_URL,
  THIRDWEB_SECRET_KEY,
  BACKEND_WALLET_ADDRESS,
  NFT_CONTRACT_ADDRESS,
} = process.env;

export async function POST(req: Request) {
  if (!ENGINE_URL || !THIRDWEB_SECRET_KEY || !BACKEND_WALLET_ADDRESS) {
    throw new Error("Missing environment variables");
  }

  const { userImage, address } = await req.json();

  const res = await fetch(
    `${ENGINE_URL}/contract/mumbai/${NFT_CONTRACT_ADDRESS}/erc721/mint-to`,
    {
      method: "POST",
      headers: {
        "Content-Type": "application/json",
        Authorization: `Bearer ${THIRDWEB_SECRET_KEY}`,
        "x-backend-wallet-address": BACKEND_WALLET_ADDRESS,
      },
      body: JSON.stringify({
        receiver: address,
        metadata: {
          name: "AI NFT",
          description: "NFT generated by AI",
          image: userImage,
        },
      }),
    }
  );
  if (res.ok) {
    return NextResponse.json(
      { message: "Minted NFT Successfully!" },
      { status: 200 }
    );
  } else {
    return NextResponse.json(
      { message: "Minting NFT failed!" },
      { status: 500 }
    );
  }
}
Here, we are using the thirdweb engine to call the mumbai/${NFT_CONTRACT_ADDRESS}/erc721/mint-to route and mint the NFT with the metadata and if the tx goes through we return minted successfully otherwise minting failed.
Make sure that you have added the following variables in your .env.local file: ENGINE_URL, THIRDWEB_SECRET_KEY, BACKEND_WALLET_ADDRESS, NFT_CONTRACT_ADDRESS.
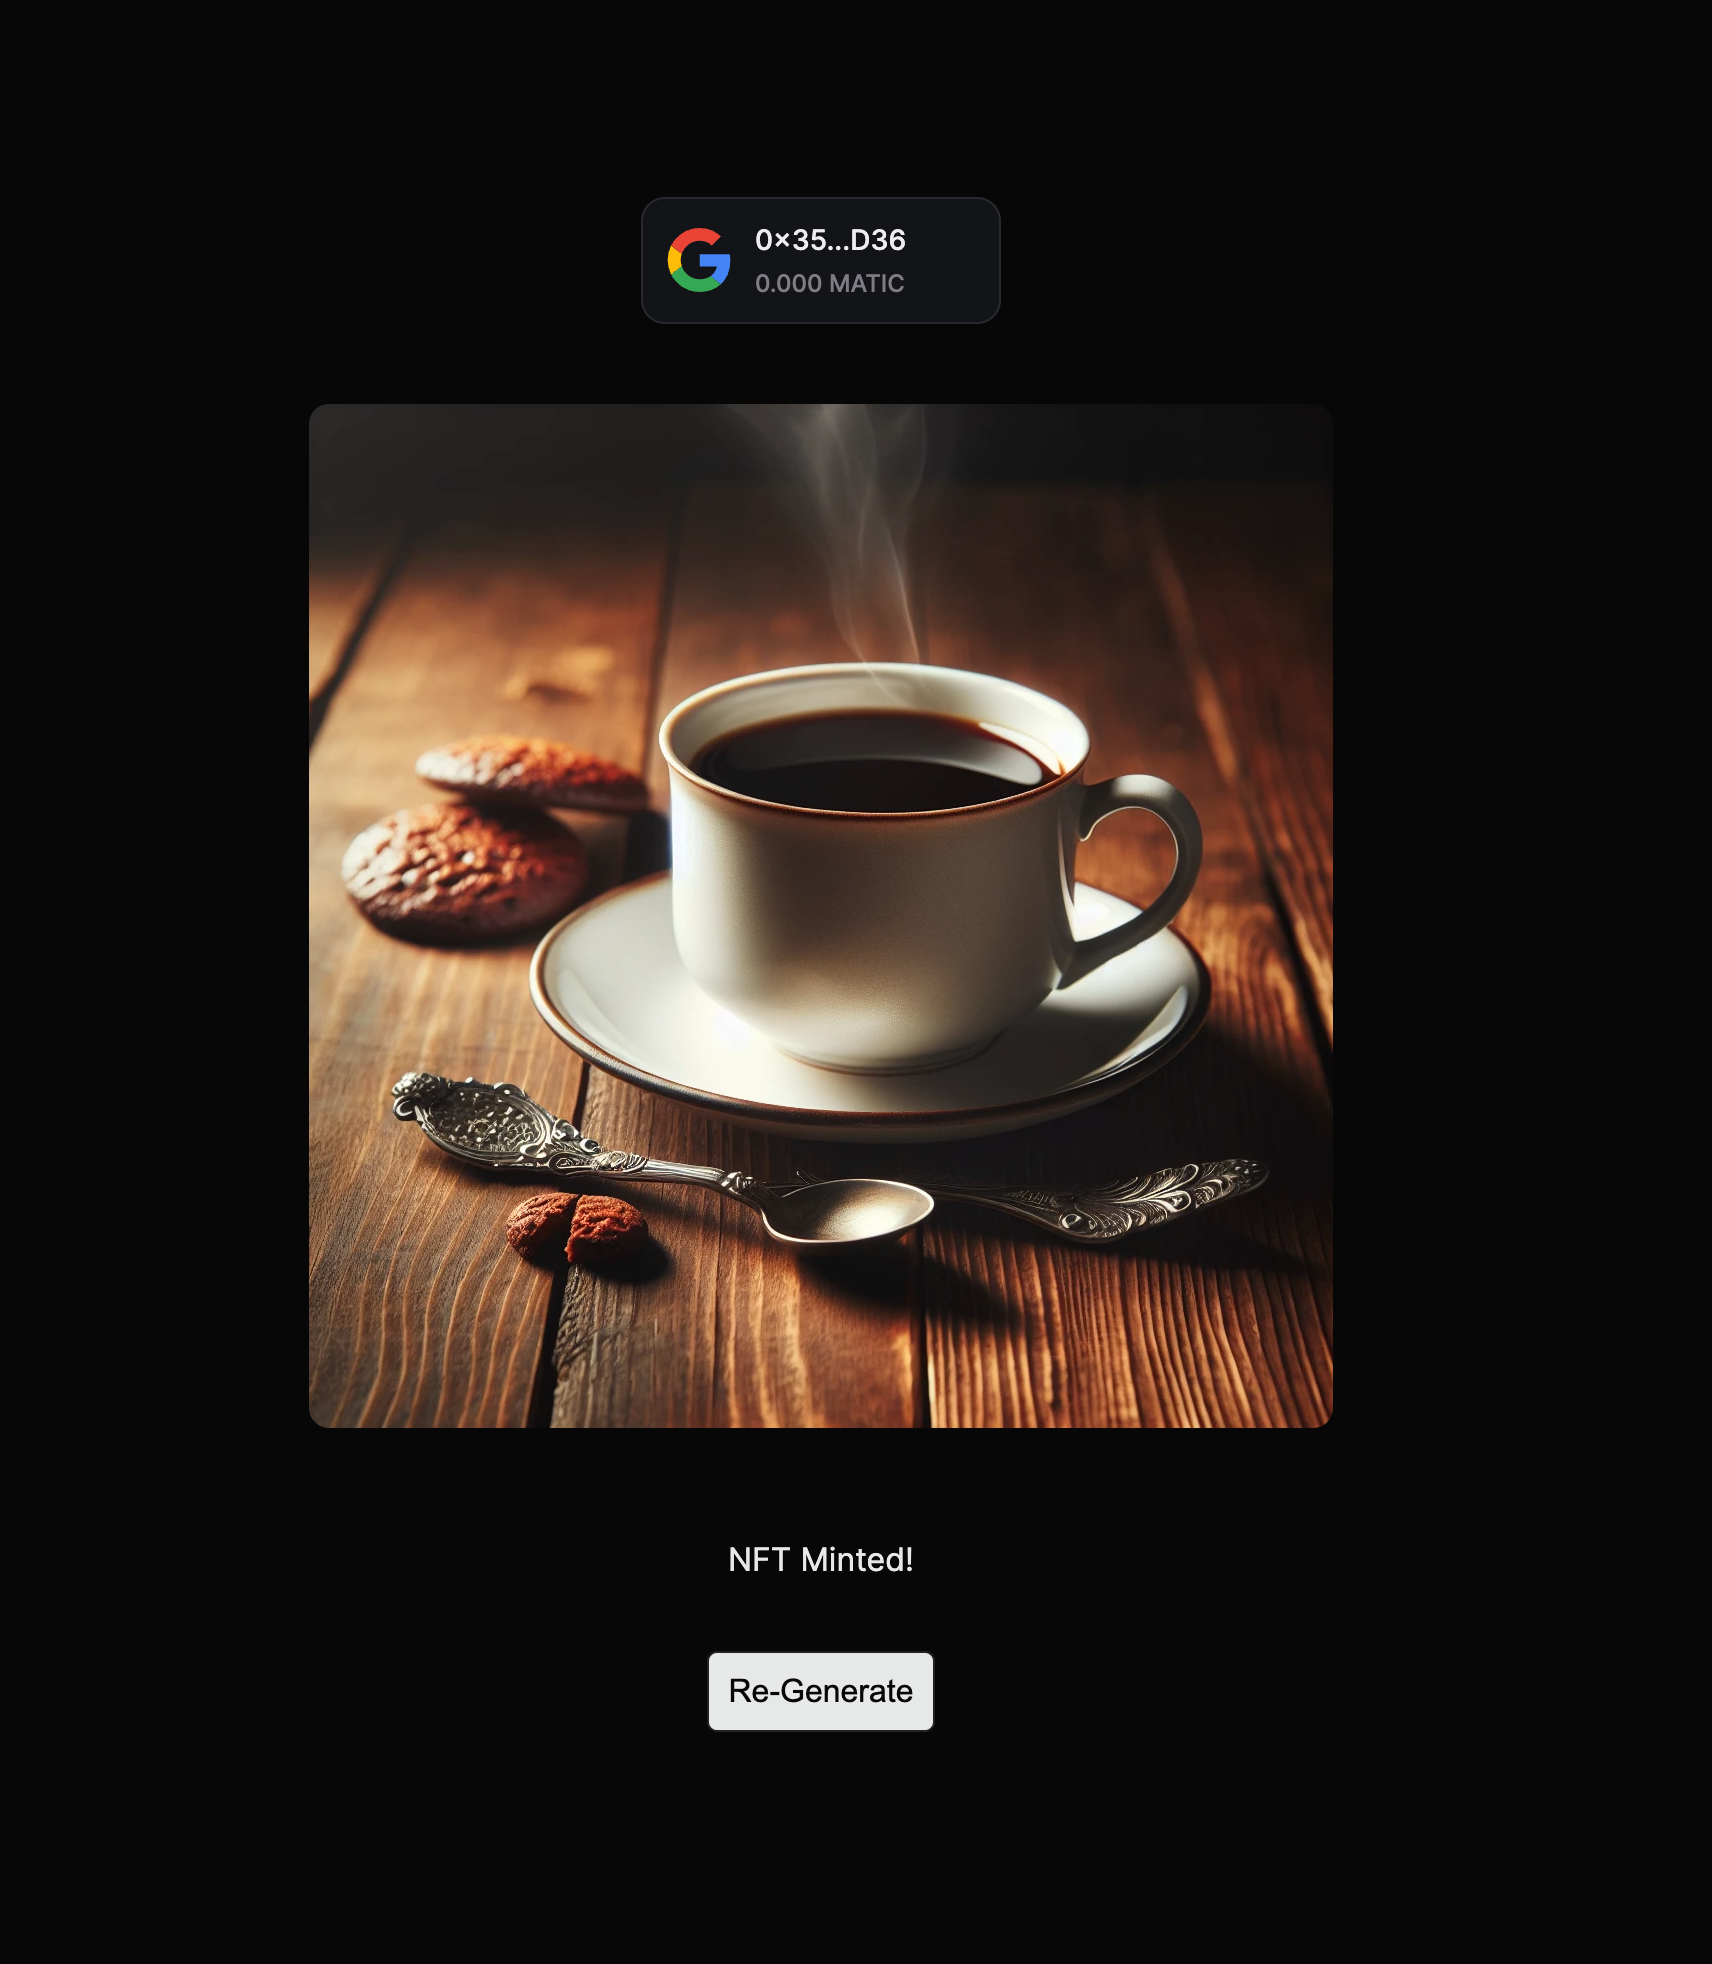
Now, if you go to your server and try minting an NFT you should get an alert saying NFT minted successfully!
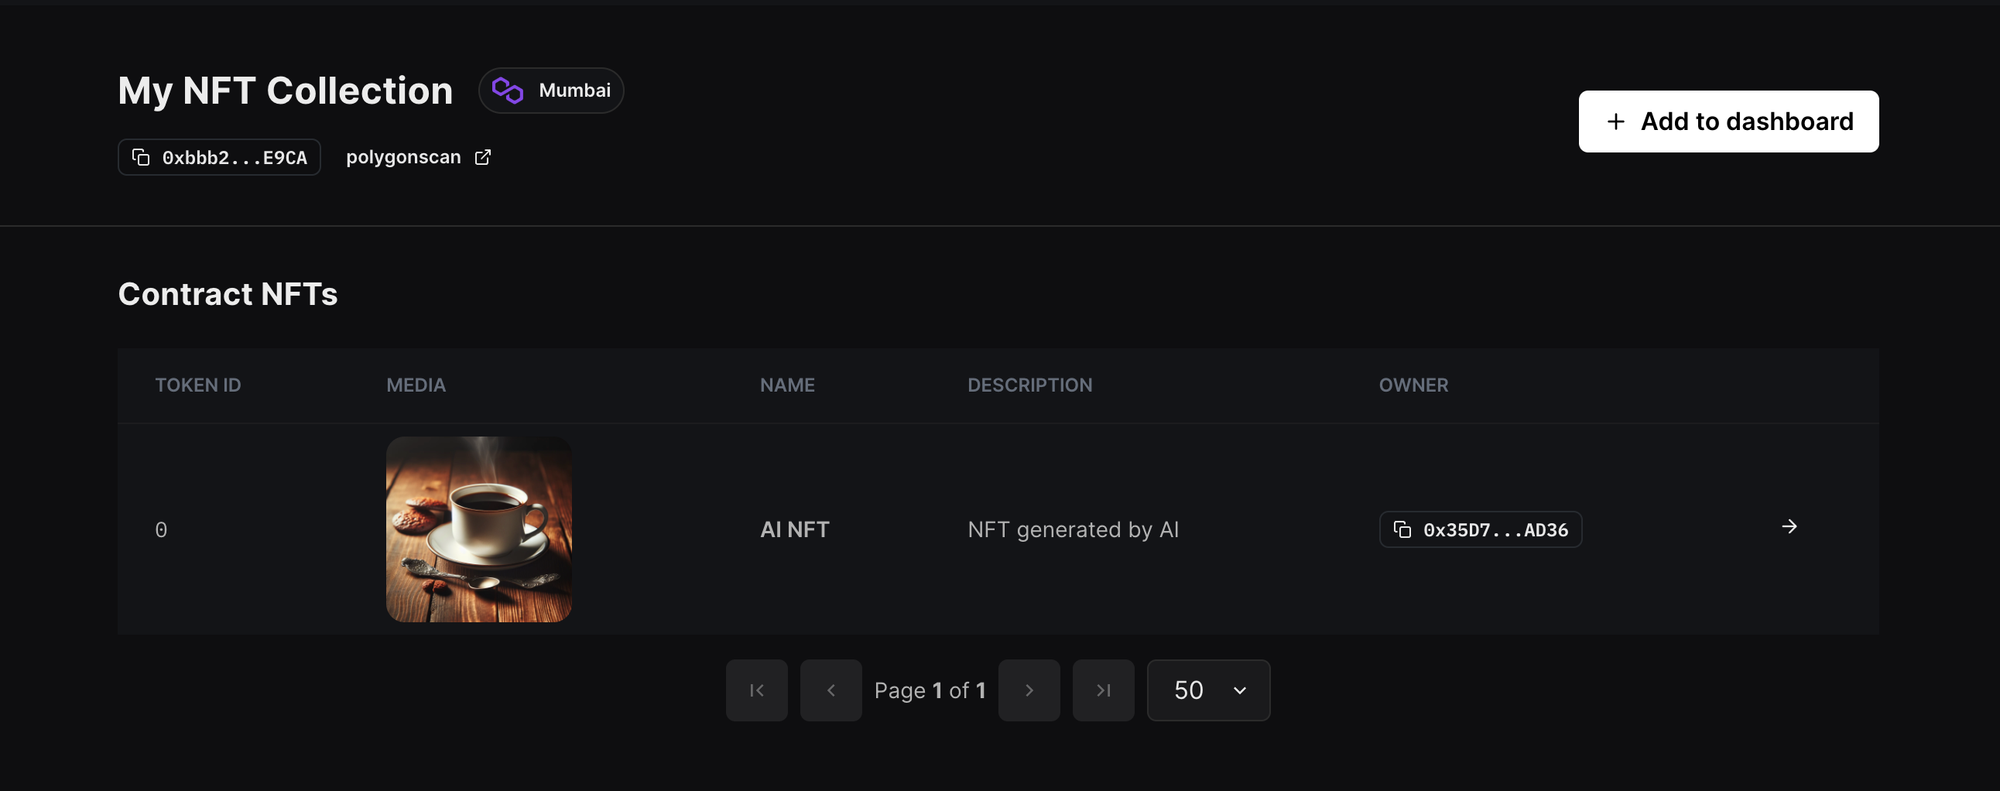
If you go to your NFT collection dashboard you'll be able to see that the NFT was successfully minted! 🥳
Conclusion
This guide taught us how to use the thirdweb engine and openAI, to generate images using a prompt and mint it as an NFT to the user's wallet!
You learned a lot, now pat yourself on the back and share your amazing apps with us on the thirdweb discord! If you want to look at the code, check out the GitHub Repository.
Need help?
For support, join the official thirdweb Discord server or share your thoughts on our feedback board.