How to Add Permissions to Your Smart Contract in Solidity

In this guide, we will show how to add permissions to a smart contract to manage access control.
We will use the thirdweb CLI to create an NFT smart contract, add the thirdweb permissions extension and then implement access control in our contract. Finally, we will deploy the contract and grant a new role to a user.
Let's get started!
Create A Solidity Project
In your terminal, create a new contract with this command:
npx thirdweb@latest create contract- Give your project a name.
- Select the development framework (we will use Hardhat in this guide).
- Choose the contract you’d like to start with (we are starting from an
Empty Contract).
Once the project has been built, open it up in your favorite IDE and start building.
This installs the @thirdweb-dev/contracts package into a new Solidity project; which we'll use to import permissions.
Add Permissions To Your Smart Contract
To add permissions, we need to import the thirdweb permissions contract. In contracts/Contract.sol import the thirdweb permissions contract and make your contract inherit it.
// SPDX-License-Identifier: UNLICENSED
pragma solidity ^0.8.9;

import "@thirdweb-dev/contracts/extension/Permissions.sol";

contract MyContract is Permissions {
    constructor() {}
}
The thirdweb permissions contract comes with a pre-defined role - the DEFAULT_ADMIN_ROLE. We can start by assigning that role to the deployer of the contract in the constructor:
constructor() {
        _setupRole(DEFAULT_ADMIN_ROLE, msg.sender);
 }
To enforce access control, we can use the onlyRole modifier provided by the Permissions.sol contract to check for a specific role.
Let's create a new function; add, and require that only people with the DEFAULT_ADMIN_ROLE can invoke the function.
function add(uint256 a, uint256 b) public view onlyRole(DEFAULT_ADMIN_ROLE) returns (uint256) {
        return a + b;
  }
Create A Role For Permission Controls
Roles can be any bytes32 value so you can define a new role (at the top of your contract) like this:
bytes32 public constant SUBTRACT_ROLE = keccak256("SUBTRACT_ROLE");Let's add some functionality to the contract and use the new role. Start by creating a new variable called number:
uint256 public number;Then, change the add function so that it adds the provided number to the number variable instead of simply adding two numbers.
function add(uint256 a) public onlyRole(DEFAULT_ADMIN_ROLE){
	number += a;
}
Now, create a new function called subtract which subtracts a provided number from the number variable and can only be called by those who hold the SUBTRACT_ROLE.
Your full contract should look like this:
// SPDX-License-Identifier: UNLICENSED
pragma solidity ^0.8.9;

import "@thirdweb-dev/contracts/extension/Permissions.sol";

contract MyContract is Permissions {
    bytes32 public constant SUBTRACT_ROLE = keccak256("SUBTRACT_ROLE");

    uint256 public number;

    constructor() {
        _setupRole(DEFAULT_ADMIN_ROLE, msg.sender);
    }

    function add(uint256 a) public onlyRole(DEFAULT_ADMIN_ROLE) {
        number += a;
    }

    function subtract(uint256 a) public onlyRole(SUBTRACT_ROLE) {
        number -= a;
    }
}
Assign A Role To A Wallet Address
The grantRole function (inherited from the Permissions contract) can be used to assign a role to a wallet address.
The easiest way to do this is to deploy your contract with the CLI, and then invoke the grantRole function from the dashboard.
To deploy your contract, run the following command from your smart contract project directory:
npx thirdweb@latest deployOnce the contract is deployed, you'll find yourself in the contract dashboard. Take a few minutes to explore the dashboard.
- Check out the
Explorertab, which allows you to interact with your deployed contract - View events from your contract in the
Eventstab - Imagine what you can build with the code snippets in the
Codetab.
To assign a role, go to the Explorer tab in the dashboard. From the WRITE functions, select the grantRole function.
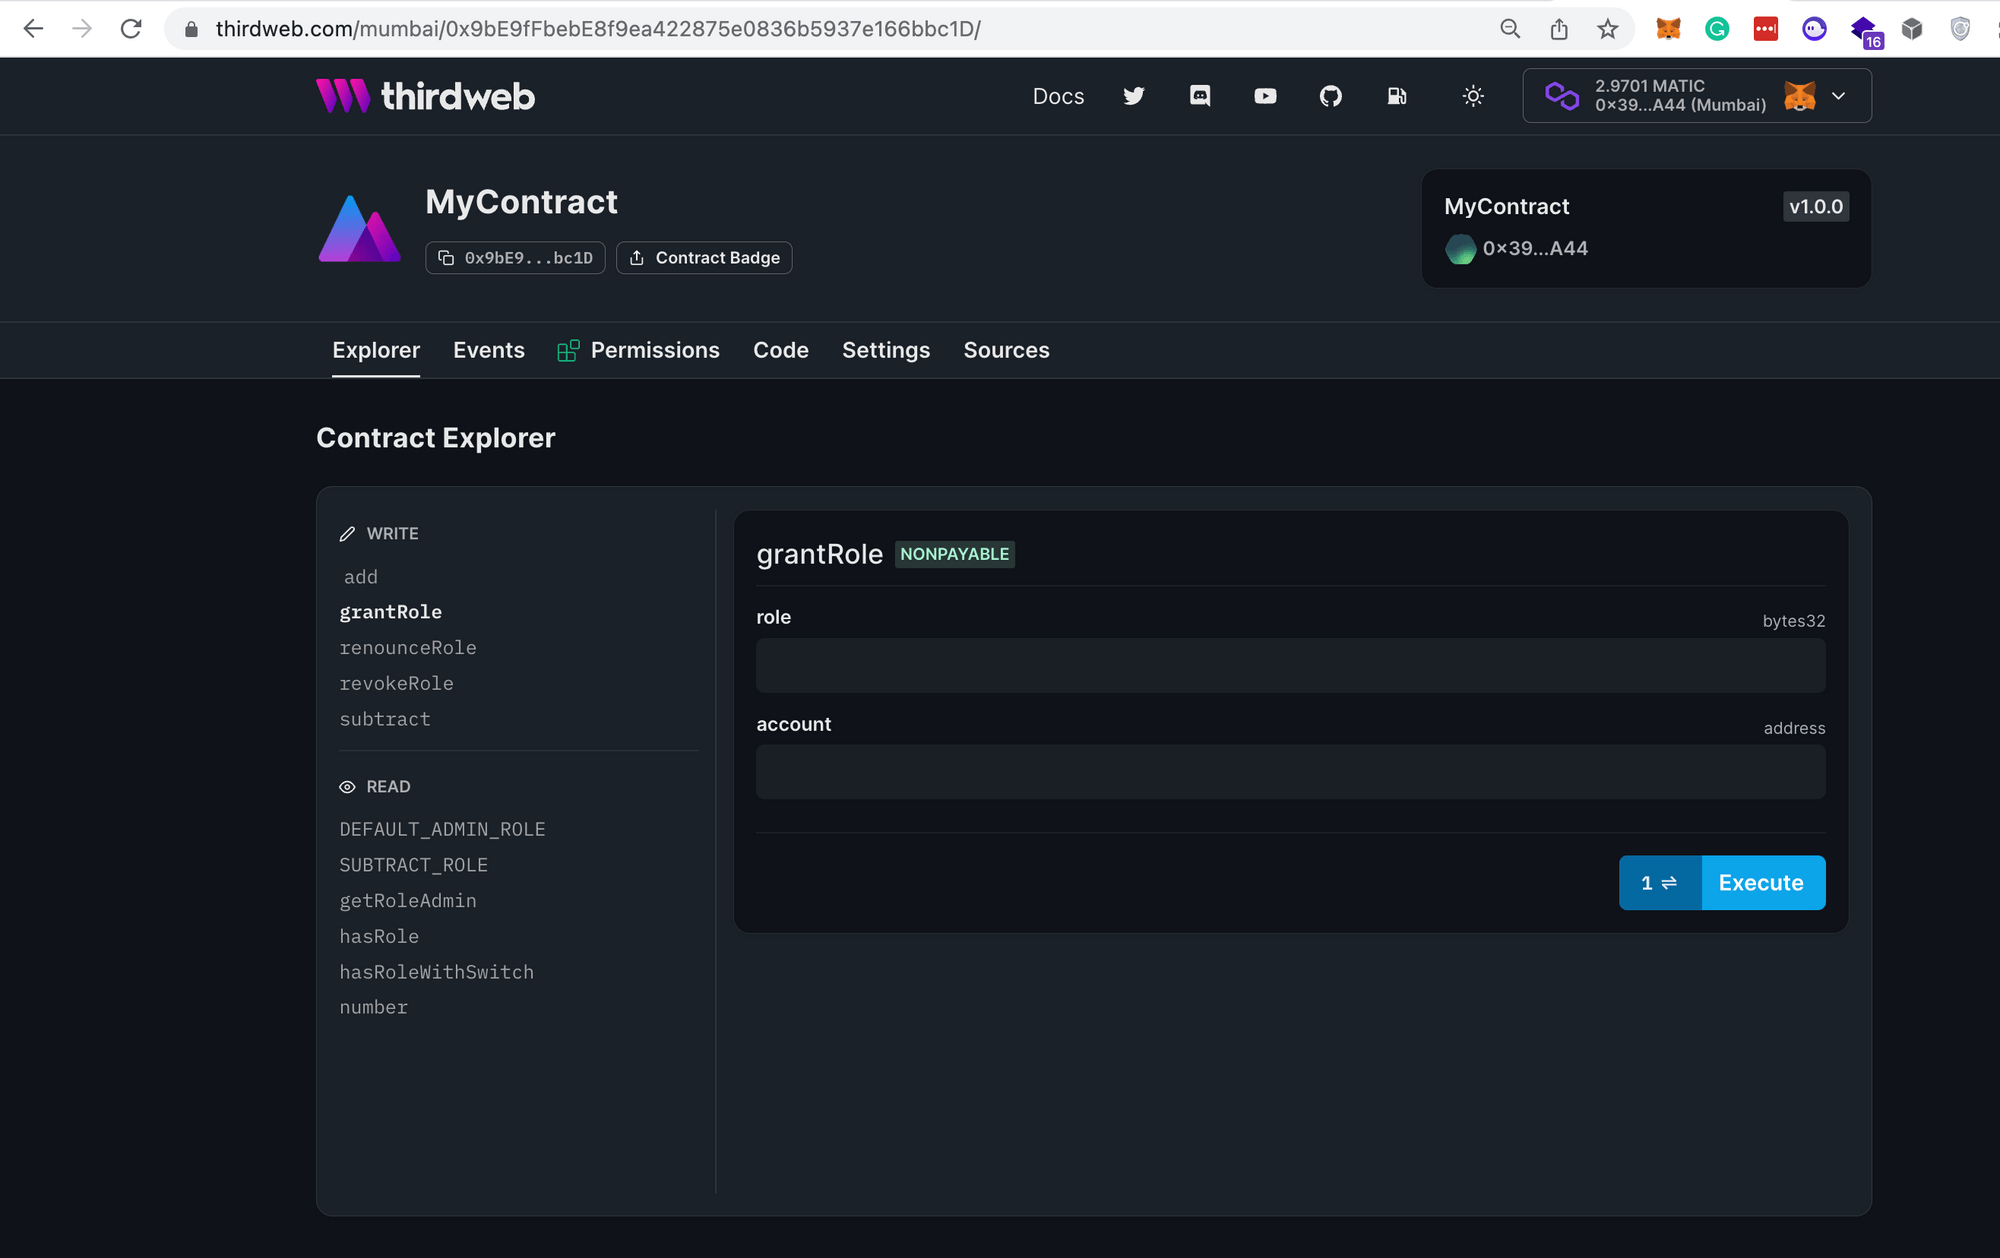
Notice that we have to provide the role (as a bytes32) and the account (wallet address). The role we want to grant is the SUBTRACT_ROLE which we defined earlier with this line of code.
bytes32 public constant SUBTRACT_ROLE = keccak256("SUBTRACT_ROLE");To get this bytes32 value, we can use an online tool like this one, and convert "SUBTRACT_ROLE" to a bytes32 value. Your bytes32 value should look like this: 0x3ccb835e934d10e2ec13cf39065b900d8b3d4a3a39038f8b762590a977809e5e.
You can paste your bytes32 value into the dashboard, add the wallet address to which you want to assign the role, and then click on the Execute button and approve the transaction.
You can see the output from the transaction in the dashboard, and you can view the emitted event in the Events tab.
Conclusion
Awesome 🎉 You have added permissions to your contract, created a new role, and granted that role to a wallet.
For any questions you have, please join the thirdweb discord! It is a great place to find fellow builders and ask any questions you may have. The whole thirdweb team is there waiting for you!