Build An ERC721A NFT Collection using Solidity
In this guide, we'll show you how to build and deploy a custom ERC-721A NFT Collection contract using Solidity, using our contracts SDK and CLI.
By the end, you'll have a contract deployed onto the Ethereum Goerli test network where you can mint new NFTs via the dashboard.
You can access the full source code for this project in this interactive Repl.it
https://replit.com/@thirdweb/Create-an-NFT-collection-with-Solidity-thirdweb
Let's begin!
Creating A Smart Contract
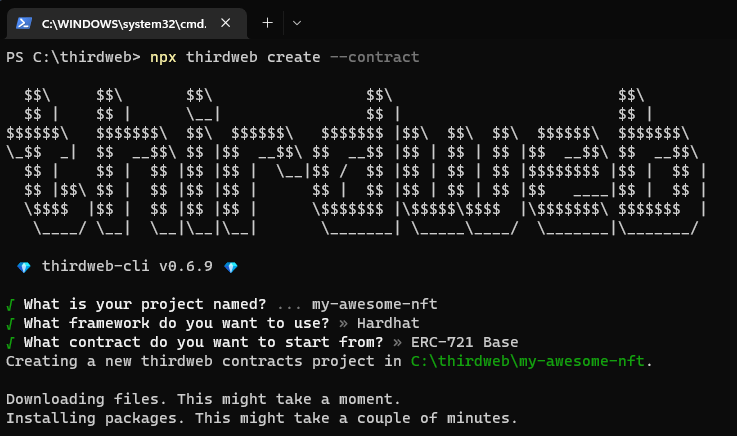
To create a new smart contract, we can use the following command from the CLI:
npx thirdweb create contract
This command runs an interactive setup process for us to get started. Give your project a name, select Hardhat for the framework, and finally choose the ERC721Base contract to get started with.
Once your project has been initialized, change directories into the newly created project and open it in your text editor!
cd my-awesome-nft # the name of your project
Understanding the Starter Code
To begin with, we have a single smart contract file called Contract.sol, that looks like this:
// SPDX-License-Identifier: MIT
pragma solidity ^0.8.0;

import "@thirdweb-dev/contracts/base/ERC721Base.sol";

contract Contract is ERC721Base {

      constructor(
        string memory _name,
        string memory _symbol,
        address _royaltyRecipient,
        uint128 _royaltyBps
    )
        ERC721Base(
            _name,
            _symbol,
            _royaltyRecipient,
            _royaltyBps
        )
    {}

}
To break this down, this code is:
- Importing the
ERC721Basebase contract from the contracts SDK - Making our contract implement that base contract
- Writing any required functions for that implementation (e.g. constructor)
The result is our contract successfully extends the ERC721Base contract, meaning we get all of its functionality out of the box, and can also add or override any custom logic on top.
Let's do that now!
Adding Custom Smart Contract Logic
One great thing about the contracts SDK is that you can incorporate any custom logic you like into your custom smart contracts, which wasn't possible before with the pre-built contracts.
In this example, I'll add some on-chain information about each NFT, where each NFT can have a nickname.
Let's see how that code looks:
contract Contract is ERC721Base {
    // Mapping of token ID to nickname string
    mapping (uint => string) public nicknames;

    // Set a new nickname for a token
    function setNickname(uint _tokenId, string calldata _nickname) public {
        nicknames[_tokenId] = _nickname;
    }

    // ... constructor
}
Above, we create a mapping of the NFT Token ID to the nickname, meaning each token ID can have one nickname at a time. We also create a function called setNickname, that takes in both a token ID and nickname, and adds the "key-value" pair into the mapping.
Great! There's only one problem... Anyone can call this function! This means anybody can change our NFT nicknames! What if we wanted to restrict access so that only we (the creator) could update this data?
Let's see how we can make use of the contract extensions available in the contracts SDK to add permission controls to our contract so that only the creator of the contract can call this function.
Using Contract Extensions
If we take a look at the Permissions contract extension, we can see that it allows us to call the _setupRole function and provide a wallet address to give that wallet the role we define.
We can use this to create a role called nicknamer and create a function modifier to restrict access to our setNickname function.
First, we need to import the PermissionsEnumerable contract extension from the contracts SDK.
import "@thirdweb-dev/contracts/extension/PermissionsEnumerable.sol";
Then, we need to make our contract extend this contract extension:
contract Contract is ERC721Base, PermissionsEnumerable {
Now we're ready to define our role within our contract. Roles must be in the type of bytes32, so let's define a variable for our role that looks like this:
bytes32 public constant NICKNAMER_ROLE = keccak256("NICKNAMER_ROLE");
We can now modify our function using the onlyRole function modifier provided by the PermissionsEnumerable contract extension like so:
// Set a new nickname for a token
function setNickname(uint _tokenId, string calldata _nickname) public onlyRole(NICKNAMER_ROLE) {
    nicknames[_tokenId] = _nickname;
}
Finally, let's give the wallet that deploys this contract the role. We'll also give them the ADMIN role which comes included as part of the permissions contract extension too:
    constructor(
        string memory _name,
        string memory _symbol,
        address _royaltyRecipient,
        uint128 _royaltyBps
    )
        ERC721Base(
            _name,
            _symbol,
            _royaltyRecipient,
            _royaltyBps
        )
    {
        // Give the contract deployer these roles when the contract is deployed.
        _setupRole(DEFAULT_ADMIN_ROLE, msg.sender);
        _setupRole(NICKNAMER_ROLE, msg.sender);
    }
Awesome! Now when we deploy this contract, we'll be set up with both roles and only we will be able to call the setNickname function.
Let's deploy it now!
Release & Deploy
The CLI allows us to deploy our contracts without any additional configuration or use of private keys. Let's see how we can do it.
First, let's check what features we've successfully implemented from the contracts SDK by running the following command:
npx thirdweb detect
This command shows us all of the contract extensions we've implemented, which will unlock features for us in the Web3 SDK as well as the dashboard (more on that later).
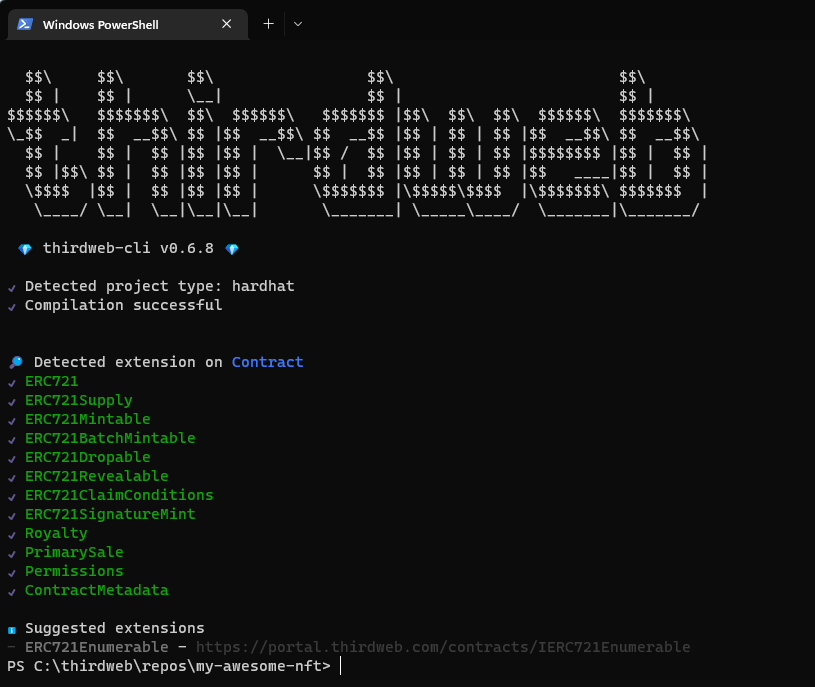
Along with all of the extensions implemented by the base contract, we've also successfully implemented the Permissions contract extension. This looks good! Now we're ready to deploy.
You can deploy directly via the CLI using npx thirdweb deploy, but I'm going to show you how you can create a landing page for your contract that you can share before deploying too. To do that, let's run the following command:
npx thirdweb release
This command:
- Compiles your project
- Uploads the contract ABI to IPFS
- Generates a link for you where you can ship your contract onto our on-chain registry.
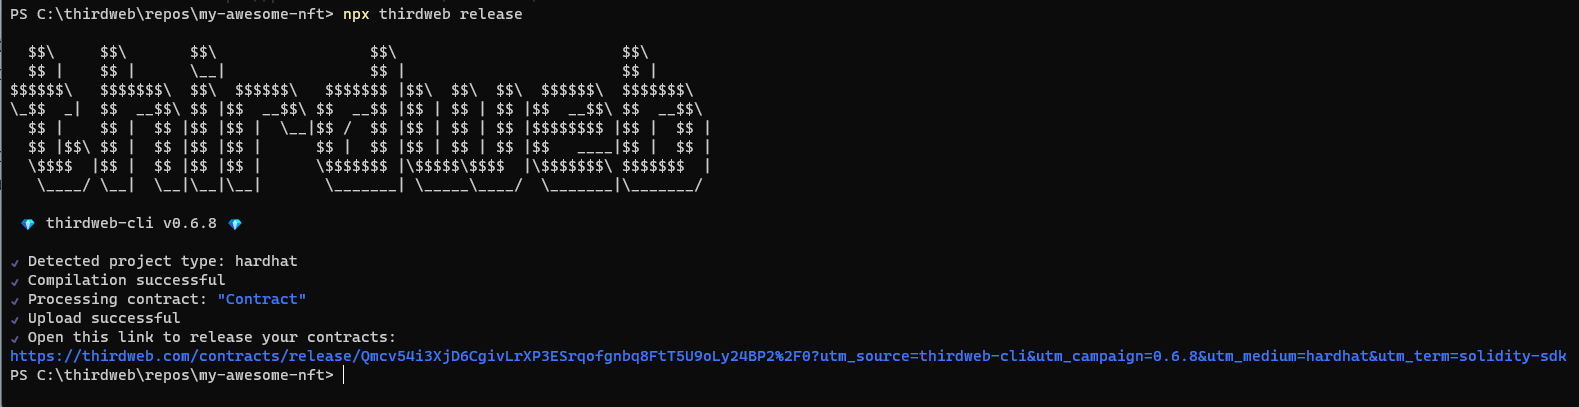
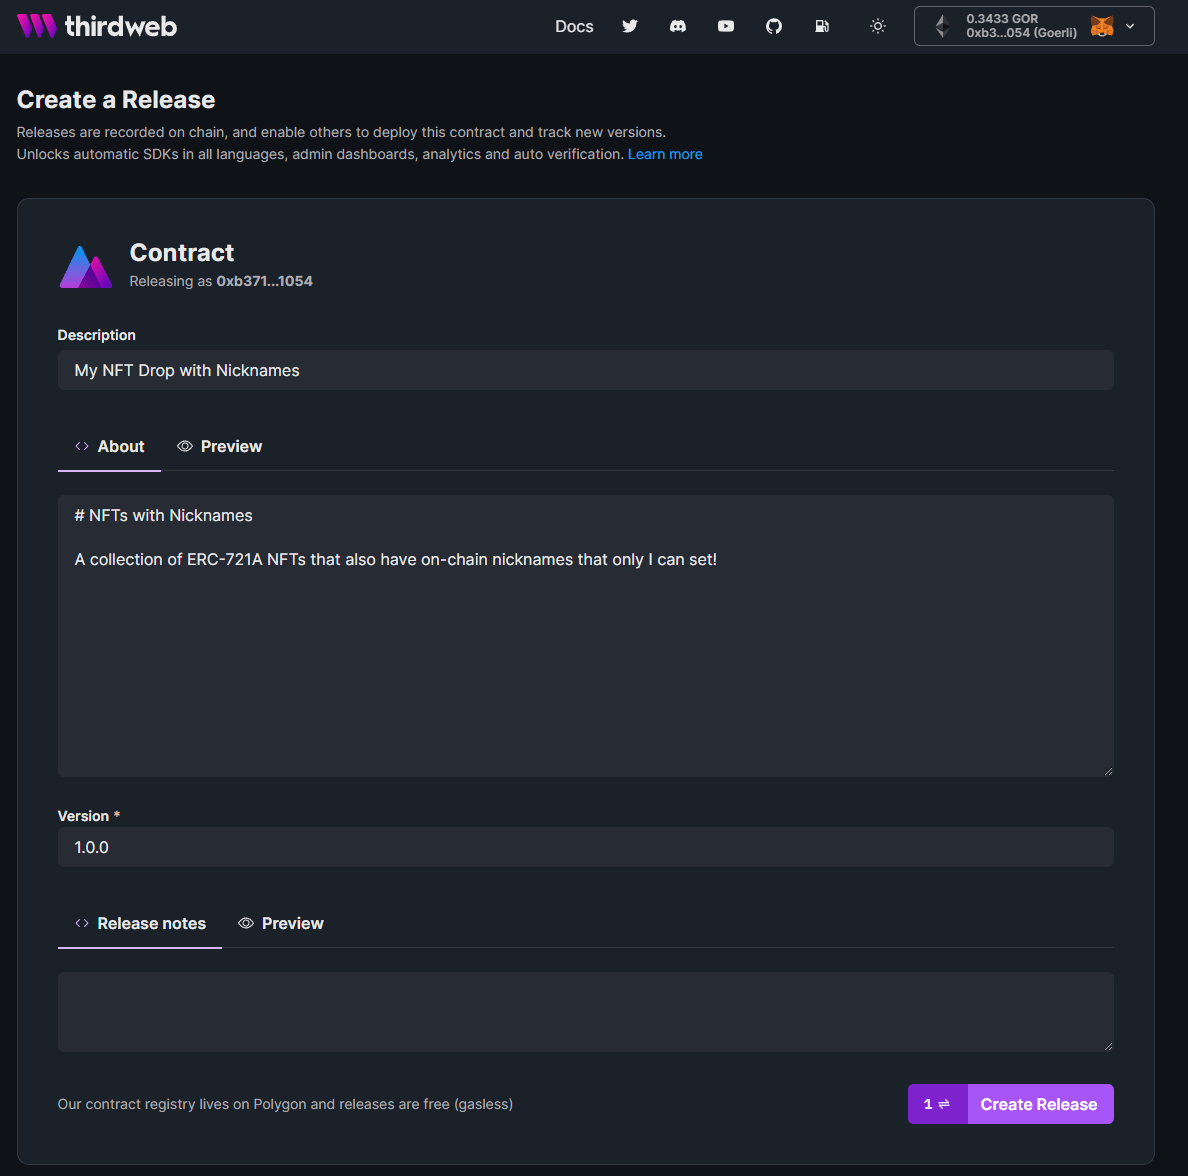
Go ahead and click the URL that it generates to be taken to the dashboard.
Here is where you can fill out the metadata of your contract that will get stored on-chain on the Polygon network. Give your contract a description, readme, and version and click Create Release.
Once you've uploaded your contract to the registry, you have your very own contract landing page! Where anybody can come and view all of the functionality available in your contract.
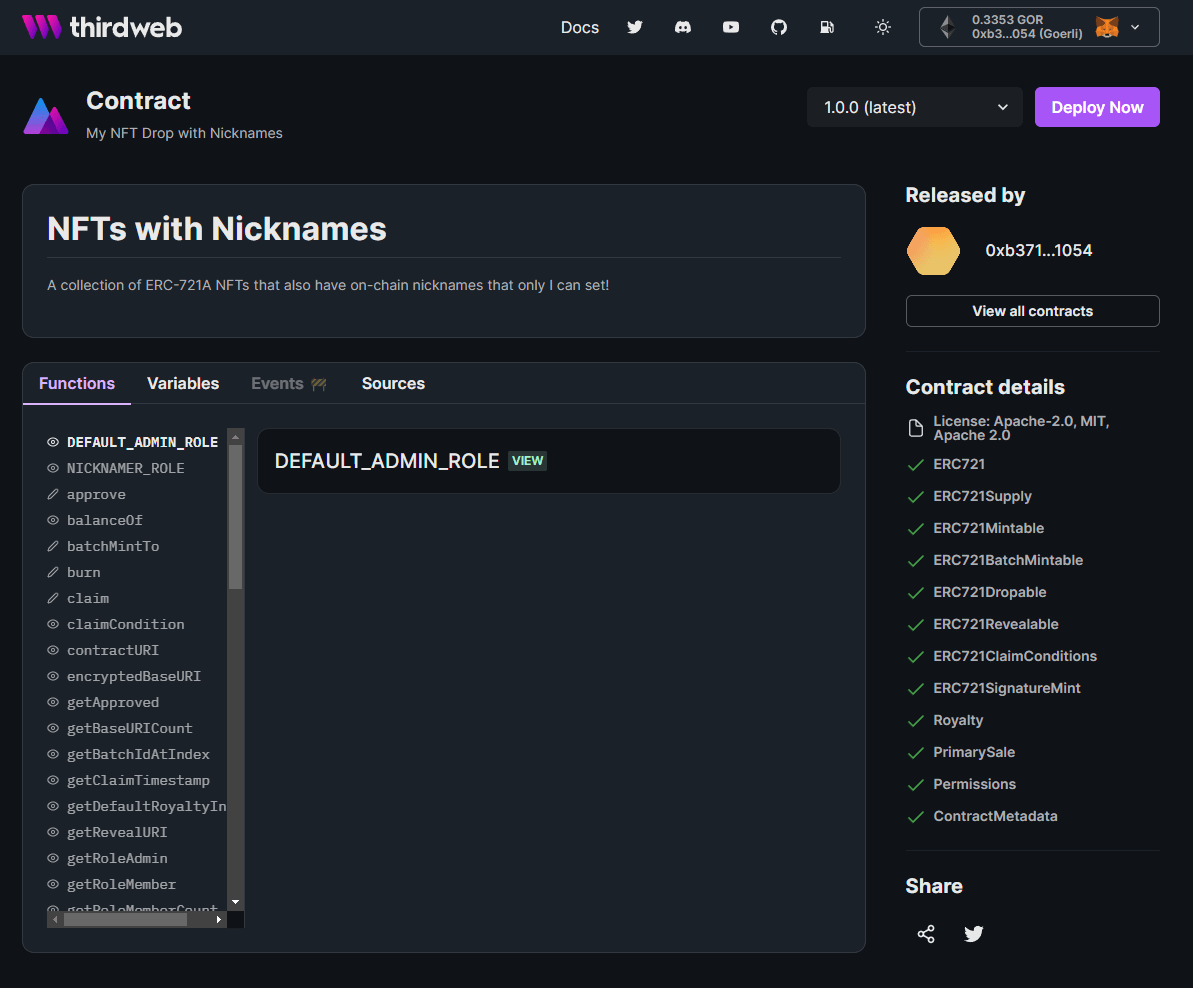
You can check mine out here: https://thirdweb.com/0xb371d1C5629C70ACd726B20a045D197c256E1054/Contract
Great work! You can share your contract with anybody and have them deploy it directly from this page too!
Let's go ahead and deploy it now by clicking the Deploy Now button in the top right.
Here, we need to provide values for the constructor parameters we set up in our contract.
You can see how I've configured these below:
- Name: Name of the contract itself
- Symbol: The ticker for the tokens of this contract
- Royalty Recipient: Wallet address that receives royalties from secondary sales
- Royalty BPS: Amount of royalties (e.g. 500 = 5%)
- Primary Sale Recipient: Wallet address that receives funds from primary sales
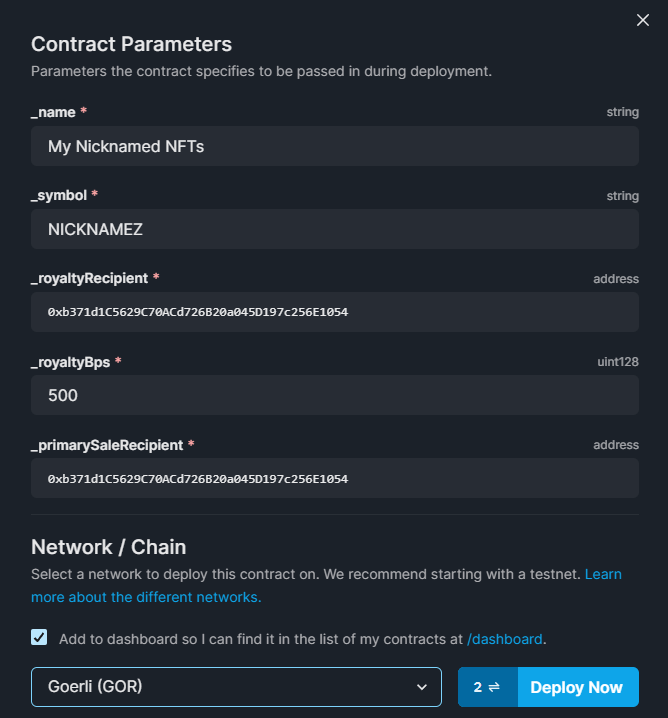
I'm deploying my contract to the Goerli Ethereum test network.
Once your contract is deployed, you will be taken to the dashboard to interact with your contract, view permissions, settings, and much more!
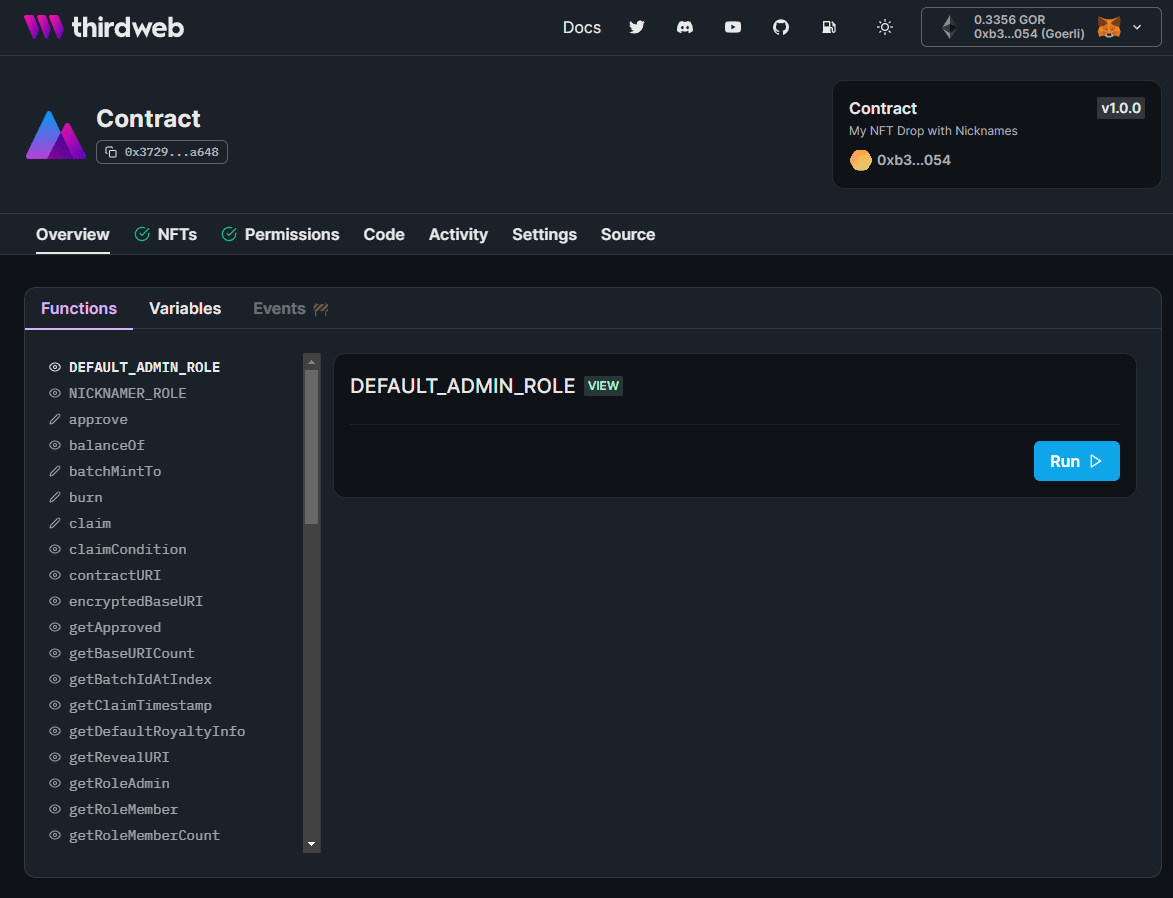
Let's see what we can do from the dashboard now!
Using the Dashboard
The dashboard allows us to do all kinds of amazing things with our contract without any code. To begin with, we can call any function on our contract using our connected wallet, for example, let's take a look at the NICKNAMER_ROLE we set up by hitting Run:
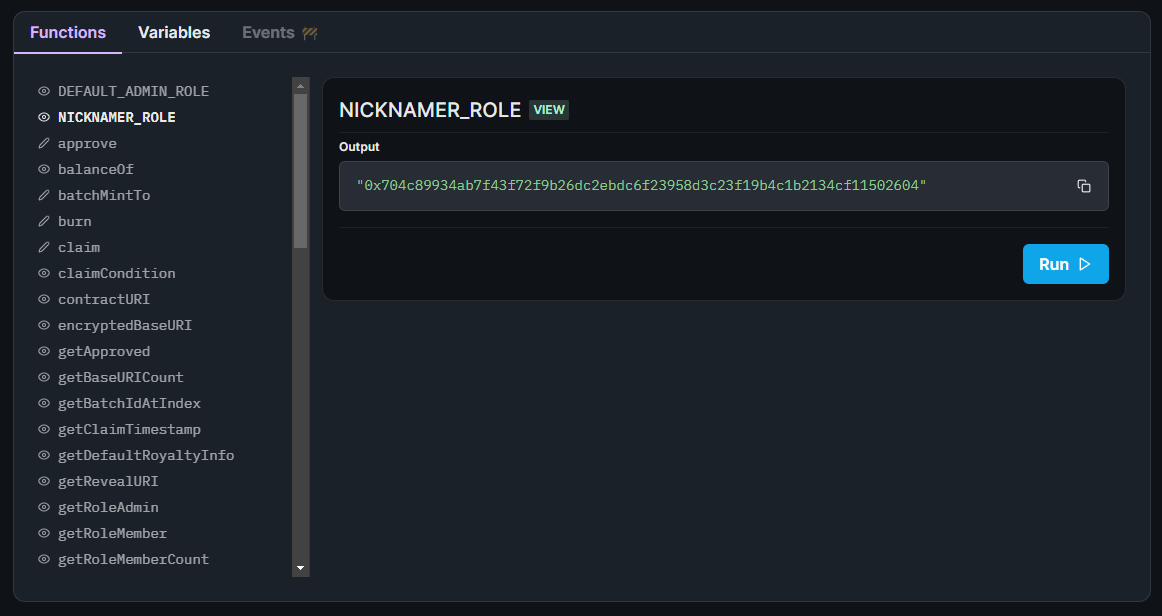
Great! Looks like we have a bytes32 value configured for it.
We can use this value to check if our wallet address has the NICKNAMER_ROLE assigned:
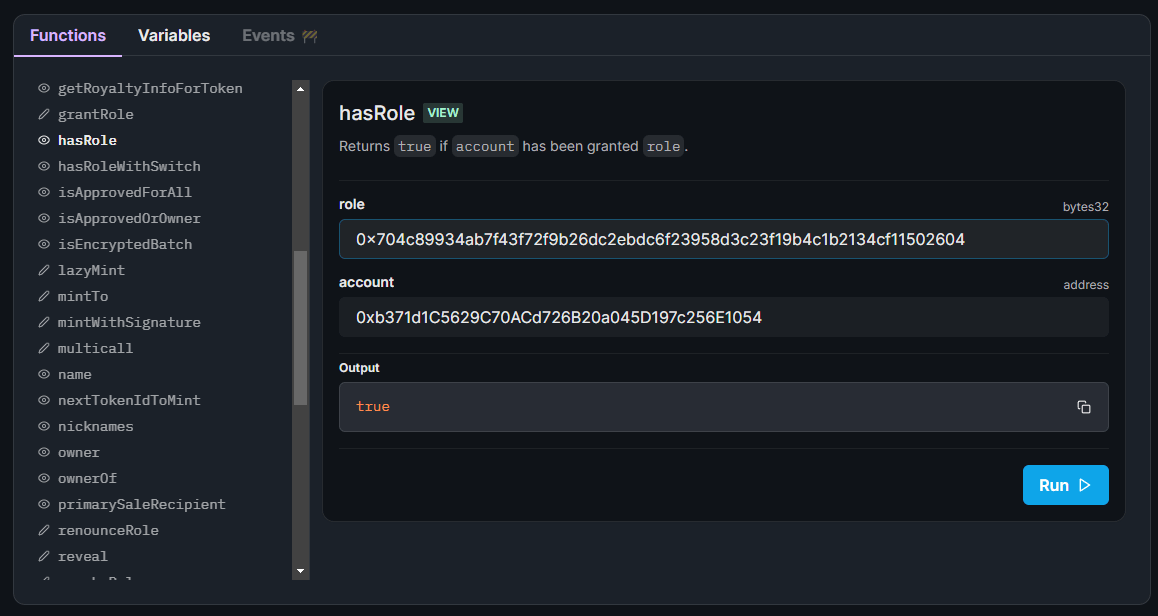
Awesome! This means we'll be able to assign nicknames to any token IDs, so let's create some NFTs now.
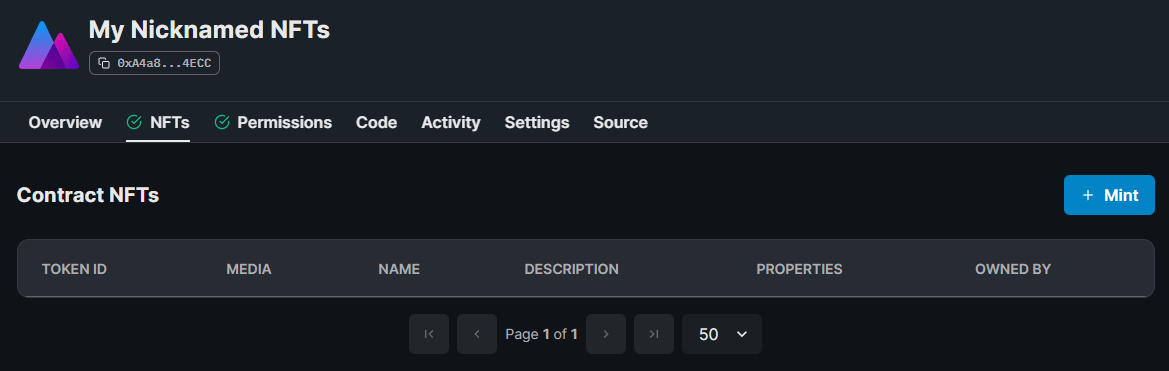
Mint An NFT
Let's mint an NFT into our collection now by going to the NFTs tab by clicking the Mint button:
Here, we get to enter the metadata of our NFT:
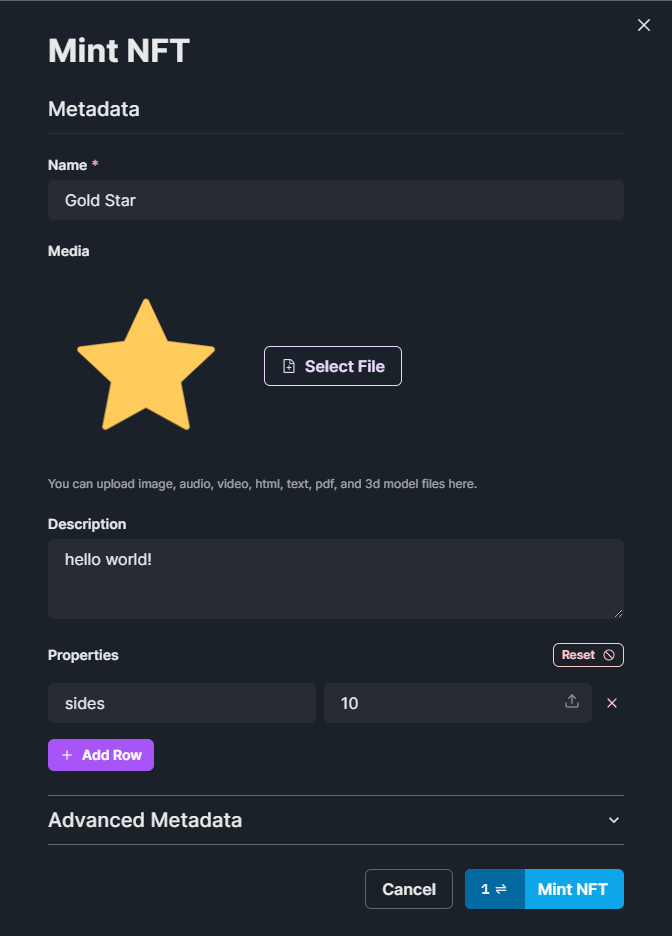
Behind the scenes, this uploads and pins your metadata to IPFS, and mints the NFT you just made! Once it's minted, we can see it show up in the NFTs tab:
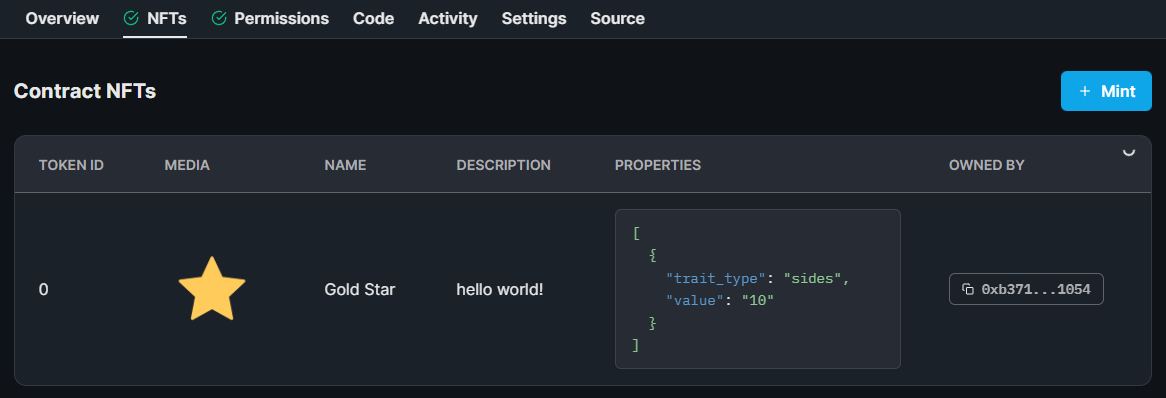
Now that we have an NFT minted, let's assign a nickname to it by using the contract explorer, back in the Overview tab!
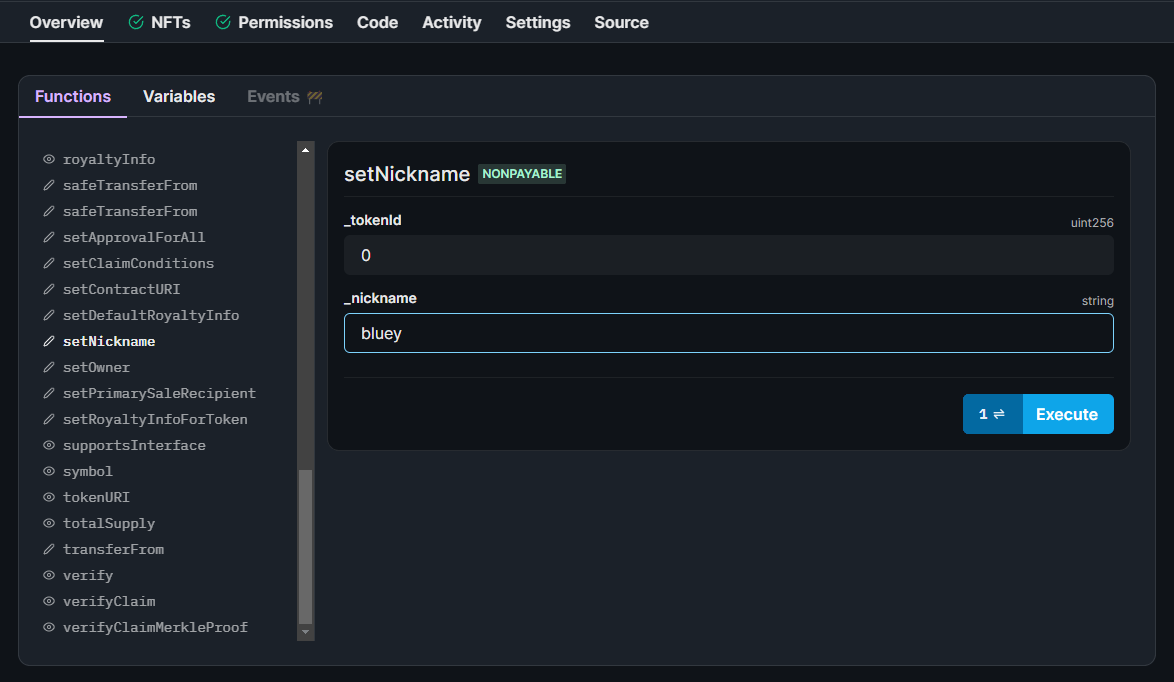
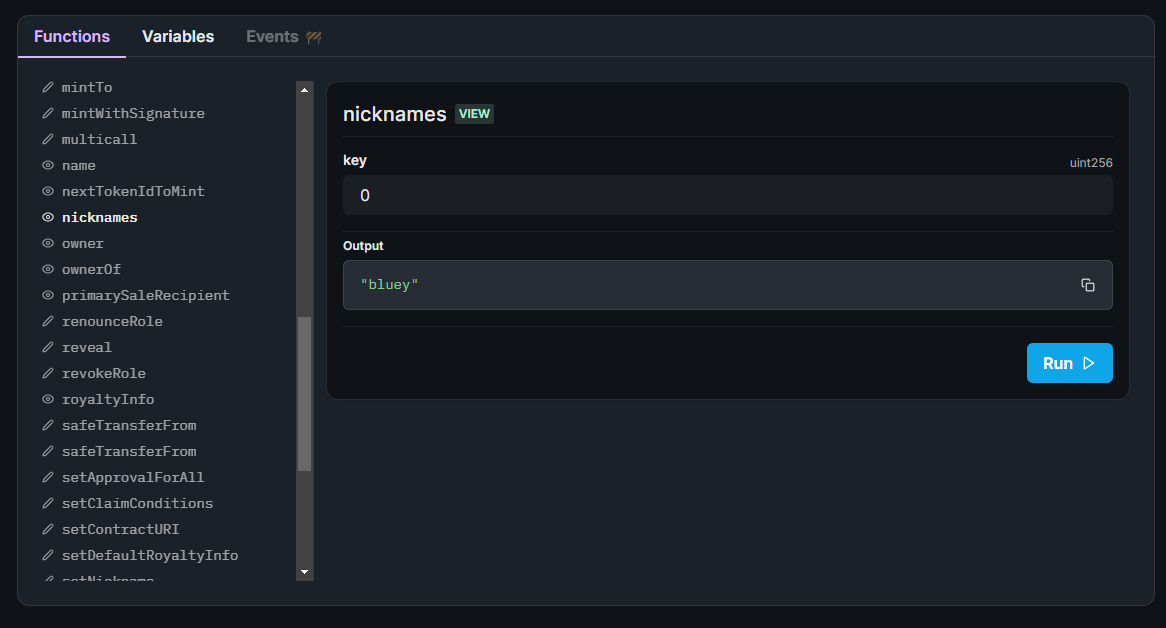
Hit Execute and sign the Set Nickname transaction. Once it's been accepted, we can view the nickname of token ID 0:
Awesome! We have just successfully created an ERC-721A NFT Collection with custom on-chain functionality!
Building An App With Our Contract
Let's take it to the next level and build an app that uses our contract now!
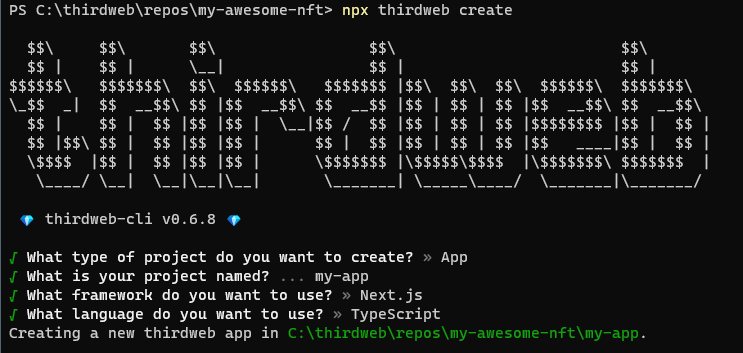
To do so, head back to the CLI and run the following command:
npx thirdweb create app
This time, we're going to create an App (using Next.js and TypeScript), rather than a Contract as we did the first time, so select App, and the frameworks you are comfortable building with.
Once again let's change directories into this new project and open it up in our text editor:
cd my-app
Firstly, let's change the desiredChainId to be Goerli (the network we deployed our contract to) inside the _app.tsx file:
// This is the chainId your dApp will work on.
const activeChainId = ChainId.Goerli;
Next, we'll connect to our contract on the index.tsx file, inside the component:
// Read the contract from the blockchain
const { contract } = useContract("0xe0F5f8Bb09627B0A886D4CBd300Ba36cd9E522c6");
By implementing contract extensions, we unlocked special functionality inside the SDK like querying for all NFTs and a function for minting new NFTs too:
// Read the NFTs from the contract
const { data: nfts, isLoading: loading } = useNFTs(contract?.nft);

// Function to mint a new NFT
const { mutate: mintNft, isLoading: minting } = useMintNFT(contract?.nft);
We also have access to hooks that allow us to view the user's wallet and check the network they're connected to:
const address = useAddress();
const connectWithMetamask = useMetamask();
const disconnectWallet = useDisconnect();

const isWrongNetwork = useNetworkMismatch();
const [, switchNetwork] = useNetwork();
Using a combination of these hooks, we can write a function that:
- Ensures the user has their wallet connected
- Ensures the wallet is connected to the right network
- Mints a new NFT into the collection
async function mintAnNft() {
  if (!address) {
    connectWithMetamask();
    return;
  }

  if (isWrongNetwork) {
    switchNetwork(ChainId.Goerli);
    return;
  }

  mintNft(
    {
      metadata: {
        name: "Yellow Star",
        image:
          "https://gateway.ipfscdn.io/ipfs/QmZbovNXznTHpYn2oqgCFQYP4ZCpKDquenv5rFCX8irseo/0.png",
      },
      to: address,
    },
    {
      onSuccess(data) {
        alert(`🚀 Successfully Minted NFT!`);
      },
    },
  );
}
Rendering the UI
On the UI, we show the connect wallet button when we detect no address from the useAddress hook, and show all of the NFTs next to a mint button for user's who have connected their wallet:
return (
  <div>
    {address ? (
      <>
        <a onClick={disconnectWallet}>Disconnect Wallet</a>
        <p>Your address: {address}</p>
      </>
    ) : (
      <a onClick={connectWithMetamask}>Connect Wallet</a>
    )}

    {!loading ? (
      <div>
        {nfts?.map((nft) => (
          <div key={nft.metadata.id.toString()}>
            <ThirdwebNftMedia metadata={nft.metadata} />
            <h3>{nft.metadata.name}</h3>
            <p>Owner: {nft.owner.slice(0, 6)}</p>
          </div>
        ))}
      </div>
    ) : (
      <p>Loading NFTs...</p>
    )}

    <button onClick={mintAnNft}>{minting ? "Minting..." : "Mint NFT"}</button>
  </div>
);
Conclusion
That's it! You can preview your application by running npm run dev in the terminal and then visiting http://localhost:3000 in your browser.
You've learned how to build an ERC-721A NFT Collection with custom on-chain functionality, using the SDK and the CLI!
For any questions or suggestions, join our discord at https://discord.gg/thirdweb.