Create Seamless Web3 UX with Smart Wallets & Session Keys


In this tutorial, we'll explore how to leverage smart wallets and session keys to create seamless web3 user experiences for your applications. By the end of this guide, you'll understand what smart wallets and session keys are, how they can enhance the user experience, and how to implement them in your web3 application using thirdweb.
You can check out the video version of this tutorial here:
What are Smart Wallets and Session Keys?
Smart Wallets
Smart wallets are smart contract wallets that utilize account abstraction. They can enable features like gasless transactions using a paymaster to cover gas fees for users. This removes the need for users to hold and spend gas when interacting with your application.
Session Keys
Session keys allow you to set permissions for a wallet or key to sign transactions on behalf of your smart wallet. Instead of the user having to confirm and sign each transaction, they can give permission to another wallet or key to do it for them. This is particularly useful for applications with frequent transactions, as it eliminates the need for users to manually confirm each one. It also unlocks the ability for us to be able to handle automated or timed transactions without the need of a user present to sign with their wallet.
Seamless Web3 UX with Smart Wallets and Engine
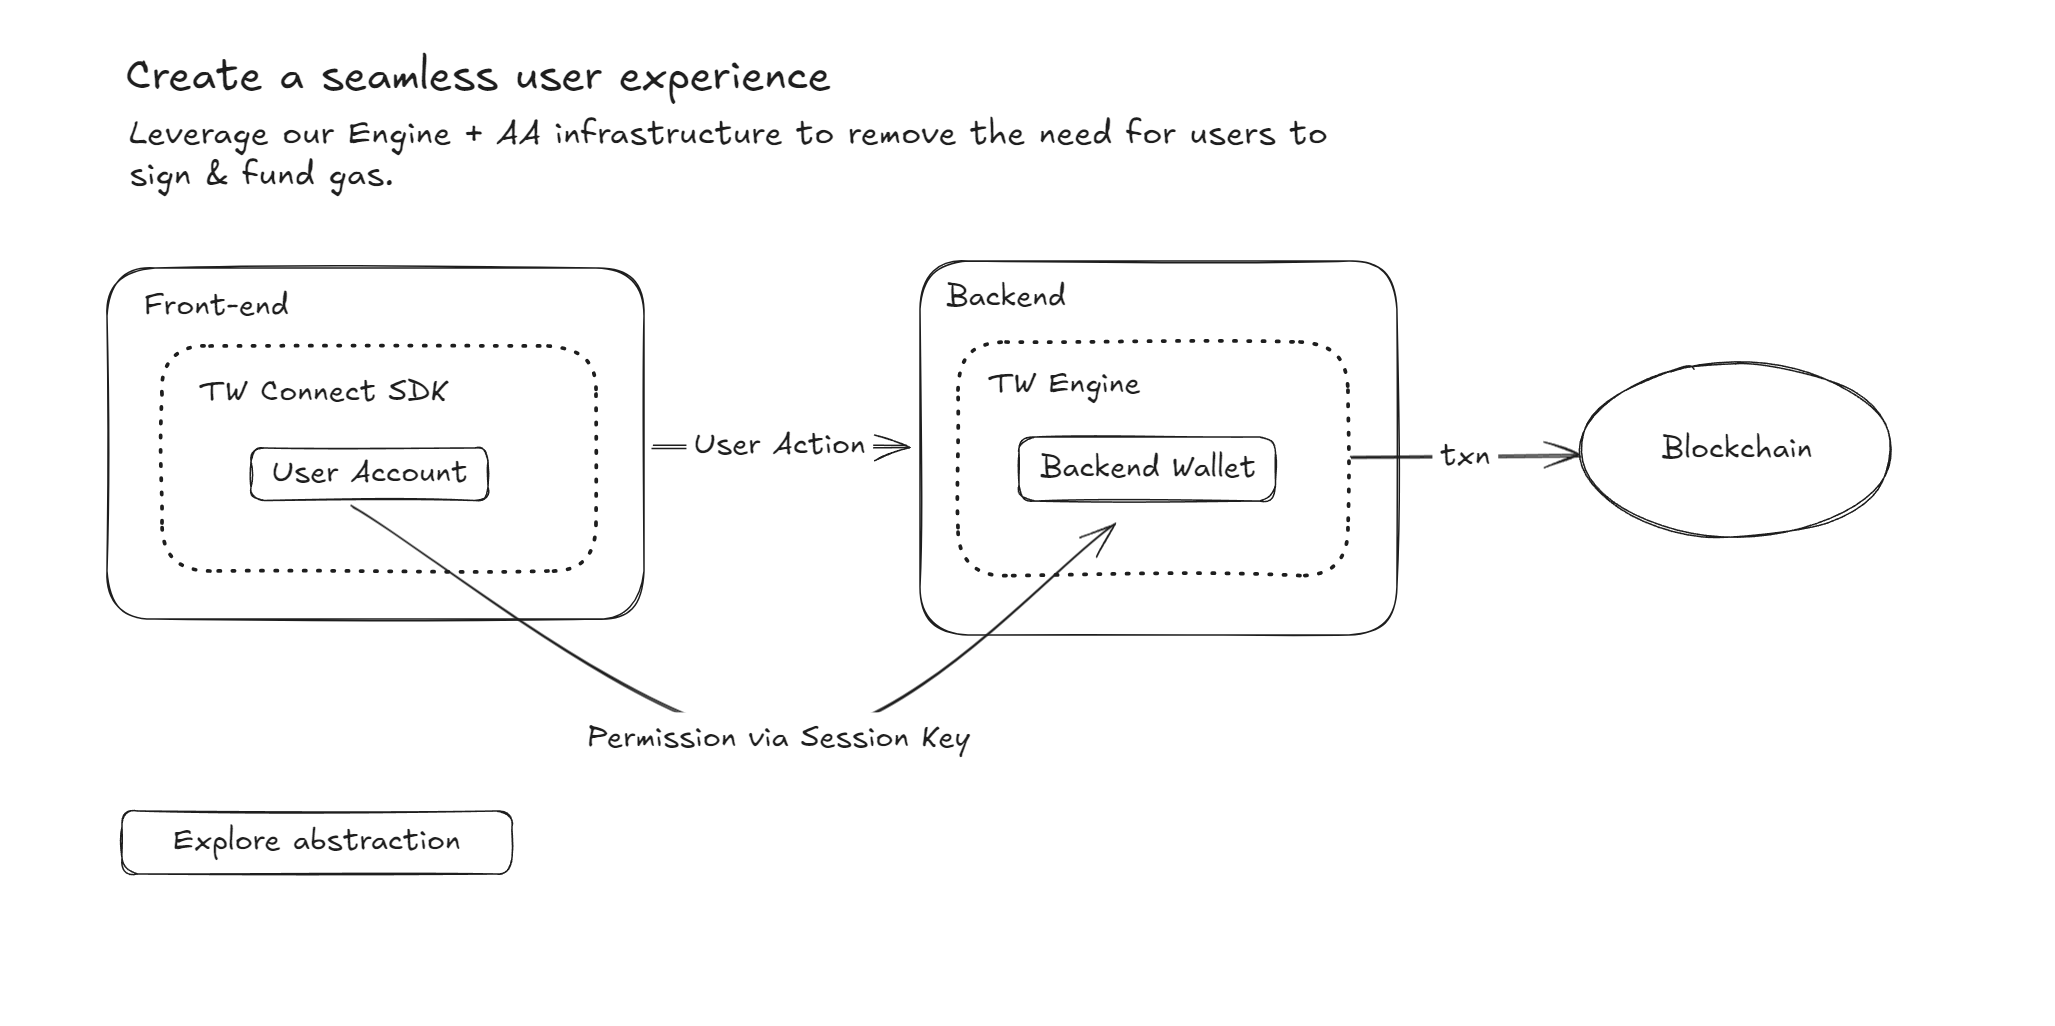
With thirdweb we can take advantage of Smart Wallets and session keys using Engine. In the diagram above we have our frontend where our user will connect to their Smart Wallet and our backend will be Engine along with our backend wallets. We can then set a session key permission for the backend wallet, that way when we make a call to Engine it can use that backend wallet to sign the transaction. This will result in our user not having to sign a transaction on the frontend.
Step 1: Setting Up the Project
To get started, let's set up a new Next.js project and install the necessary dependencies.
- Create a new project using one of starter templates:
npx thirdweb create app- Edit the file called
.envin the root of your project and add your thirdweb API key.
Now that we have our project setup with the thirdweb SDK lets add a connect wallet button to our app that will allow us to utilize account abstraction with Smart Wallets.
Step 2: Implementing Smart Wallets
To add a connect wallet button we can use a pre-built UI component from thirdweb called ConnectButton
- Add the
ConnecButtonUI component to your app and provide it yourclientfrom theclient.tsfile
import { ConnectWallet } from "@thirdweb-dev/react";
import { client } from "./client";

export default function Home() {
  return (
    <div>
      <ConnectWallet
        client={client}
      />
    </div>
  );
}- Next, we need to implement account abstraction and Smart Wallets. We need to specify the chain we are using and if we want to sponsor gas or not with a paymaster.
import { ConnectWallet } from "@thirdweb-dev/react";
import { client } from "./client";

export default function Home() {
  return (
    <div>
      <ConnectWallet
        client={client}
        accountAbstraction={{
          chain: <chain>,
          sponsorGas: true
        }}
      />
    </div>
  );
}
And with just a few lines of code we have a connect button where a user can connect a Smart Wallet to our app. Next, lets take a look on how we can add, view, and remove session keys
Step 3: Adding Session Keys
To add session keys and enable seamless transaction execution, we'll use an extension from the thirdweb SDK called addSessionKey and a UI component called TransactionButton
- Create a button to interact with our smart contract wallet with the
TransactionButtoncomponent
<TransactionButton>Add Session Key</TransactionButton>- Before we create a session key we'll need the smart contract of the Smart Wallet connected along with it's address. This way we can interact with our Smart Wallet and set the session keys.
const account = useActiveAccount();

const smartWallet = getContract({
  client: client,
  chain: <chain>,
  address: account?.address as string
});- Next, create the transaction using the addSessionKey extension. Here you can set the wallet that has permission to sign and the permissions of that wallet.
<TransactionButton
  transaction={() => addSessionKey({
    contract: smartWallet,
    account: account,
    sessionKeyAddress: <engine_backend_wallet_address>,
    permissions: {
      approvedTargets: "*",
      nativeTokenLimitPerTransaction: 0.1,
      permissionStartTimestamp: new Date(),
      permissionEndTimestamp: new Date(
        Date.now() + 1000 * 60 * 60 * 24 * 365,
      ),
    },
  })}
>Add Session Key</TransactionButton>Step 4: View Active Session Keys
We now have a session key that has permission to sign on our Smart Wallet's behalf. Next, we'll learn how to get all the active session keys on our Smart Wallet and view the permission they have.
- Get the active session keys for a Smart Wallet using the
getAllActiveSignersextension. We can use this with the useReadContract hook to get that data from the Smart Wallet (smart contract wallet)
const { data: sessionKeys } = useReadContract(
  getAllActiveSigners,
  {
    contract: smartWallet
  }
);
Step 5: Executing Transactions with Session Keys
Now that we have added a session key, let's see how to execute transactions seamlessly without requiring user confirmation. We will use thirdweb's Engine to execute a transaction and be able to sign that transaction with the backend wallet (session key wallet)
- Create a new folder called
apiand a another within calledclaimNFT. Finally, add aroute.tsfile in that folder - Create a request to Engine to execute a transaction. For this example we will claim an ERC-721 NFT.
const {
  BACKEND_WALLET_ADDRESS,
  ENGINE_URL,
  THIRDWEB_SECRET_KEY,
} = process.env;

export async function POST(request: Request) {
  const { address } = await request.json();

  if (
    !BACKEND_WALLET_ADDRESS ||
    !ENGINE_URL ||
    !THIRDWEB_SECRET_KEY
  ) { throw 'Server misconfigured.'; }

  const resp = await fetch(
    `${ENGINE_URL}/contract/{chainID}/{contractAddress}/erc721/claim-to`,
    {
      method: "POST",
      headers: {
        "Content-Type": "application/json",
        Authorization: `Bearer ${THIRDWEB_SECRET_KEY}`,
        "x-backend-wallet-address": BACKEND_WALLET_ADDRESS,
        "chain": {chainID},
        "contractAddress": {contractAddress},
        "x-account-address": address,
      },
      body: JSON.stringify({
        "receiver": address,
        "quantity": "1",
      }),
    }
  );

  if(resp.ok) {
    return NextResponse.json({ message: "Successful!", success: true });
  }
}
This will make a call to Engine to execute that transaction with the Smart Wallet provided but to sign the transaction with the backend wallet provided. The result is a seamless user experience where the user won't have to sign any transactions as long as the transaction fall within the permissions given to the session key.
Conclusion
In this tutorial, we explored how smart wallets and session keys can be used to create seamless web3 user experiences. By leveraging account abstraction and delegating transaction signing to session keys, we can eliminate the need for users to manually confirm each transaction, resulting in a smoother and more user-friendly experience.
thirdweb provides a powerful set of tools and extensions that make it easy to implement smart wallets and session keys in your web3 applications. With just a few lines of code, you can enable gasless transactions, add session keys, and execute transactions seamlessly.
I hope this tutorial has given you a good understanding of how to enhance your web3 applications with smart wallets and session keys. Feel free to explore more features and possibilities offered by thirdweb to create amazing user experiences in the web3 ecosystem.
Happy coding!