How to Create Token Bound Accounts (ERC-6551)

⚠️ Warning: This guide currently uses v4 of the Connect SDK. For v5 (latest) code snippets, please check out our documentation while this guide is being updated. ⚠️
ERC-6551 and ERC-4337 compatible Token Bound Accounts are easy to create using thirdweb — but how do you build them into your project, app, or game?
In this example app, built using both the thirdweb React SDK and Wallet SDK, we will
- Create a user flow where the user connects a personal wallet (or TBA key).
- View their owned NFTs from an NFT Drop contract with the ability to claim NFTs using this personal wallet.
- Create functionality to select an NFT, connect to the associated smart wallet for that NFT, and perform an action using that TBA smart wallet.
A common use case for TBAs is in gaming - creating a wallet associated with the ERC-721 that users claim at the start of the game and holding all of the in-game assets within this TBA. In such examples, wanting a gasless and wallet-less user experience is common. This is now possible using TBAs combined with either email (for a Web2 type flow) or local wallet (for complete wallet abstraction)!
ThirdwebProvider.The full source code for this guide can be found here!
 thirdweb-example
To learn how to build custom smart wallet contracts, like TBAs, visit this guide!
*The terms account, and wallet can be used interchangeably.
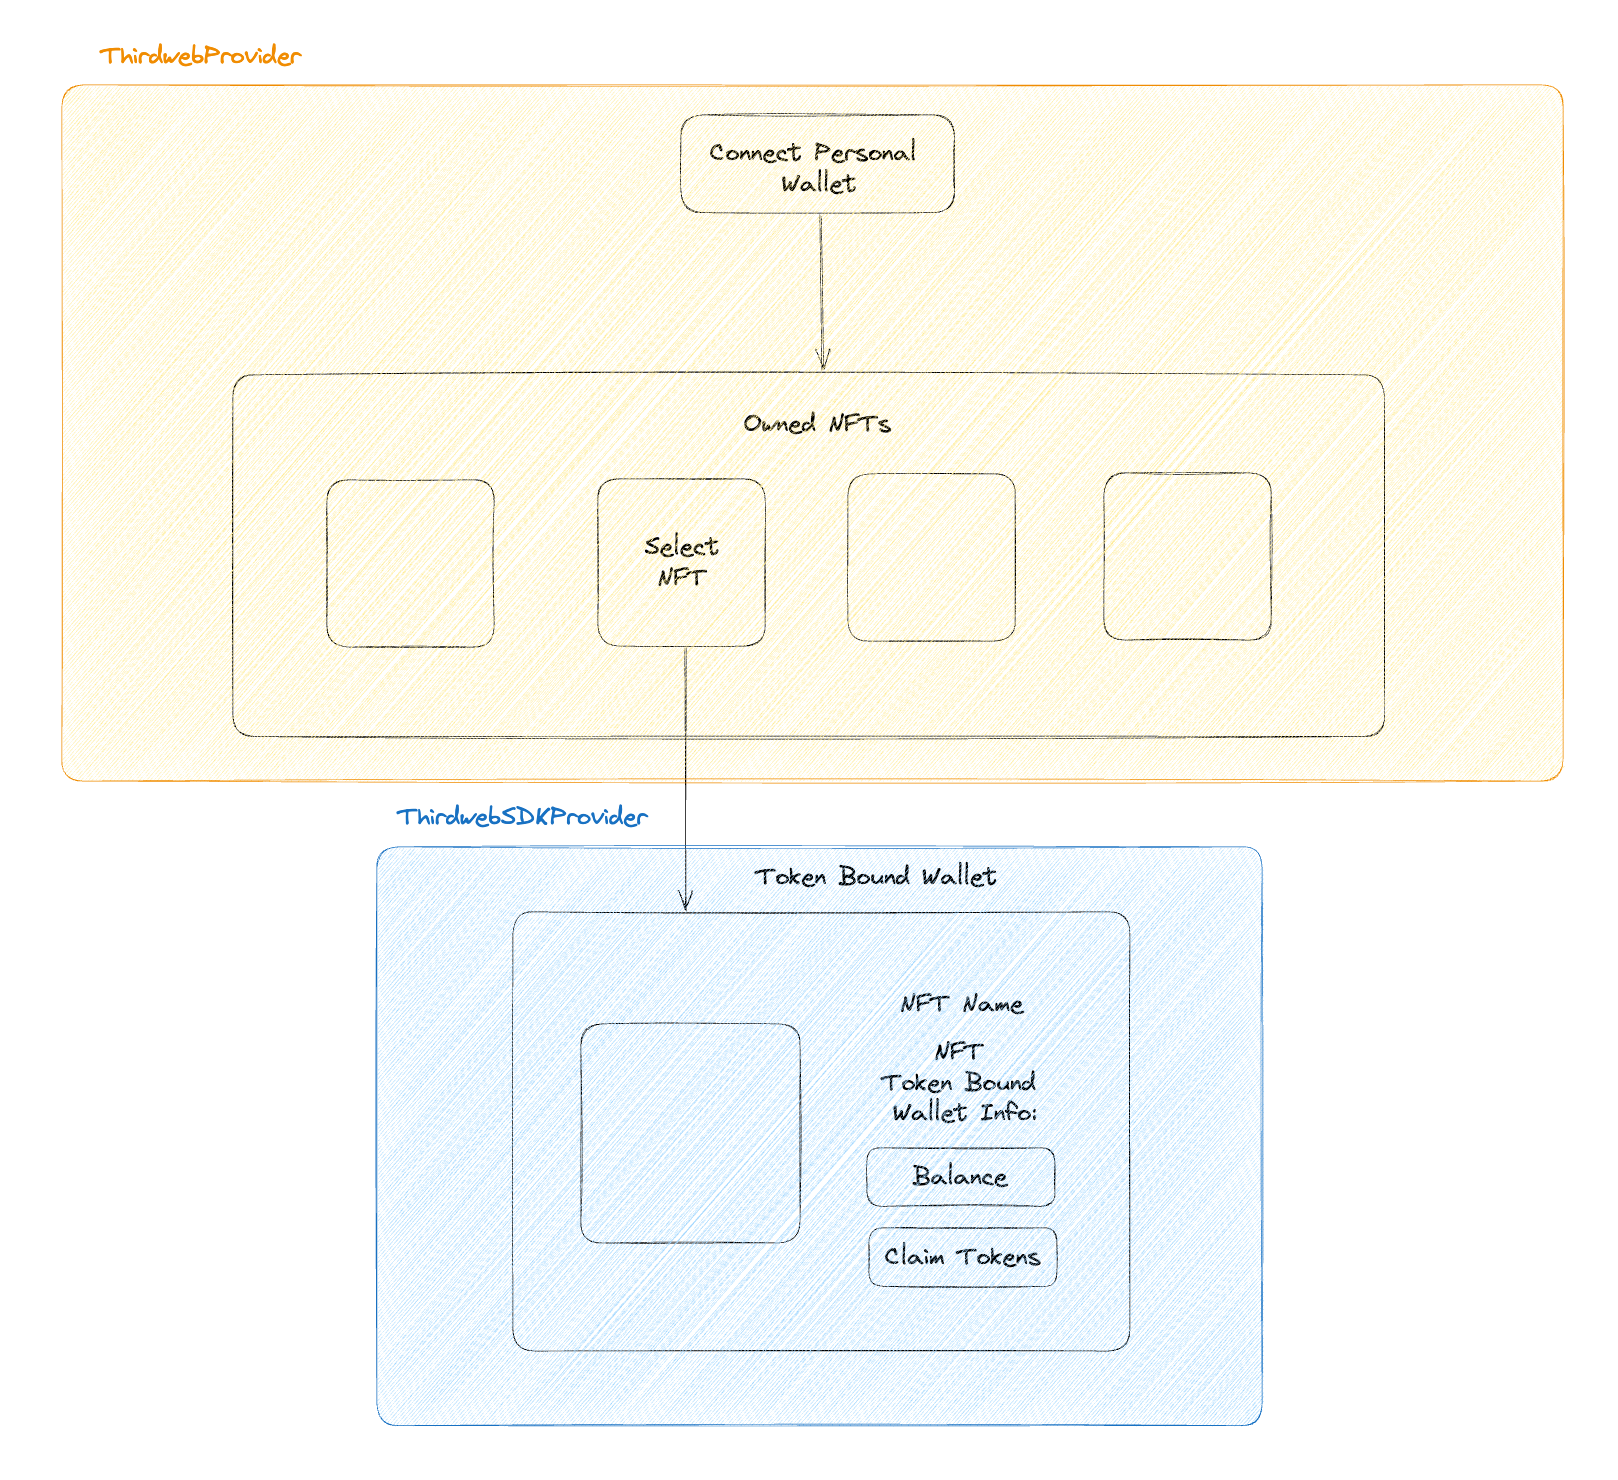
The App Structure
To create this demo app, we will wrap individual sections of the app in different providers so that we can access both the personal wallet and all TBAs as separate signers. When users connect their personal wallets, they can view and select each owned NFT in the drop contract. Upon selecting, they will be taken to a page showing the TBA for that token. This page will be wrapped in another provider so that the TBA signer can be used to perform actions such as claiming tokens and viewing the account's token balance.
Pre Requisites
For this guide, you will need the following:
- NPX installed to run the thirdweb CLI commands.
- An NFT Drop contract deployed.
- A Token Drop contract deployed.
- A thirdweb API key that you can obtain from the Dashboard.
- A TBA implementation contract* deployed on the network you are working on**.
For this example, we will use the official ERC-6551 registry factory contract to issue clones of our implementation contract. This ensures that marketplaces like OpenSea have one source with which to obtain the predetermined smart wallet addresses.
* If you would like to add custom logic to this contract, clone this GitHub repo, customize the code, and use the following command to deploy your contract:
npx thirdweb deployWe now require you to authenticate using your API secret key in order to use this command. Check out how to login here.
0x02101dfB77FDE026414827Fdc604ddAF224F0921For more details, visit the Tokenbound documentation.Set Up the App and Connect the Personal Wallet
To set up the app, run the following command from your terminal:
npx thirdweb create appWhen prompted, select EVM blockchain, Next.js as the framework, and TypeScript as the language. Give your project a name, and once the dependencies have been installed, open this newly created directory in your code editor.
First, create a folder called const and a file called constants.ts inside this to hold all of your constant variables. The activeChain variable can be any EVM chain and has to match the chain that your implementation and factory exist on.
Add the following variables to this file:
import { Mumbai, Chain } from '@thirdweb-dev/chains'

// your token bound factory address
export const factoryAddress: string = '<your-factory-address>'

// Your thirdweb api key - you can get one at https://thirdweb.com/dashboard/api-keys
export const TWApiKey: string =
    process.env.CLIENT_ID
export const activeChain: Chain = Mumbai

export const nftDropAddress: string = '<your-nft-drop-contract-address>'
export const tokenAddress: string = '<your-token-drop-contract-address>'
Open _app.tsx and modify the ThirdwebProvider with a supportedWallets object containing an array of wallets that users can connect to as their personal wallet. This wallet will contain all the NFTs we will create TBAs for.
import type { AppProps } from "next/app";
import {
  ThirdwebProvider,
  coinbaseWallet,
  metamaskWallet,
  walletConnect,
} from "@thirdweb-dev/react";
import "../styles/globals.css";
import { Navbar } from "../components/Navbar/Navbar";
import { TWApiKey, activeChain } from "../const/constants";

function MyApp({ Component, pageProps }: AppProps) {
  return (
    <ThirdwebProvider
      activeChain={activeChain}
      supportedWallets={[metamaskWallet(), coinbaseWallet(), walletConnect()]}
      clientId={TWApiKey}
    >
      <Navbar />
      <Component {...pageProps} />
    </ThirdwebProvider>
  );
}

export default MyApp;
Note that we also passed our thirdweb API Key so that we could use the thirdweb Smart Wallet infrastructure services such as the bundler and provider.
This array can be any wallet from the thirdweb Wallet SDK. These wallets will now be included as part of the ConnectWallet button - let's add this to our app.
Inside index.tsx, add the following code:
import type { NextPage } from "next";
import styles from "../styles/Main.module.css";
import {
ConnectWallet,
useAddress,
useContract,
useOwnedNFTs,
} from "@thirdweb-dev/react";
import { nftDropAddress } from "../const/constants";
/**
* The home page of the application.
*/
const Home: NextPage = () => {
return (
<div>
{address ? (
<div className={styles.container}>
<h1>Your NFTs</h1>
<p>
Browse the NFTs inside your personal wallet, select one to connect a
token bound smart wallet & view it's balance.
</p>
<div className={styles.btnContainer}>
{/*the ability to claim NFTs here*/}
</div>
</div>
) : (
<div className={styles.container}>
<h2>Connect a personal wallet to view your owned NFTs</h2>
<ConnectWallet />
</div>
)}
</div>
);
};
export default Home;
Users will now initially be prompted to connect a personal wallet when they enter the app.
We have left a space for giving users the ability to claim NFTs and view their owned NFTs if they have connected their wallet - let's do that now.
Claiming and Viewing Owned NFTs
To claim an NFT, we will use the Web3Button UI component. We also need to view the connected wallet's owned NFTs. To do this, we will use the useOwnedNfts hook. This hook takes a contract as an argument, so we will need to get a contract from our NFT Drop contract address using the useContract hook. Putting all of this together, our index.ts file should now look like this:
import type { NextPage } from "next";
import styles from "../styles/Main.module.css";
import NFTGrid from "../components/NFT/NFTGrid";
import {
ConnectWallet,
Web3Button,
useAddress,
useContract,
useOwnedNFTs,
useClaimNFT,
} from "@thirdweb-dev/react";
import { nftDropAddress } from "../const/constants";
/**
* The home page of the application.
*/
const Home: NextPage = () => {
const address = useAddress();
const { contract: nftDropContract } = useContract(nftDropAddress, "nft-drop");
const { data: nfts, isLoading } = useOwnedNFTs(nftDropContract, address);
return (
<div>
{address ? (
<div className={styles.container}>
<h1>Your NFTs</h1>
<p>
Browse the NFTs inside your personal wallet, select one to connect a
token bound smart wallet & view it's balance.
</p>
<NFTGrid
nfts={nfts}
isLoading={isLoading}
emptyText={
"Looks like you don't own any NFTs. Did you import your contract on the thirdweb dashboard? https://thirdweb.com/dashboard"
}
/>
<div className={styles.btnContainer}>
<Web3Button
contractAddress={nftDropAddress}
action={async (contract) => await contract?.erc721.claim(1)}
>
Claim NFT
</Web3Button>
</div>
</div>
) : (
<div className={styles.container}>
<h2>Connect a personal wallet to view your owned NFTs</h2>
<ConnectWallet />
</div>
)}
</div>
);
};
export default Home;
We have used a component called NFTGrid to display the owned NFTs - let's create this now.
Create a folder called components , and inside this, create another folder called NFT. In this folder, create two files: NFT.tsx and NFTGrid.tsx. Here, we are separating the individual NFT components from the grid itself. First, let's create the NFT component for a single NFT inside NFT.tsx:
import { ThirdwebNftMedia } from "@thirdweb-dev/react";
import { NFT } from "@thirdweb-dev/sdk";
import React from "react";
import styles from "./NFT.module.css";

type Props = {
  nft: NFT;
};

// Each NFT component shows the NFT image, name, and token ID.
export default function NFTComponent({ nft }: Props) {
  return (
    <>
      <ThirdwebNftMedia metadata={nft.metadata} className={styles.nftImage} />

      <p className={styles.nftTokenId}>Token ID #{nft.metadata.id}</p>
      <p className={styles.nftName}>{nft.metadata.name}</p>
    </>
  );
}
This component renders a ThirdwebNftMedia UI component to display the NFT.
Now let's create the grid:
import type { NFT as NFTType } from "@thirdweb-dev/sdk";
import Link from "next/link";
import React from "react";
import { nftDropAddress } from "../../const/constants";
import NFT from "./NFT";
import styles from "../../styles/Main.module.css";

type Props = {
  isLoading: boolean;
  nfts: NFTType[] | undefined;
  overrideOnclickBehavior?: (nft: NFTType) => void;
  emptyText?: string;
};

// NFTGrid component shows a grid of the connected wallet's owned NFTs.
export default function NFTGrid({ nfts, emptyText = "No owned NFTS." }: Props) {
  return (
    <div className={styles.nftGridContainer}>
      {nfts && nfts.length > 0 ? (
        nfts.map((nft) => (
          <Link
            href={`/token/${nftDropAddress}/${nft.metadata.id}`}
            key={nft.metadata.id}
            className={styles.nftContainer}
          >
            <NFT nft={nft} />
          </Link>
        ))
      ) : (
        <p>{emptyText}</p>
      )}
    </div>
  );
}
Here, we are mapping over each NFT to render an NFT component for each that has a clickable link. We now need to create a destination for this link.
Selecting an NFT to Connect to the Token-Bound Account
When someone clicks an individual NFT, they need to be taken to a page allowing them to connect the associated smart wallet and view and interact with it. Create a folder called token inside pages and inside this folder, create a folder called [contractAddress]. This is a dynamic route, so it will take the contractAddress and use it as part of the URL. Inside this folder, create a file called [tokenId].tsx, another dynamic route that will append the tokenId for the NFT that the user clicked on and append it to the URL.
Inside this file, add the following two functions:
getStaticProps: fetch the metadata for the NFT Drop contract and get the NFT datagetStaticPaths: statically pre-render pages since we are using dynamic routes
secretKey when instantiating the thirdweb SDK.export const getStaticProps: GetStaticProps = async (context) => {
const tokenId = context.params?.tokenId as string;
const sdk = new ThirdwebSDK(activeChain, {
secretKey: process.env.SECRET_KEY,
});
const contract = await sdk.getContract(nftDropAddress);
const nft = await contract.erc721.get(tokenId);
let contractMetadata;
try {
contractMetadata = await contract.metadata.get();
} catch (e) {}
return {
props: {
nft,
contractMetadata: contractMetadata || null,
},
revalidate: 1, // https://nextjs.org/docs/basic-features/data-fetching/incremental-static-regeneration
};
};
export const getStaticPaths: GetStaticPaths = async () => {
const sdk = new ThirdwebSDK(activeChain, {
secretKey: process.env.SECRET_KEY,
});
const contract = await sdk.getContract(nftDropAddress);
const nfts = await contract.erc721.getAll();
const paths = nfts.map((nft) => {
return {
params: {
contractAddress: nftDropAddress,
tokenId: nft.metadata.id,
},
};
});
return {
paths,
fallback: "blocking", // can also be true or 'blocking'
};
};Now let's create a useEffect so that on page render, a new smart wallet is created for that token. We will create a function createSmartWallet that will check if the smart wallet for this token already exists, the NFT itself exists, and the wallet is connected. In this function, we will call another function, newSmartWallet, which we will create in a moment, to create a smart wallet:
// create a smart wallet for the NFT
  useEffect(() => {
    const createSmartWallet = async (nft: NFT) => {
      if (nft && smartWalletAddress == null && address && wallet) {
        const smartWallet = newSmartWallet(nft);
        console.log("personal wallet", address);
        await smartWallet.connect({
          personalWallet: wallet,
        });
        setSigner(await smartWallet.getSigner());
        console.log("signer", signer);
        setSmartWalletAddress(await smartWallet.getAddress());
        console.log("smart wallet address", await smartWallet.getAddress());
        return smartWallet;
      } else {
        console.log("smart wallet not created");
      }
    };
    createSmartWallet(nft);
  }, [nft, smartWalletAddress, address, wallet]);
We need a useState to update the signer using setSigner, which we will use when performing actions with our TBA by passing it to the SmartWalletConnected component, and another useState to keep track of the smart wallet address which we set using setSmartWalletAddress. Putting this together, your [tokenId].tsx file should look like this:
import {
  MediaRenderer,
  ThirdwebNftMedia,
  useAddress,
  useWallet,
} from "@thirdweb-dev/react";
import React, { useEffect, useState } from "react";
import { GetStaticProps, GetStaticPaths } from "next";
import { NFT, ThirdwebSDK } from "@thirdweb-dev/sdk";
import { activeChain, nftDropAddress } from "../../../const/constants";
import styles from "../../../styles/Token.module.css";
import { Signer } from "ethers";
import newSmartWallet from "../../../components/SmartWallet/SmartWallet";
import SmartWalletConnected from "../../../components/SmartWallet/smartConnected";

type Props = {
  nft: NFT;
  contractMetadata: any;
};

export default function TokenPage({ nft, contractMetadata }: Props) {
  const [smartWalletAddress, setSmartWalletAddress] = useState<string | null>(
    null
  );
  const [signer, setSigner] = useState<Signer>();

  // get the currently connected wallet
  const address = useAddress();
  const wallet = useWallet();

  // create a smart wallet for the NFT
  useEffect(() => {
    const createSmartWallet = async (nft: NFT) => {
      if (nft && smartWalletAddress == null && address && wallet) {
        const smartWallet = newSmartWallet(nft);
        console.log("personal wallet", address);
        await smartWallet.connect({
          personalWallet: wallet,
        });
        setSigner(await smartWallet.getSigner());
        console.log("signer", signer);
        setSmartWalletAddress(await smartWallet.getAddress());
        console.log("smart wallet address", await smartWallet.getAddress());
        return smartWallet;
      } else {
        console.log("smart wallet not created");
      }
    };
    createSmartWallet(nft);
  }, [nft, smartWalletAddress, address, wallet]);

  return (
    <>
      <div>
        <div className={styles.container}>
          <div className={styles.metadataContainer}>
            <ThirdwebNftMedia
              metadata={nft.metadata}
              className={styles.image}
            />
          </div>

          <div className={styles.listingContainer}>
            {contractMetadata && (
              <div className={styles.contractMetadataContainer}>
                <MediaRenderer
                  src={contractMetadata.image}
                  className={styles.collectionImage}
                />
                <p className={styles.collectionName}>{contractMetadata.name}</p>
              </div>
            )}
            <h1 className={styles.title}>{nft.metadata.name}</h1>
            <p className={styles.collectionName}>Token ID #{nft.metadata.id}</p>
            {smartWalletAddress ? (
              <SmartWalletConnected signer={signer} />
            ) : (
              <div className={styles.btnContainer}>
                <p>Loading...</p>
              </div>
            )}
          </div>
        </div>
      </div>
    </>
  );
}

export const getStaticProps: GetStaticProps = async (context) => {
  const tokenId = context.params?.tokenId as string;

  const sdk = new ThirdwebSDK(activeChain);

  const contract = await sdk.getContract(nftDropAddress);

  const nft = await contract.erc721.get(tokenId);

  let contractMetadata;

  try {
    contractMetadata = await contract.metadata.get();
  } catch (e) {}

  return {
    props: {
      nft,
      contractMetadata: contractMetadata || null,
    },
    revalidate: 1, // https://nextjs.org/docs/basic-features/data-fetching/incremental-static-regeneration
  };
};

export const getStaticPaths: GetStaticPaths = async () => {
  const sdk = new ThirdwebSDK(activeChain);

  const contract = await sdk.getContract(nftDropAddress);

  const nfts = await contract.erc721.getAll();

  const paths = nfts.map((nft) => {
    return {
      params: {
        contractAddress: nftDropAddress,
        tokenId: nft.metadata.id,
      },
    };
  });

  return {
    paths,
    fallback: "blocking", // can also be true or 'blocking'
  };
};
There are two missing pieces:
- creating a new TBA with the
newSmartWalletfunction SmartWalletConnected- the component to display the wallet information, including claiming tokens and displaying the wallet's balance
Creating a TBA with the ERC-6551 Registry
Let's create the newSmartWallet function. To create a TBA smart wallet by creating a clone of our implementation with the ERC-6551 registry factory contract, we are going to create a file inside components called SmartWallet and inside this, create a file called SmartWallet.ts. This file will contain the logic for creating our smart wallet. To set up a smart wallet using the ERC-6551 registry add the following:
import { ethers } from "ethers";
import { SmartWallet } from "@thirdweb-dev/wallets";
import {
  TWApiKey,
  factoryAddress,
  activeChain,
  nftDropAddress,
  implementation,
} from "../../const/constants";
import { SmartContract, NFT } from "@thirdweb-dev/sdk";
import { WalletOptions } from "@thirdweb-dev/wallets";
import type { SmartWalletConfig } from "@thirdweb-dev/wallets";
import type { BaseContract } from "ethers";

export default function newSmartWallet(token: NFT) {
  //Smart Wallet config object
  const config: WalletOptions<SmartWalletConfig> = {
    chain: activeChain, // the chain where your smart wallet will be or is deployed
    factoryAddress: factoryAddress, // your own deployed account factory address
    thirdwebApiKey: TWApiKey, // obtained from the thirdweb dashboard
    gasless: true, // enable or disable gasless transactions
    factoryInfo: {
      createAccount: async (
        factory: SmartContract<BaseContract>,
        owner: string
      ) => {
        const account = factory.prepare("createAccount", [
          implementation,
          activeChain.chainId,
          nftDropAddress,
          token.metadata.id,
          0,
          ethers.utils.toUtf8Bytes("")
        ]);
        console.log("here", account);
        return account;
      }, // the factory method to call to create a new account
      getAccountAddress: async (
        factory: SmartContract<BaseContract>,
        owner: string
      ) => {
        return factory.call("account", [
          implementation,
          activeChain.chainId,
          nftDropAddress,
          token.metadata.id,
          0
        ]);
      }, // the factory method to call to get the account address
    },
  };
  return new SmartWallet(config);
}
The NFT token information is passed to the getAddress and createAccount functions used for determining the deterministic wallet address and creating a wallet for that NFT, respectively. The function newSmartWallet contains the configuration for creating a new smart wallet for this NFT using the data.
Claiming Tokens with the TBA and Viewing Balance
To render the information for the smart wallet and connect this smart wallet to our app, create a file called smartWalletConnected.tsx inside the SmartWallet folder. This file will contain the logic and components for when a smart wallet is created and connected.
To connect the TBA to our app, create a component called SmartWalletConnected which will take a signer as a prop - the signer that we updated inside [token].tsx. This signer will be passed to a new ThirdwebSDKProvider which will wrap the ClaimTokens component so that the new TBA signer can perform operations in this part of the app.
interface ConnectedProps {
  signer: Signer | undefined;
}

// ThirdwebSDKProvider is a wrapper component that provides the smart wallet signer and active chain to the Thirdweb SDK.
const SmartWalletConnected: React.FC<ConnectedProps> = ({ signer }) => {
  return (
    <ThirdwebSDKProvider
    	signer={signer}
        activeChain={activeChain}
        clientID={TWApiKey}
    >
      <ClaimTokens />
    </ThirdwebSDKProvider>
  );
};
Finally, let's create the ClaimTokens component to view the TBA wallet's balance and claim tokens. To do this, we will use the useAddress hook to get the smart wallet address and the useBalance hook to get the balance of the TBA. We will use another Web3Button to claim tokens when the button is clicked using the action prop. The file should contain the following:
import {
  ThirdwebSDKProvider,
  useAddress,
  useBalance,
  Web3Button,
} from "@thirdweb-dev/react";
import React from "react";
import { activeChain, tokenAddress } from "../../const/constants";
import { Signer } from "ethers";
import style from "../../styles/Token.module.css";
interface ConnectedProps {
  signer: Signer | undefined;
}

// ThirdwebSDKProvider is a wrapper component that provides the smart wallet signer and active chain to the Thirdweb SDK.
const SmartWalletConnected: React.FC<ConnectedProps> = ({ signer }) => {
  return (
    <ThirdwebSDKProvider
    	signer={signer}
        activeChain={activeChain}
        clientId={process.env.CLIENT_ID}
        >
      <ClaimTokens />
    </ThirdwebSDKProvider>
  );
};

// This is the main component that shows the user's token bound smart wallet.
const ClaimTokens = () => {
  const address = useAddress();
  const { data: tokenBalance, isLoading: loadingBalance } =
    useBalance(tokenAddress);

  return (
    <div className={style.walletContainer}>
      <h2>This is Your Token Bound Smart Wallet!</h2>
      {address ? (
        loadingBalance ? (
          <h2>Loading Balance...</h2>
        ) : (
          <div className={style.pricingContainer}>
            <h2>Balance: {tokenBalance?.displayValue}</h2>
            <Web3Button
              contractAddress={tokenAddress}
              action={async (contract) => await contract.erc20.claim(10)}
            >
              Claim 10 Tokens
            </Web3Button>
          </div>
        )
      ) : null}
    </div>
  );
};

export default SmartWalletConnected;
And that's it! Add a few CSS styles, onSuccess and onLoading components, details of which can be found in the full source code, and you have a fully functioning app that uses TBAs!
Additionally, you could abstract away the wallet aspect completely by using a local or email wallet as the smart wallet's personal wallet to claim tokens and sign messages. You could also make this personal wallet gasless by passing the gasless option to the ThirdwebProvider in _app.tsx.
To view the full source code, including styling and small UX improvements, visit the GitHub repo.
Wrapping Up
That's it! 🥳 Great work.
You've set up a front end to create token-bound accounts for your users!
Got questions? Jump into our Discord to speak with our team directly!