Transfer USDC Cross-Chain with Circle CCTP & thirdweb
In this guide, we will use Circle's Cross-Chain Transfer Protocol (CCTP) to transfer USDC cross-chain.


⚠️ Warning: This guide currently uses v4 of the Connect SDK. For v5 (latest) code snippets, please check out our documentation while this guide is being updated. ⚠️
In this guide, we will use Circle's Cross-Chain Transfer Protocol (CCTP) to transfer USDC cross-chain.
Using thirdweb, we will use CCTP in a script to provide a capital-efficient way to transfer USDC across chains — currently available on:
- Ethereum
- Avalanche
- Arbitrum
- OP Mainnet
By combining thirdweb and CCTP, we can create apps with a streamlined user and developer experience.
View the source code: GitHub repository:
 thirdweb-example
What is CCTP?
CCTP is a permissionless, on-chain utility created by Circle that enables you to transfer USDC tokens cross-chain with a simple user experience. CCTP works by burning native USDC on a source chain and minting native USDC of the same amount on a destination chain.
Traditional bridges use a "lock-and-mint" mechanism in which tokens are locked in the bridge on the source chain, and a synthetic or bridged version of the token is minted on the destination chain. This is a potential security risk with a poor user experience and fragmented liquidity.
Smart contracts define CCTP. Therefore, extra logic can be added beyond burning and minting USDC without this being exposed to an end user. For example, upon minting tokens, the tokens could be staked automatically in a protocol in one seamless user transaction. This way, functionality can be bundled to provide a customizable, modular developer experience with a simple user experience.
To learn more about how CCTP works, view the developer documentation.
How does it work?
1. USDC is burned on the source chain: Using an app, a user initiates a transfer of USDC from one blockchain to another and specifies the recipient wallet address on the destination chain. The app facilitates a burn of the specified amount of USDC on the source chain.
2. A signed attestation is fetched from Circle: Circle observes and attests to the burn event on the source chain. The app requests the attestation from Circle, which provides authorization to mint the specified amount of USDC on the destination chain.
3. USDC is minted on the destination chain: The app uses the attestation to trigger the minting of USDC. The specified amount of USDC is minted on the destination chain and sent to the recipient's wallet address.
Transferring USDC using CCTP
In this guide, we will go through how to use the Typescript SDK to build a script that transfers USDC between chains.
We will transfer USDC from Ethereum Goerli to Avalanche Fuji Testnet for this guide, but the same adapted script works for all supported chains: Ethereum, Avalanche, Arbitrum, OP Mainnet.
Getting Started
To build our script, we will use the thirdweb CLI to create a Node.js script:
npx thirdweb create appChoose the following options when prompted:
- Name:
cctp-script - Blockchain:
EVM - Framework:
Node.js - Language:
TypeScript
This will create a directory called cctp-script with a Node.js project set up and all of the required dependencies installed.
Add the Constants
Inside index.ts, we first need to add all of our constants:
amountToTransfer: the amount of USDC we are going to send cross-chain.privateKey: the private key used to execute the transactions needed to perform the transfer.fromChain: the source chain we will be transferring USDC from.toChain: the destination chain we will be transferring USDC to.AVAX_DESTINATION_DOMAIN: This is the domain of the destination chain which can be found in the Circle documentation.
For this script, we will use Goerli as the source chain and Avalanche Fuji testnet as the destination chain.
// Private key of the account that will be used to sign transactions
const privateKey = process.env.PRIVATE_KEY as string;
// Amount to transfer in USDC
const amountToTransfer = 0.1;
// Chain to transfer from and to
const fromChain = "goerli";
const toChain = "avalanche-fuji";

const AVAX_DESTINATION_DOMAIN = 1;
We will also need the following contract addresses:
ETH_TOKEN_MESSENGER_CONTRACT_ADDRESS: The token message contract address on the source chain.USDC_ETH_CONTRACT_ADDRESS: The USDC contract on the source chain.AVAX_MESSAGE_TRANSMITTER_CONTRACT_ADDRESS: The message transmitter contract on the destination chain.
const ETH_TOKEN_MESSENGER_CONTRACT_ADDRESS: string =
    "0xd0c3da58f55358142b8d3e06c1c30c5c6114efe8";
  const USDC_ETH_CONTRACT_ADDRESS: string =
    "0x07865c6e87b9f70255377e024ace6630c1eaa37f";
  const AVAX_MESSAGE_TRANSMITTER_CONTRACT_ADDRESS: string =
    "0xa9fb1b3009dcb79e2fe346c16a604b8fa8ae0a79";
To find the relevant contract addresses if you are working on different source and destination chains, visit the Circle documentation.
Instantiate the thirdweb SDK
Now, let's create an instance of the thirdweb SDK on both the source and destination chains using the fromPrivateKey method:
import { config } from "dotenv";
import { ThirdwebSDK, SmartContract } from "@thirdweb-dev/sdk";

const main = async () => {
  const sdkETH = ThirdwebSDK.fromPrivateKey(privateKey, fromChain, {
    secretKey: process.env.SECRET_KEY as string,
  });
  const sdkAVAX = ThirdwebSDK.fromPrivateKey(privateKey, toChain, {
    secretKey: process.env.SECRET_KEY as string,
  });
 }
Equally, you could also use a wallet instance to initialize the SDK using the fromWallet method.
Now, let's create an instance of each of the required contracts so that we can use them in our script using the getContract method:
import { SmartContract } from "@thirdweb-dev/sdk";

// initialize contracts
  const ethTokenMessengerContract: SmartContract = await sdkETH.getContract(
    ETH_TOKEN_MESSENGER_CONTRACT_ADDRESS
  );
  const usdcEthContract: SmartContract = await sdkETH.getContract(
    USDC_ETH_CONTRACT_ADDRESS
  );
  const avaxMessageTransmitterContract: SmartContract =
    await sdkAVAX.getContract(AVAX_MESSAGE_TRANSMITTER_CONTRACT_ADDRESS);
Finally, let's find the address of our wallet on the destination chain using the getAddress method on the destination chain's SDK instance:
const destinationAddress = await sdkAVAX.wallet.getAddress();We will need to use this address later since, in this example, the wallet we are executing the script with is the one we want to transfer funds to.
Approve Messenger Contract to Withdraw
First, we need to initiate a transfer of USDC from the source chain to the destination chain. We need to specify the recipient wallet address on the destination chain and approve the Ethereum Token Messenger contract to withdraw USDC from the provided ETH address. We will use the call method on the Ethereum USDC contract instance and call the "approve" function on the contract. This function takes the token messenger contract address (on the source chain) and the amount to approve (in units of 1*10**6 USDC) as arguments:
// Amount that will be transferred
  const amount = amountToTransfer * 10 ** 6;

  // STEP 1: Approve messenger contract to withdraw from our active eth address
  console.log(`Approving USDC transfer on ${fromChain}...`);
  const approveMessengerWithdraw = await usdcEthContract.call("approve", [
    ETH_TOKEN_MESSENGER_CONTRACT_ADDRESS,
    amount,
  ]);
  console.log(
    "Approved - txHash:",
    approveMessengerWithdraw.receipt.transactionHash
  );
First, we calculated the amount from USDC which is the amountToTransfer (1 unit of USDC) times 10 to the power of 6.
Burn the USDC on the Source Chain
Now, we need to facilitate a burn of the USDC on the source chain. We need to call the "depositForBurn" function on the source chain Token Messenger contract. This function expects the following arguments:
- The
amountof USDC to transfer (again in1*10**6USDC). - The destination chain domain that we used previously.
- The destination receiving address in
Bytes32 - The USDC contract address on the source chain
So, to call this function, we first need to retrieve the address that the USDC needs to receive on the destination chain. Since we are using the same address to execute this script as the one we want to transfer funds for, we can use the destination address the SDK is instantiated with that we found earlier. Then, we need to use ethers to pad the address which is a Bytes20 to a Bytes32 so that it is the correct type that the "depositForBurn" function expects using the encode method:
import { ethers } from "ethers";

// AVAX destination address
  const mintRecipient = destinationAddress;
  const destinationAddressInBytes32 = ethers.utils.defaultAbiCoder.encode(
    ["address"],
    [mintRecipient]
  );
Now, let's call the function using the call method again:
// STEP 2: Burn USDC
  console.log(`Depositing USDC to Token Messenger contract on ${fromChain}...`);
  const burnUSDC = await ethTokenMessengerContract.call("depositForBurn", [
    amount,
    AVAX_DESTINATION_DOMAIN,
    destinationAddressInBytes32,
    USDC_ETH_CONTRACT_ADDRESS,
  ]);
  console.log("Deposited - txHash:", burnUSDC.receipt.transactionHash);
Retrieve Message Bytes from the Logs
Now, we need to get the messageBytes emitted by the MessageSent event from the "depositForBurn" transaction logs and hash the retrieved messageBytes using the keccak256 hashing algorithm. This means that we can get Circle to check that we have in fact burned USDC and provide authorization to mint USDC on the destination chain.
// STEP 3: Retrieve message bytes from logs
  const transactionReceipt = burnUSDC.receipt;
  const eventTopic = ethers.utils.keccak256(
    ethers.utils.toUtf8Bytes("MessageSent(bytes)")
  );
  const log = transactionReceipt.logs.find(
    (l: any) => l.topics[0] === eventTopic
  );
  const messageBytes = ethers.utils.defaultAbiCoder.decode(
    ["bytes"],
    log.data
  )[0];
  const messageHash = ethers.utils.keccak256(messageBytes);
Fetch the Attestation Signature
Let's now request the attestation from Circle to provide authorization to mint the specified amount of USDC on the destination chain. To do this, we call an API to acquire the signature using the messageBytes from the previous step.
import fetch from "cross-fetch";

// STEP 4: Fetch attestation signature
  console.log("Fetching attestation signature...");
  let attestationResponse: AttestationResponse = { status: "pending" };
  while (attestationResponse.status !== "complete") {
    const response = await fetch(
      `https://iris-api-sandbox.circle.com/attestations/${messageHash}`
    );
    attestationResponse = await response.json();
    console.log("Attestation Status:", attestationResponse.status || "sent");
    await new Promise((r) => setTimeout(r, 2000));
  }

const attestationSignature = attestationResponse.attestation;
  console.log(`Obtained Signature: ${attestationSignature}`);

interface AttestationResponse {
  status: string;
  attestation?: string;
}
Receive Funds on Destination Chain
Finally, let's enable USDC to be minted on the destination chain. To do this, we need to call the "recieveMessage" function on the destination Message Transmitter contract to receive the required amount of USDC at the destination address.
// STEP 5: Using the message bytes and signature recieve the funds on destination chain and address
  console.log(`Receiving funds on ${toChain}...`);
  const receiveTx = await avaxMessageTransmitterContract.call(
    "receiveMessage",
    [messageBytes, attestationSignature]
  );
  console.log(
    "Received funds successfully - txHash:",
    receiveTx.receipt.transactionHash
  );
};
And that's it! You have now created a script that allows you to specify a from and to chain and transfer USDC cross-chain using CCTP! To see the full script, view the source code on GitHub.
Run the script using the following command:
yarn devYou should see the following output:
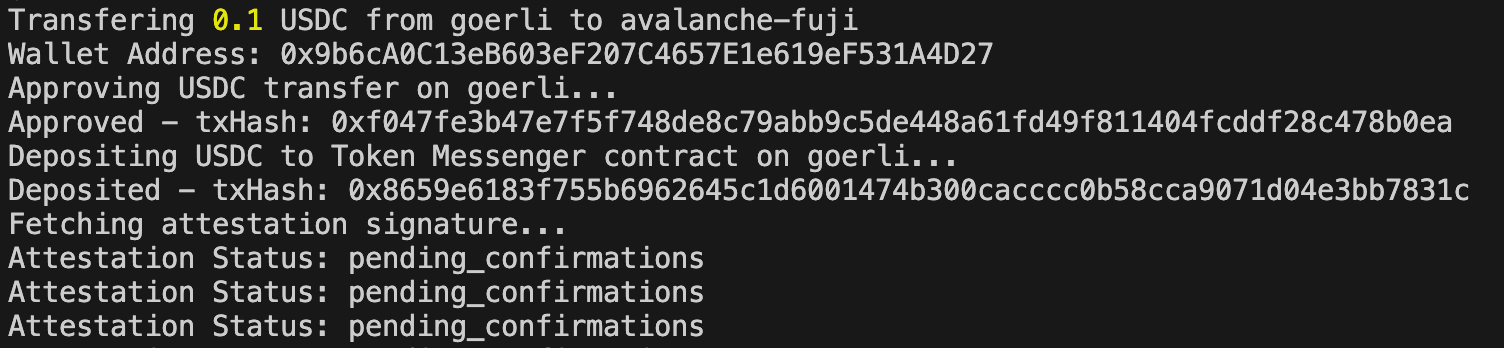

Amazing! We have successfully transferred USDC from Goerli to Avalanche Fuji testnet using CCTP!
As mentioned before, this works for Arbitrum & OP Mainnet as well — and you can add them to this flow for a multi-chain bridge in your app.
Wrapping Up
We covered a lot of ground in this guide. To recap, we used CCTP to transfer USDC cross-chain using the following steps:
- Burned USDC on the source chain.
- Fetched a signed attestation from Circle to confirm that the burn was successful.
- Using the signed attestation, we triggered the USDC to be minted on the destination chain.
To see a demo of building CCTP into an app, view this GitHub repo:
thirdweb-exampleIf you have any questions, please reach out on Discord to speak directly to someone from the thirdweb team. Make sure to share your feedback and requests here as well.