Build an NFT Subscription using Unlock

⚠️ Warning: This guide currently uses v4 of the Connect SDK. For v5 (latest) code snippets, please check out our documentation while this guide is being updated. ⚠️
In this guide, we will deploy an instance of the Lock contract created by Unlock Protocol and then integrate this contract into a simple app! This contract allows you to create time-bound NFTs for recurring subscriptions, tickets, token gating, and certifications with an expiration.
What is Unlock Protocol?
Unlock is an open-source protocol for memberships as time-bound NFTs built on Ethereum. It streamlines membership benefits for online communities and helps creators monetize content without relying on an intermediary. Unlock makes it easy to build subscriptions and memberships into your projects.
What is the Lock contract?
The Lock contract is a membership contract created by Unlock and deployed using Release, that you can deploy an instance of yourself. It creates time-bound NFTs that can be used for memberships, subscriptions, tickets, or certifications.
Deploying the Lock Contract
To get started, you can view and deploy gas-optimized and audited prebuilt contracts and protocols on the Explore page.
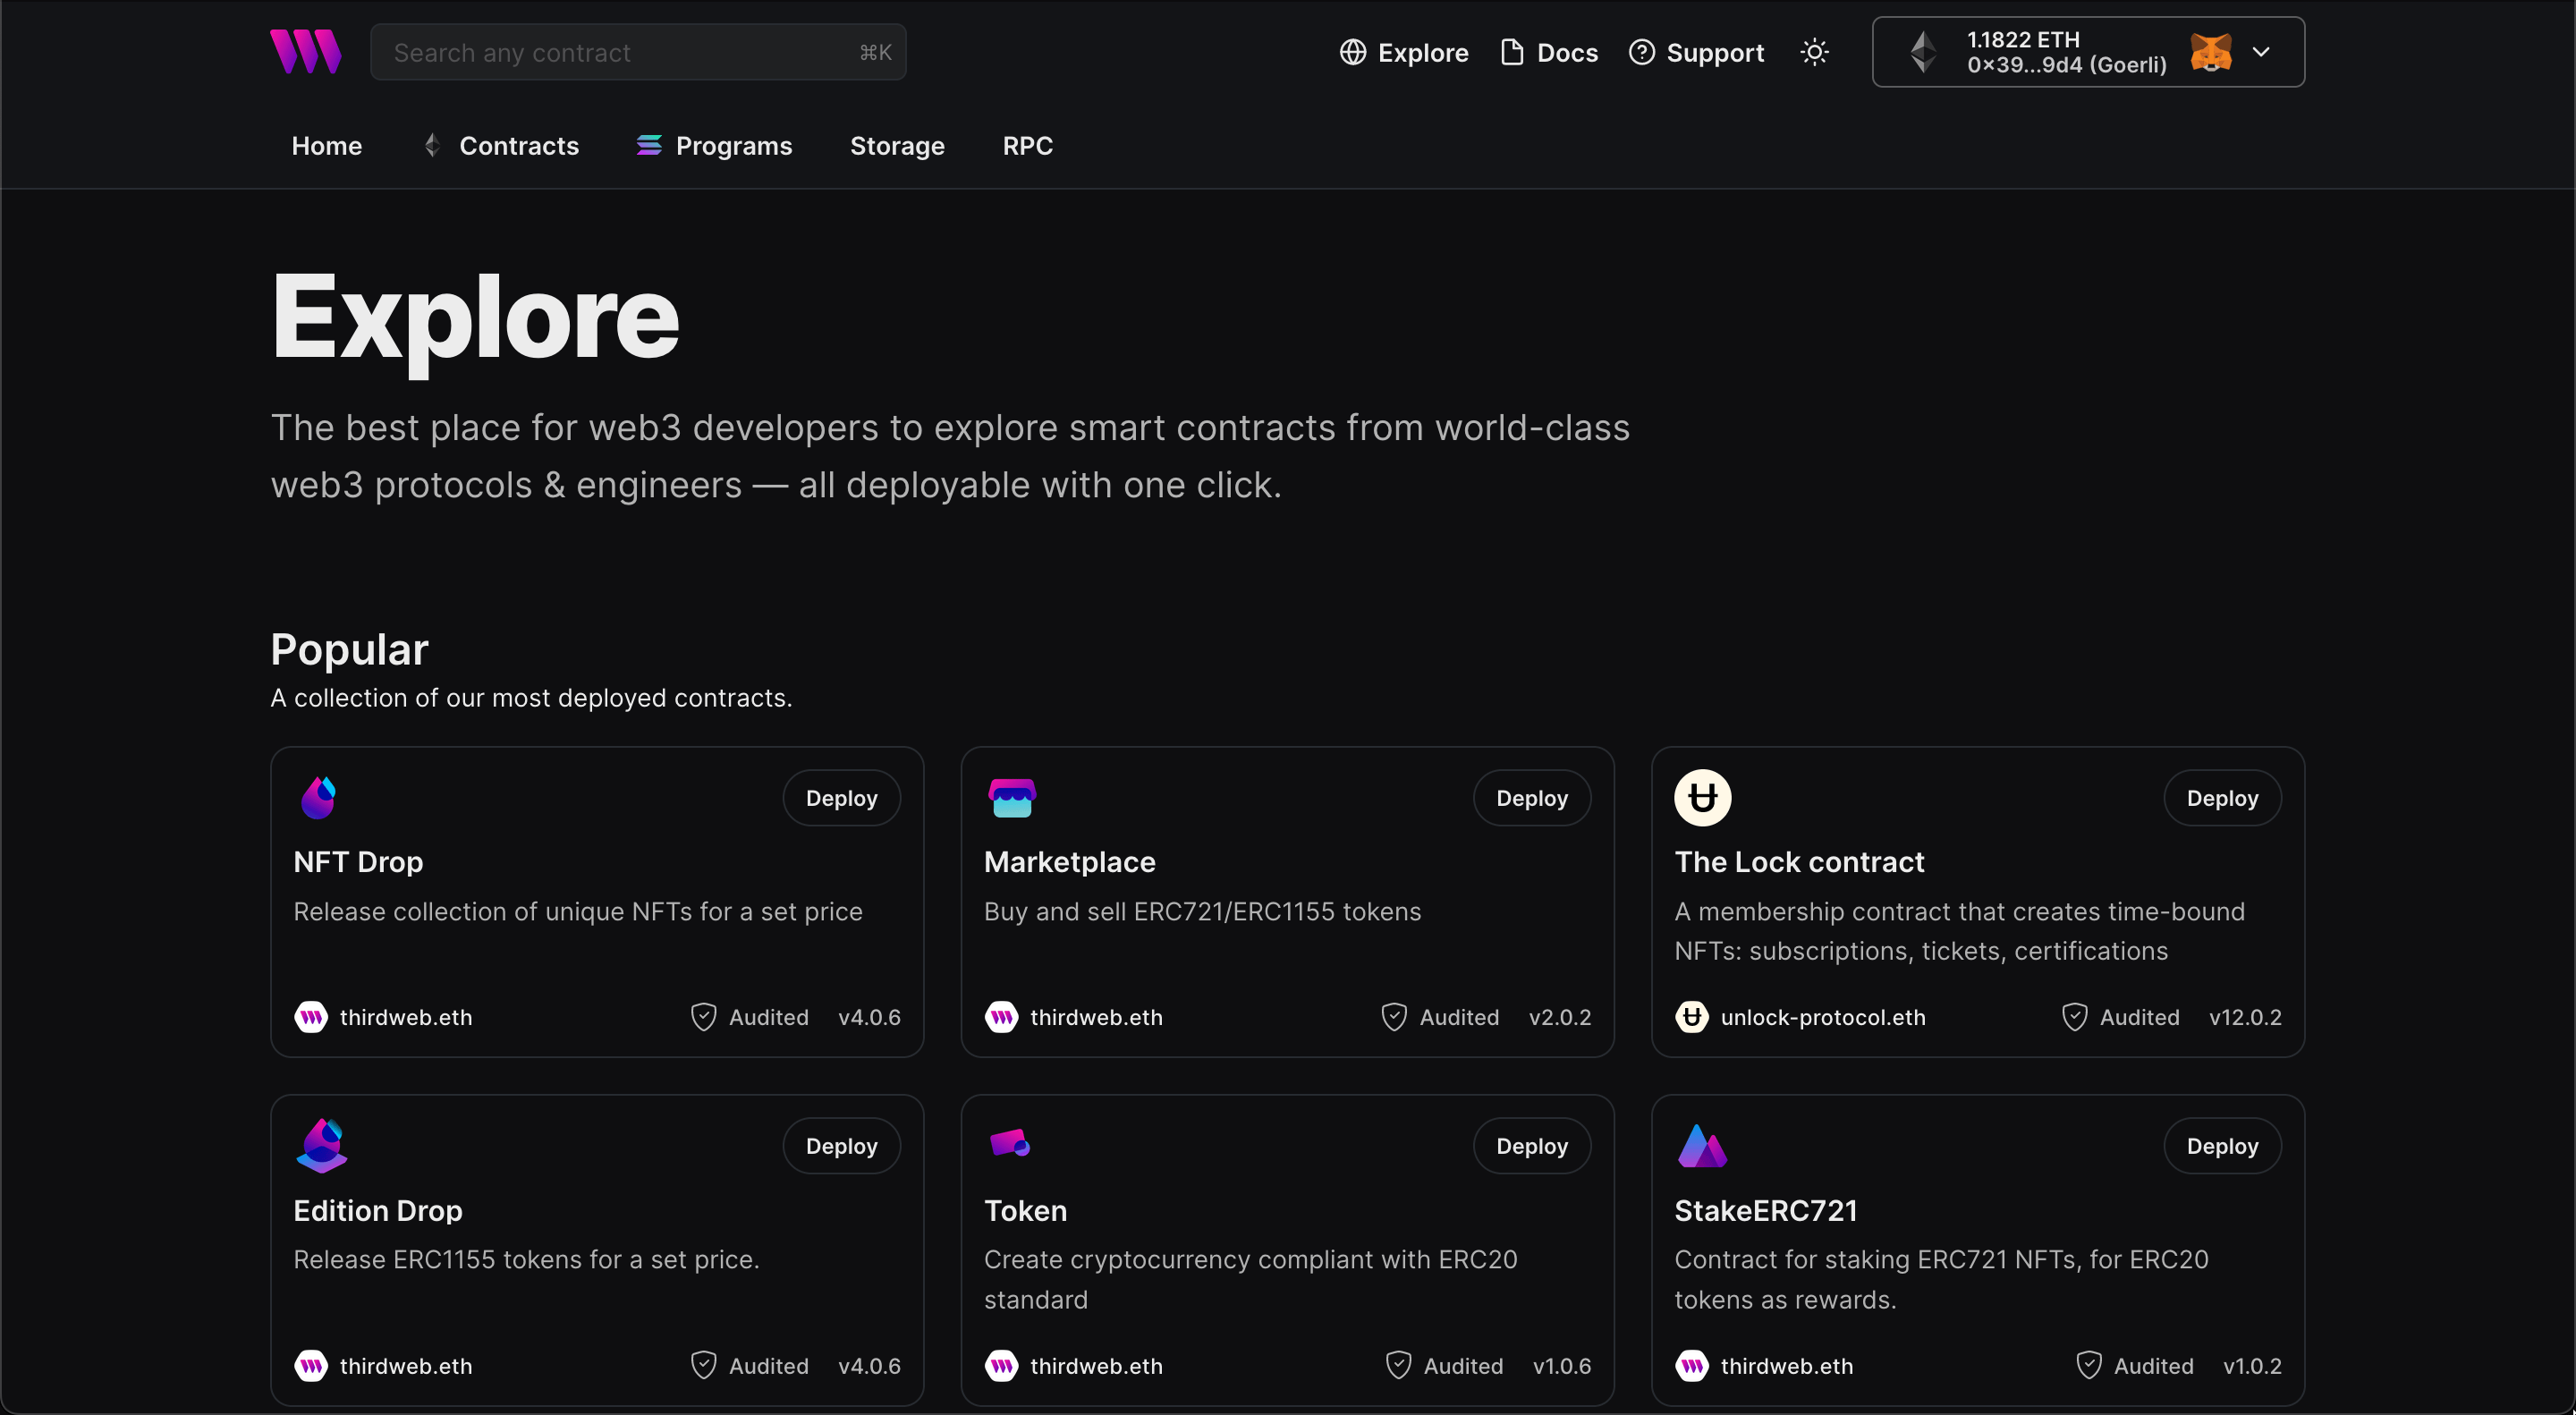
Find and click on the Lock contract. Here, you will see some examples of possible use cases, the release notes, the functions and events on the contract, the source code, and the ABI. You can also see which extensions have been included in this contract.
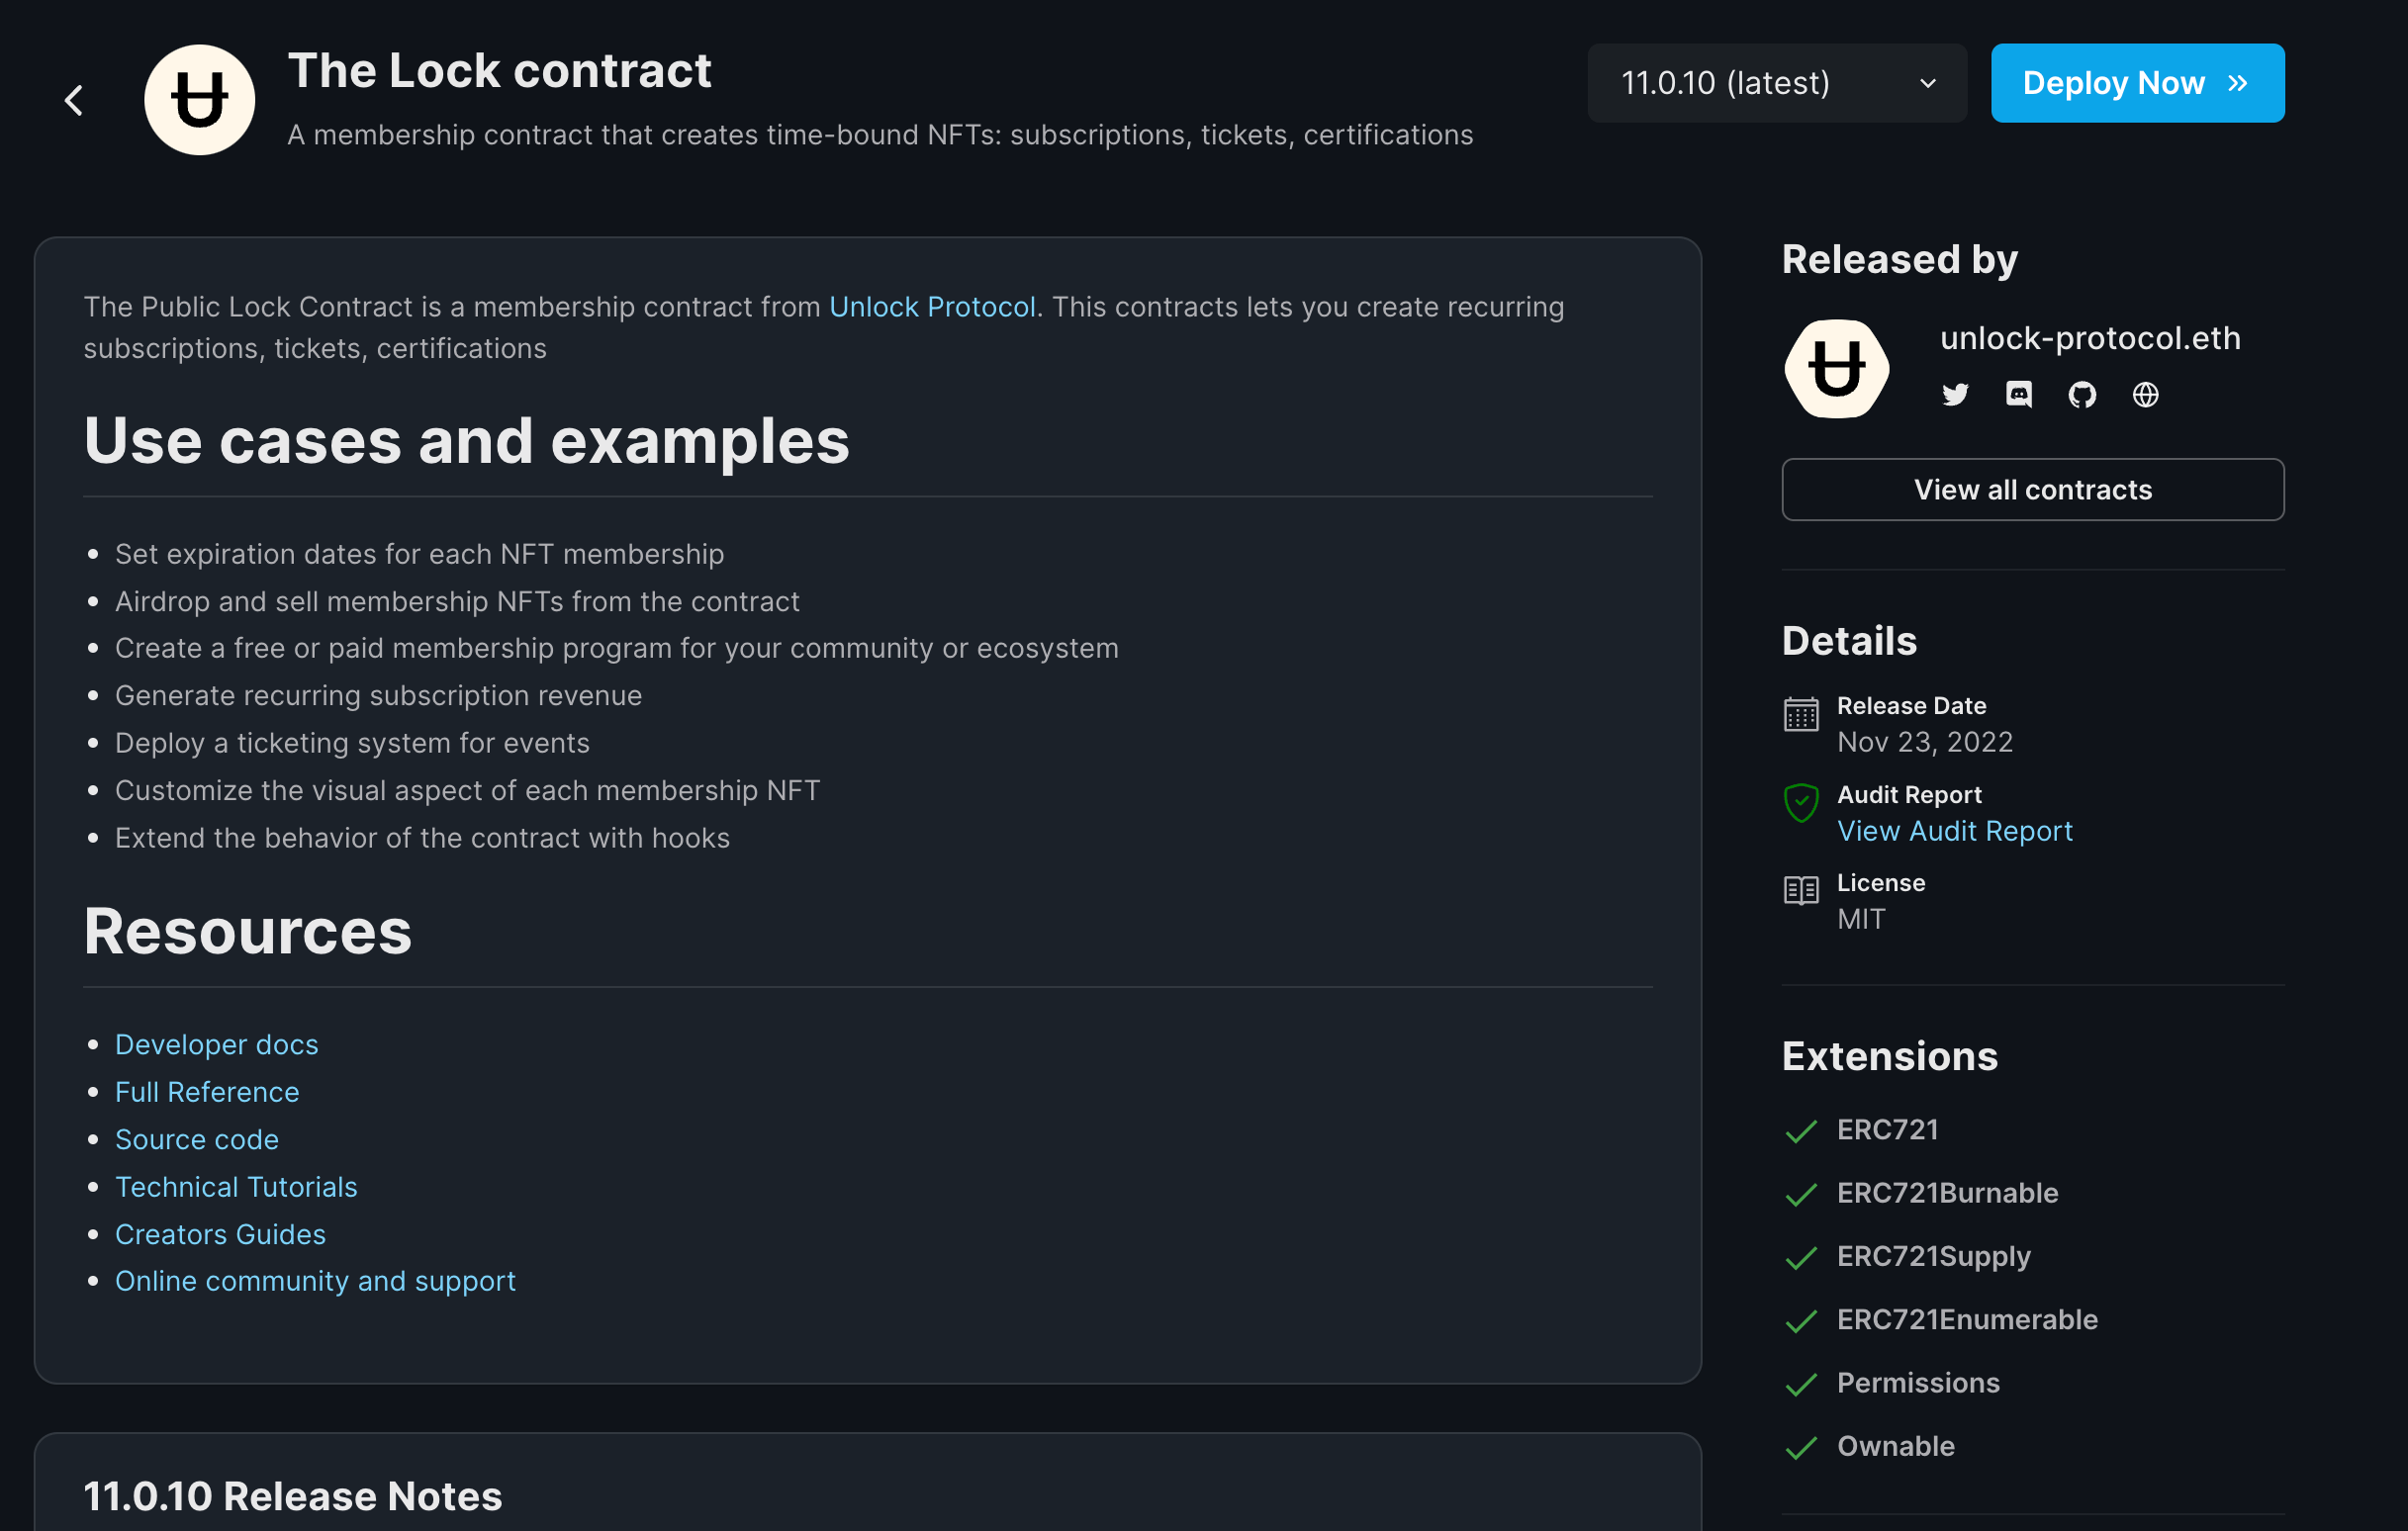
In the top right of your screen, select the version you would like to deploy; for this example, we will use v11.0.10, and click Deploy Now to deploy an instance on the Lock contract. You will then need to specify the following:
- The
_lockcreator. The creator of a Lock becomes the only LockManager by default. In this example, use your test wallet address. - The duration of membership:
_expirartionDuration. This is measured in seconds; in this example, our duration will be 1 hour or 3600 seconds. - The currency contract address:
_tokenAddress, which we will set to the zero address. - The price:
_keyPrice - The number of memberships:
_maxNumberOfKeys - The name of your contract, e.g., "My Lock Contract"
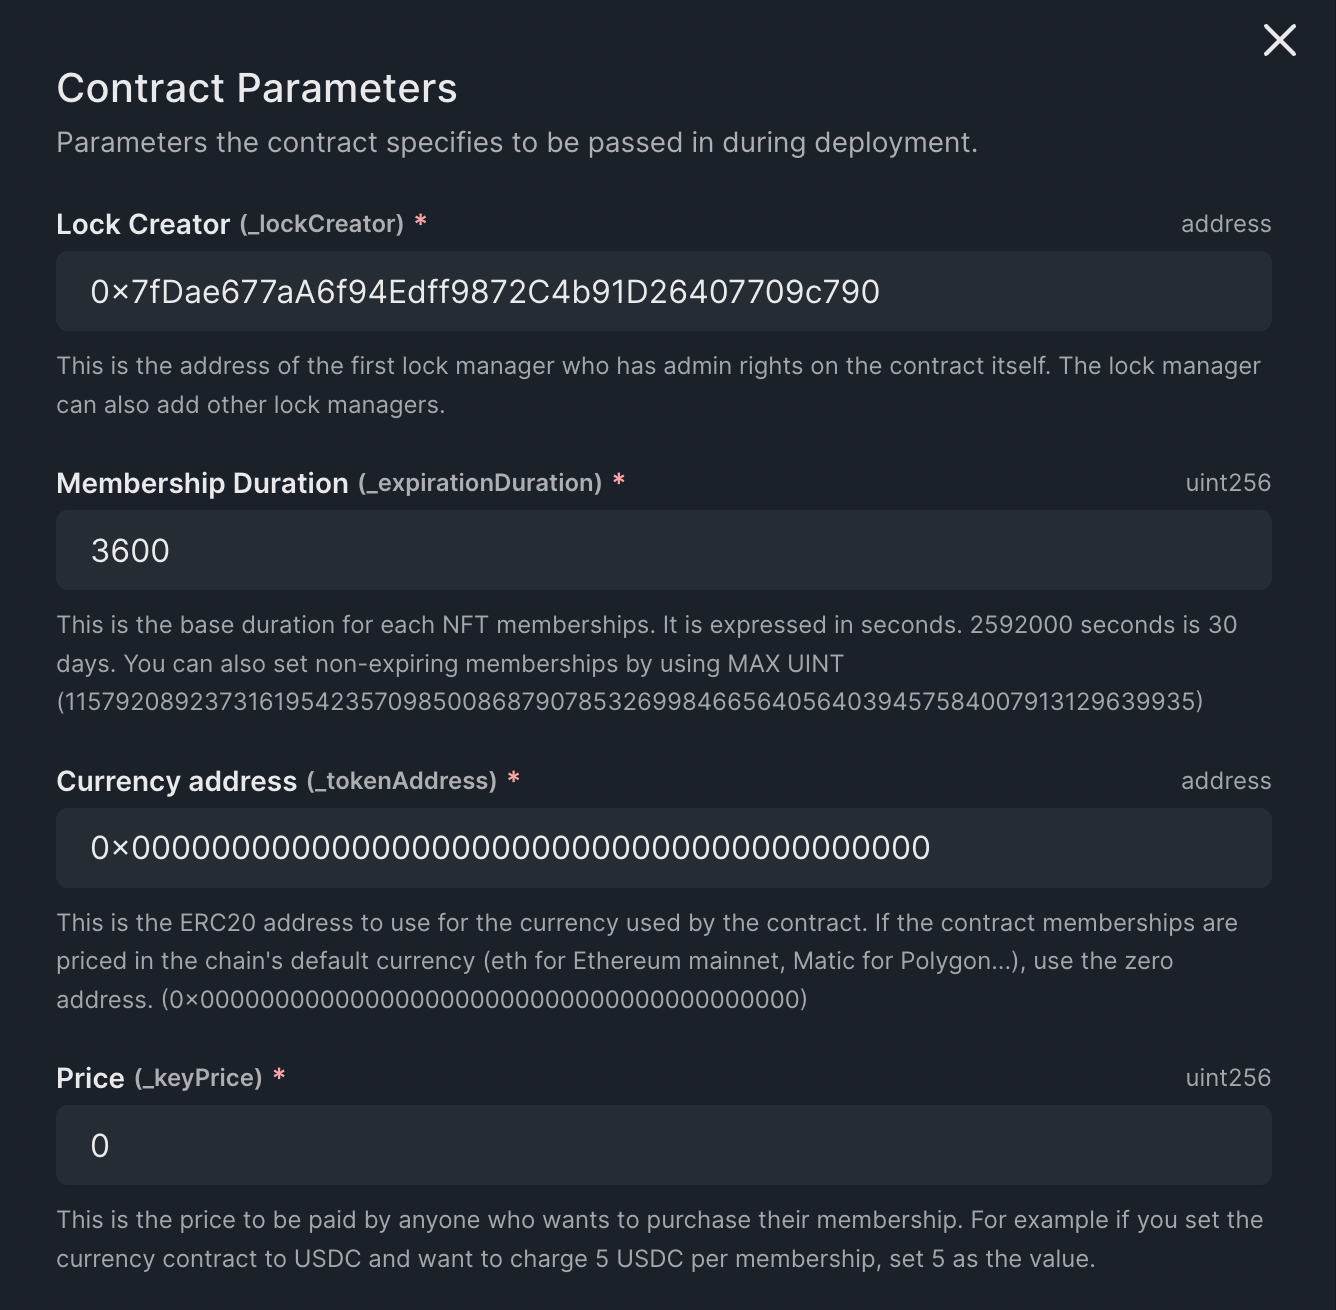
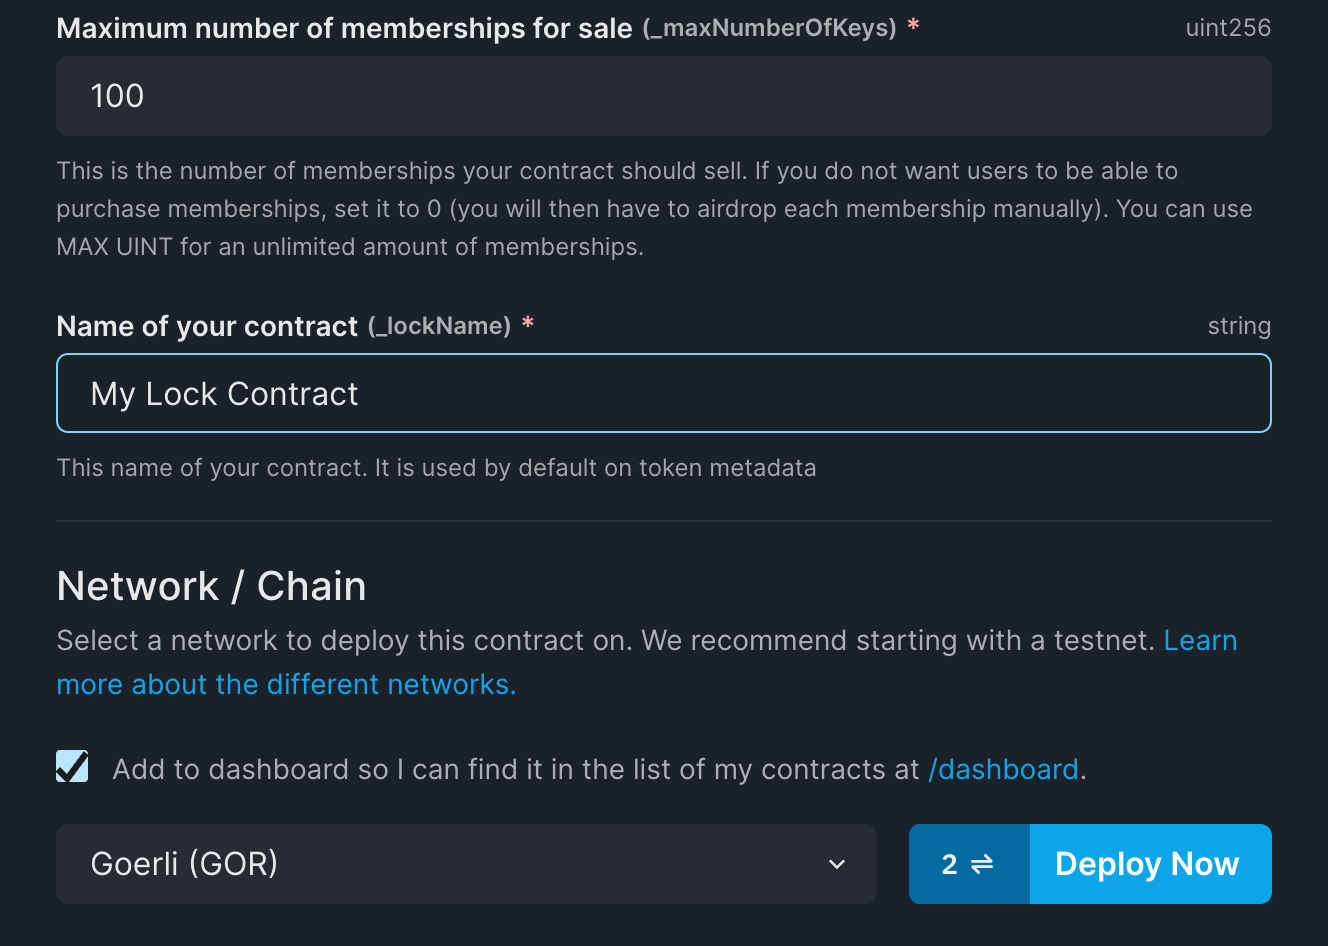
Initially, we will want to deploy our contract to a test network. For this example, we will be using the Goerli test network. Make sure you have sufficient GoerliETH funds in your test wallet, then click Deploy Now again to deploy your contract.
View your Contract
Using the Dashboard, you can view your newly deployed contract! Using the Explorer tab, you can read and modify the state and properties of your contract.
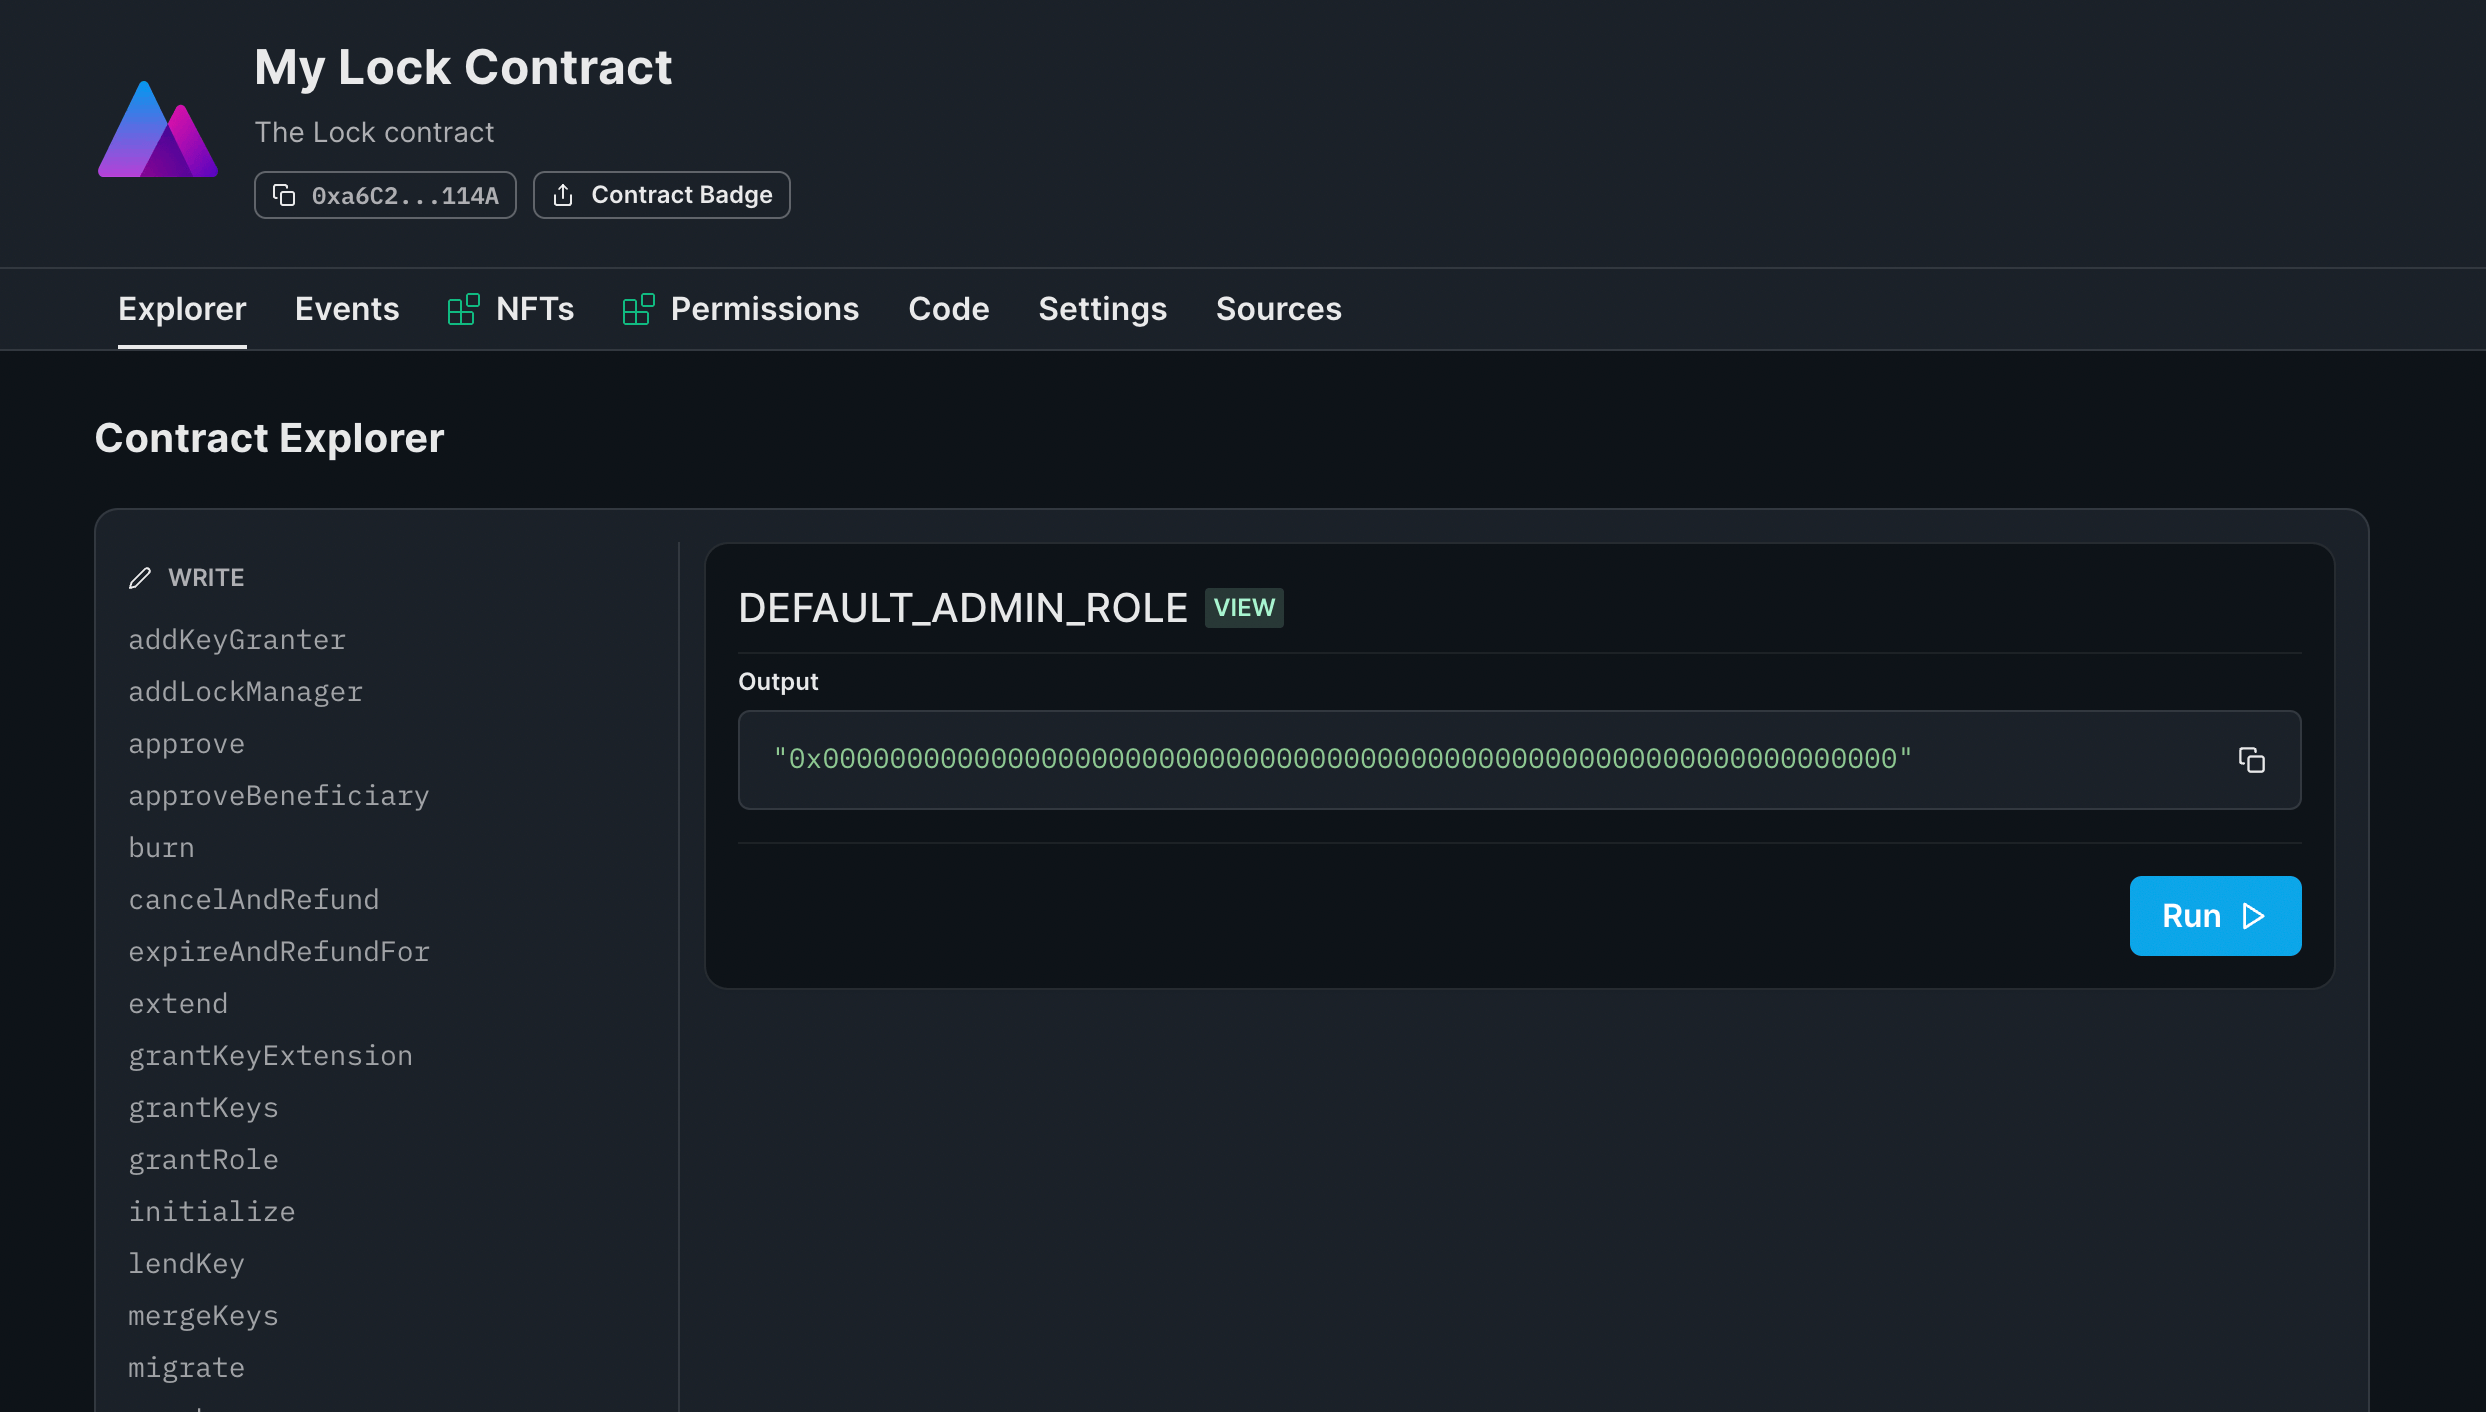
The other tabs enable you to see all NFTs minted, the events triggered on the contract, and the source code.
In the Code tab, you will see code snippets to help you use the SDK to interact with your contract and build it into your projects.

Here, you can learn how to read data from your contract. Use the dropdown menu to select the read function you would like to integrate, select your preferred language, and you are ready to go!
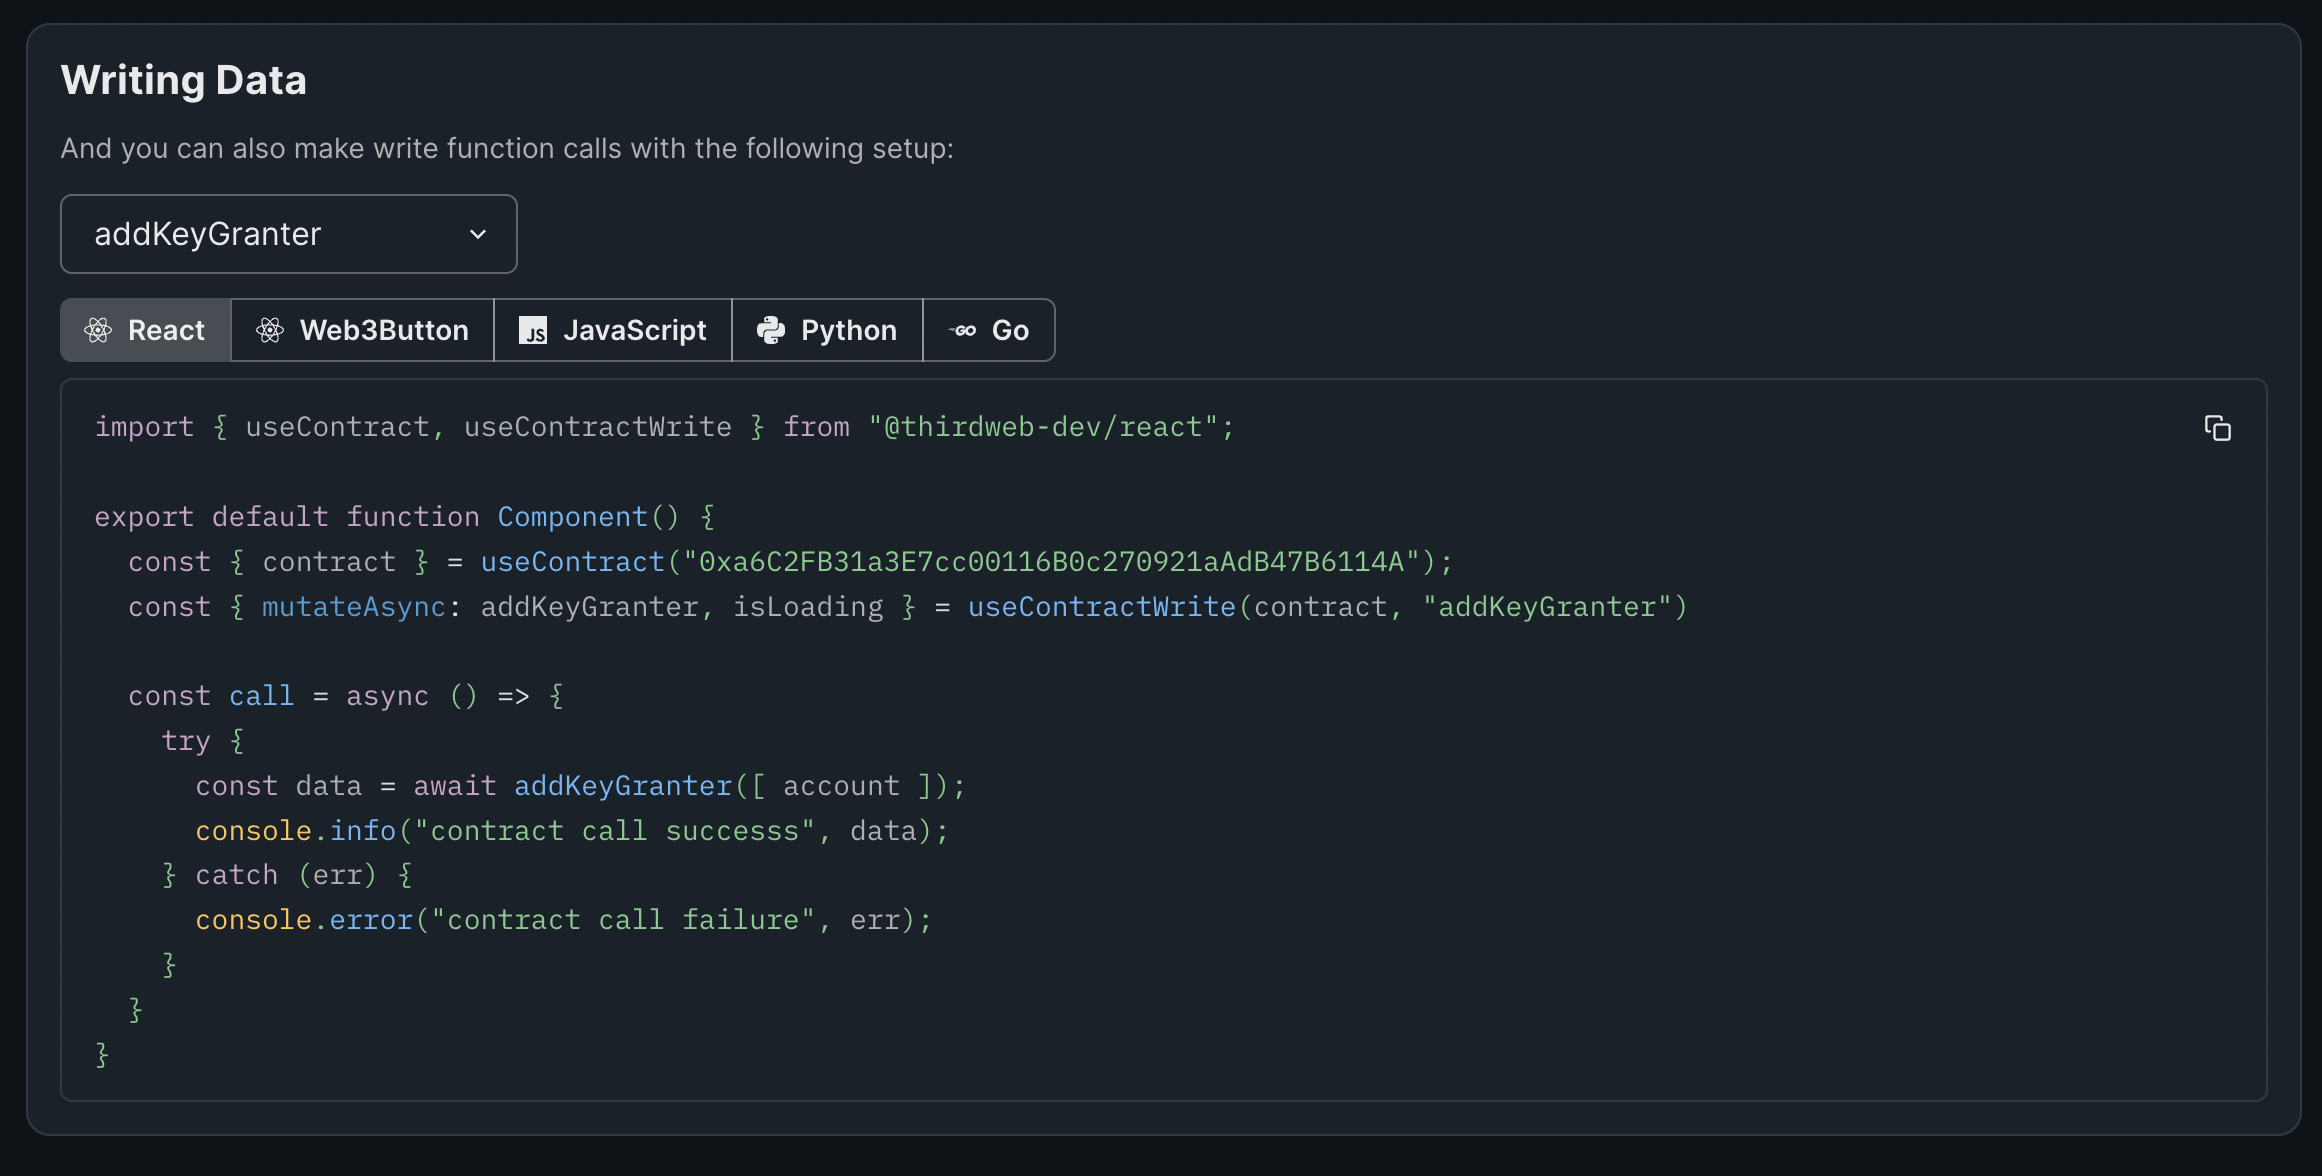
Similarly, you can write data to your contract using the SDK.
Building a Subscription into your app
We will first want to set up a Next.js project with Typescript using this thirdweb template. Create a project folder, navigate to that folder within your terminal and run:
npx thirdweb create --template next-typescript-starterThis will prompt you to name your project. Once you have done so, open the project in your code editor.
Inside pages/_app.tsx, change the chainId, which is Mainnet by default, to Goerli as we will test our app on the Goerli testnet.
import type { AppProps } from "next/app";
import { ChainId, ThirdwebProvider } from "@thirdweb-dev/react";
import "../styles/globals.css";

// This is the chainId your dApp will work on.
const activeChainId = ChainId.Mainnet;

function MyApp({ Component, pageProps }: AppProps) {
  return (
    <ThirdwebProvider desiredChainId={activeChainId}>
      <Component {...pageProps} />
    </ThirdwebProvider>
  );
}

export default MyApp;
Let's now navigate to pages/index.tsx. Initially, we are going to remove unnecessary code so that your file looks like this:
import { ConnectWallet } from "@thirdweb-dev/react";
import type { NextPage } from "next";
import styles from "../styles/Home.module.css";

const Home: NextPage = () => {
  return (
        <div className={styles.connect}>
          <ConnectWallet />
        </div>
  );
};

export default Home;
To get the wallet address of the user, add the following:
const address = useAddress();We next need to check if the address exists and a wallet is connected. If it is and if they are not already subscribed, we are going to display a Web3Button called subscribe, usage details can be found in this guide, and a ConnectWallet button to allow the user to disconnect their wallet, both thirdweb UI Components. If a wallet is not connected, we will just show a ConnectWallet button.
To connect to our Lock contract, copy the contract address from the Dashboard and save it to a variable. You can then retrieve the Lock contract that we deployed using the following function:
const { contract } = useContract(contractAddress);Clearly, we need to determine whether the user has an active subscription, as even if the user previously purchased a subscription, it may have expired. To determine whether the user has an active subscription, there is a function on the Lock contract called getHasValidKey(<address>). To call this read function, we will use the following function:
const { data: subscribed, isLoading } = useContractRead(
    contract,
    "getHasValidKey",
    address
  );
To obtain the duration of a subscription, there is another read function on the contract called expirationDuration which we will call in the same way:
const { data: expirationDuration, isLoading: expirationLoading } =
    useContractRead(contract, "expirationDuration");
The final logic we need to implement is the purchase of a subscription on click. To do this, we will call the write function purchase(<value>, <recipient>, <referrer>, <keyManager>, <data>). We will use the function useContractWrite to allow users to call purchase when clicking the subscribe button:
const { mutateAsync: purchase } = useContractWrite(contract, "purchase");

const call = async () => {
    try {
      const data = await purchase([
        [0],
        [address],
        ["0x0000000000000000000000000000000000000000"],
        [address],
        [0],
      ]);
      console.info("contract call success", data);
    } catch (err) {
      console.error("contract call failure", err);
    }
  };
The function call ties the action of a user clicking the subscribe button to the method:
<Web3Button
	contractAddress={contractAddress}
    className={styles.mainButton}
    colorMode="dark"
    accentColor="#F213A4"
    action={call}
    >
    	Subscribe
</Web3Button>
We now need to implement this logic, handle the loading states, use a few conditional rendering options and add some styling to our components:
<div className={styles.container}>
<h1 className={styles.h1}>Unlock Protocol Example</h1>
<div className={styles.pageContainer}>
<p className={styles.explain}>
An example project demonstrating how you can use{" "}
<a
href="https://unlock-protocol.com/"
target="_blank"
rel="noopener noreferrer"
className={styles.purple}
>
Unlock
</a>
's Public Lock contract to create subscrition NFTs with{" "}
<a
href="https://thirdweb.com/"
target="_blank"
rel="noopener noreferrer"
className={styles.purple}
>
thirdweb
</a>
</p>
</div>
{address ? (
isLoading ? (
<h1 className={styles.h1}>Loading...</h1>
) : (
<div className={styles.spacerTop}>
{subscribed ? (
<div className={styles.spacerTop}>
{expirationLoading ? (
<h1 className={styles.h1}>Loading...</h1>
) : (
<p className={styles.h1}>
Thanks for Subscribing! Your subscription is valid for a
total of{" "}
{new Date(expirationDuration.toNumber() * 1000)
.toISOString()
.slice(11, 16)}{" "}
hour(s)!
</p>
)}
</div>
) : (
<Web3Button
contractAddress={contractAddress}
className={styles.mainButton}
colorMode="dark"
accentColor="#F213A4"
action={call}
>
Subscribe
</Web3Button>
)}
<div className={`${styles.mainButton} ${styles.spacerTop}`}>
<ConnectWallet />
</div>
</div>
)
) : (
<div className={styles.spacerTop}>
<ConnectWallet />
</div>
)}
</div>
);Et voila! We now have our contract fully integrated into our front end so that a subscription can be created at the click of a button! We have also displayed the subscription duration to our users to inform them of when they will need to renew.
Please visit the GitHub repository for a complete look at the finished code.
Wrapping Up
Congratulations 🎉 - you have successfully created your first on-chain subscription model with Unlock! You have deployed your Lock contract and have integrated it into a front-end ready to be used in your projects.
If you have any questions, got stuck at any point, or want to share your awesome projects with us, please visit our Discord, where you can speak directly with someone from the thirdweb team!