Allow GitHub contributors to mint an NFT

⚠️ Warning: This guide currently uses v4 of the Connect SDK. For v5 (latest) code snippets, please check out our documentation while this guide is being updated. ⚠️
In this guide, we'll show you how to create an app where users can sign in with their GitHub and web3 wallet. Once they are signed in, we will validate if they have contributed to one of our repos; and if they have, we will allow the users to mint an NFT using signature-based minting!
Before we get started, below are some helpful resources where you can learn more about the tools we're going to be using in this guide.
Let's get started!
Setup
I am going to use the Next.js Typescript starter template for this guide.
If you are following along with the guide, you can create a project with the template using the thirdweb CLI:
npx thirdweb@latest create app --next --tsIf you already have a Next.js app you can follow these steps to get started:
- Install
@thirdweb-dev/reactand@thirdweb-dev/sdkandethers@5 - Add MetaMask authentication to the site. You can follow this guide to add metamask auth.
By default the network is Mainnet, we need to change it to Goerli.
import type { AppProps } from "next/app";
import { ThirdwebProvider } from "@thirdweb-dev/react";
import "../styles/globals.css";

// This is the chain your dApp will work on.
// Change this to the chain your app is built for.
// You can also import additional chains from `@thirdweb-dev/chains` and pass them directly.
const activeChain = "goerli";

function MyApp({ Component, pageProps }: AppProps) {
  return (
    <ThirdwebProvider activeChain={activeChain}>
      <Component {...pageProps} />
    </ThirdwebProvider>
  );
}

export default MyApp;
Creating an Edition Contract
To begin, head to the Contracts page in your thirdweb Dashboard and hit "Deploy new contract":
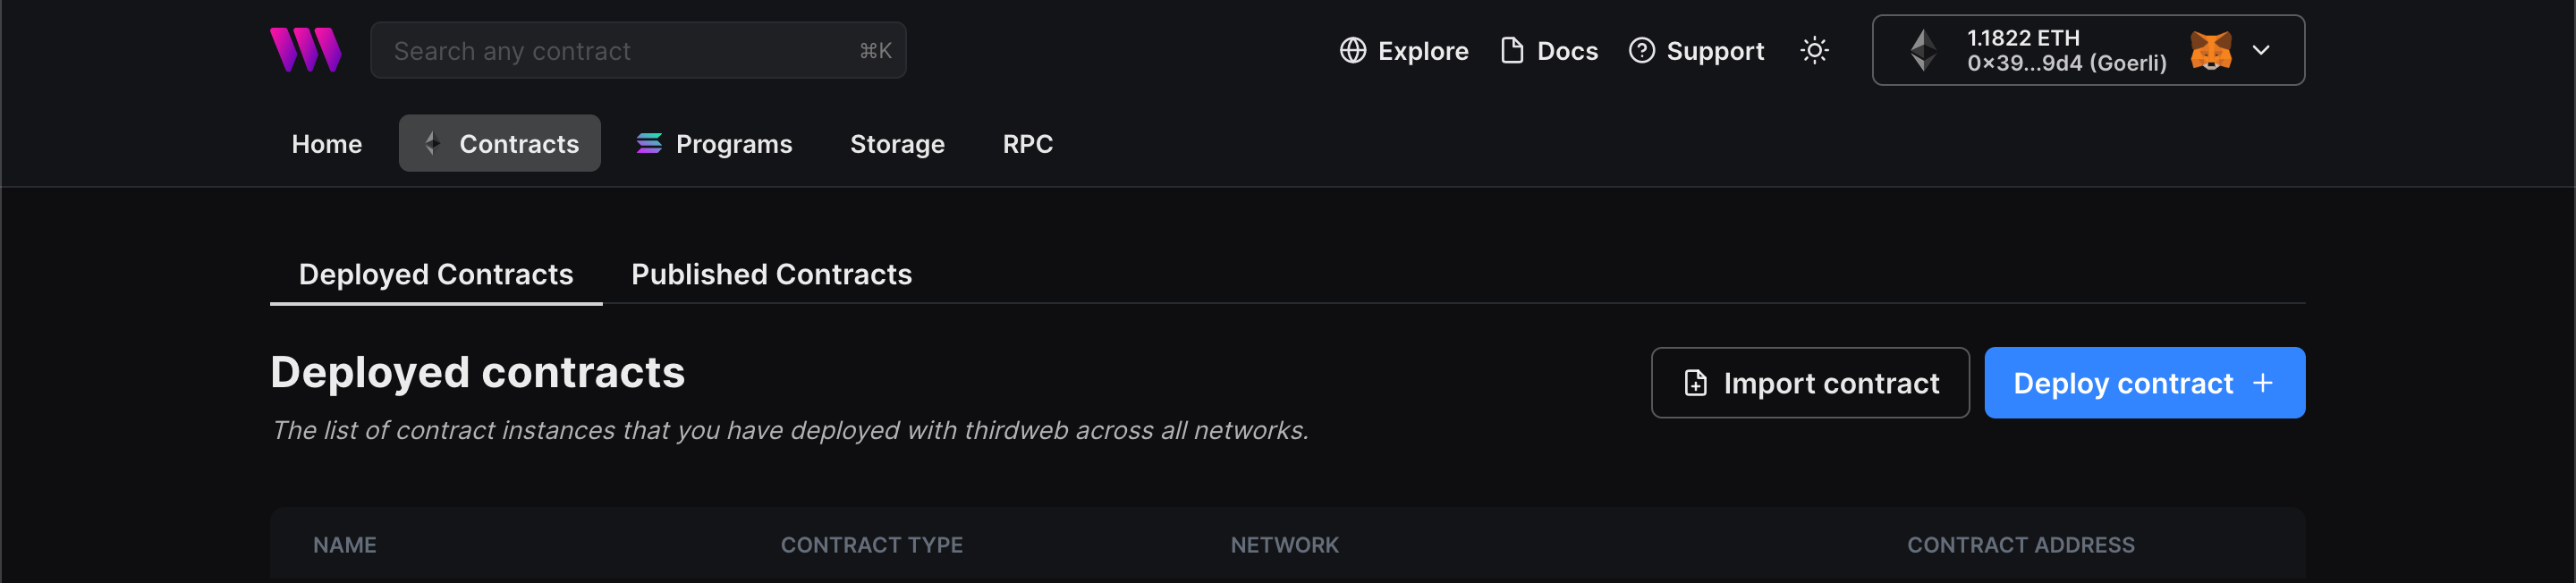
You will be taken to our Explore page — where you can browse smart contracts built by the top protocols in web3 and deploy them in just a few clicks!
Note: You can also use the thirdweb CLI to set up a smart contract environment by running the below command from your terminal:
npx thirdweb create contractThis will take you through an easy-to-follow flow of steps for you to create your contract. Learn more about this in our CLI guide.
Otherwise, let's get back to Explore:
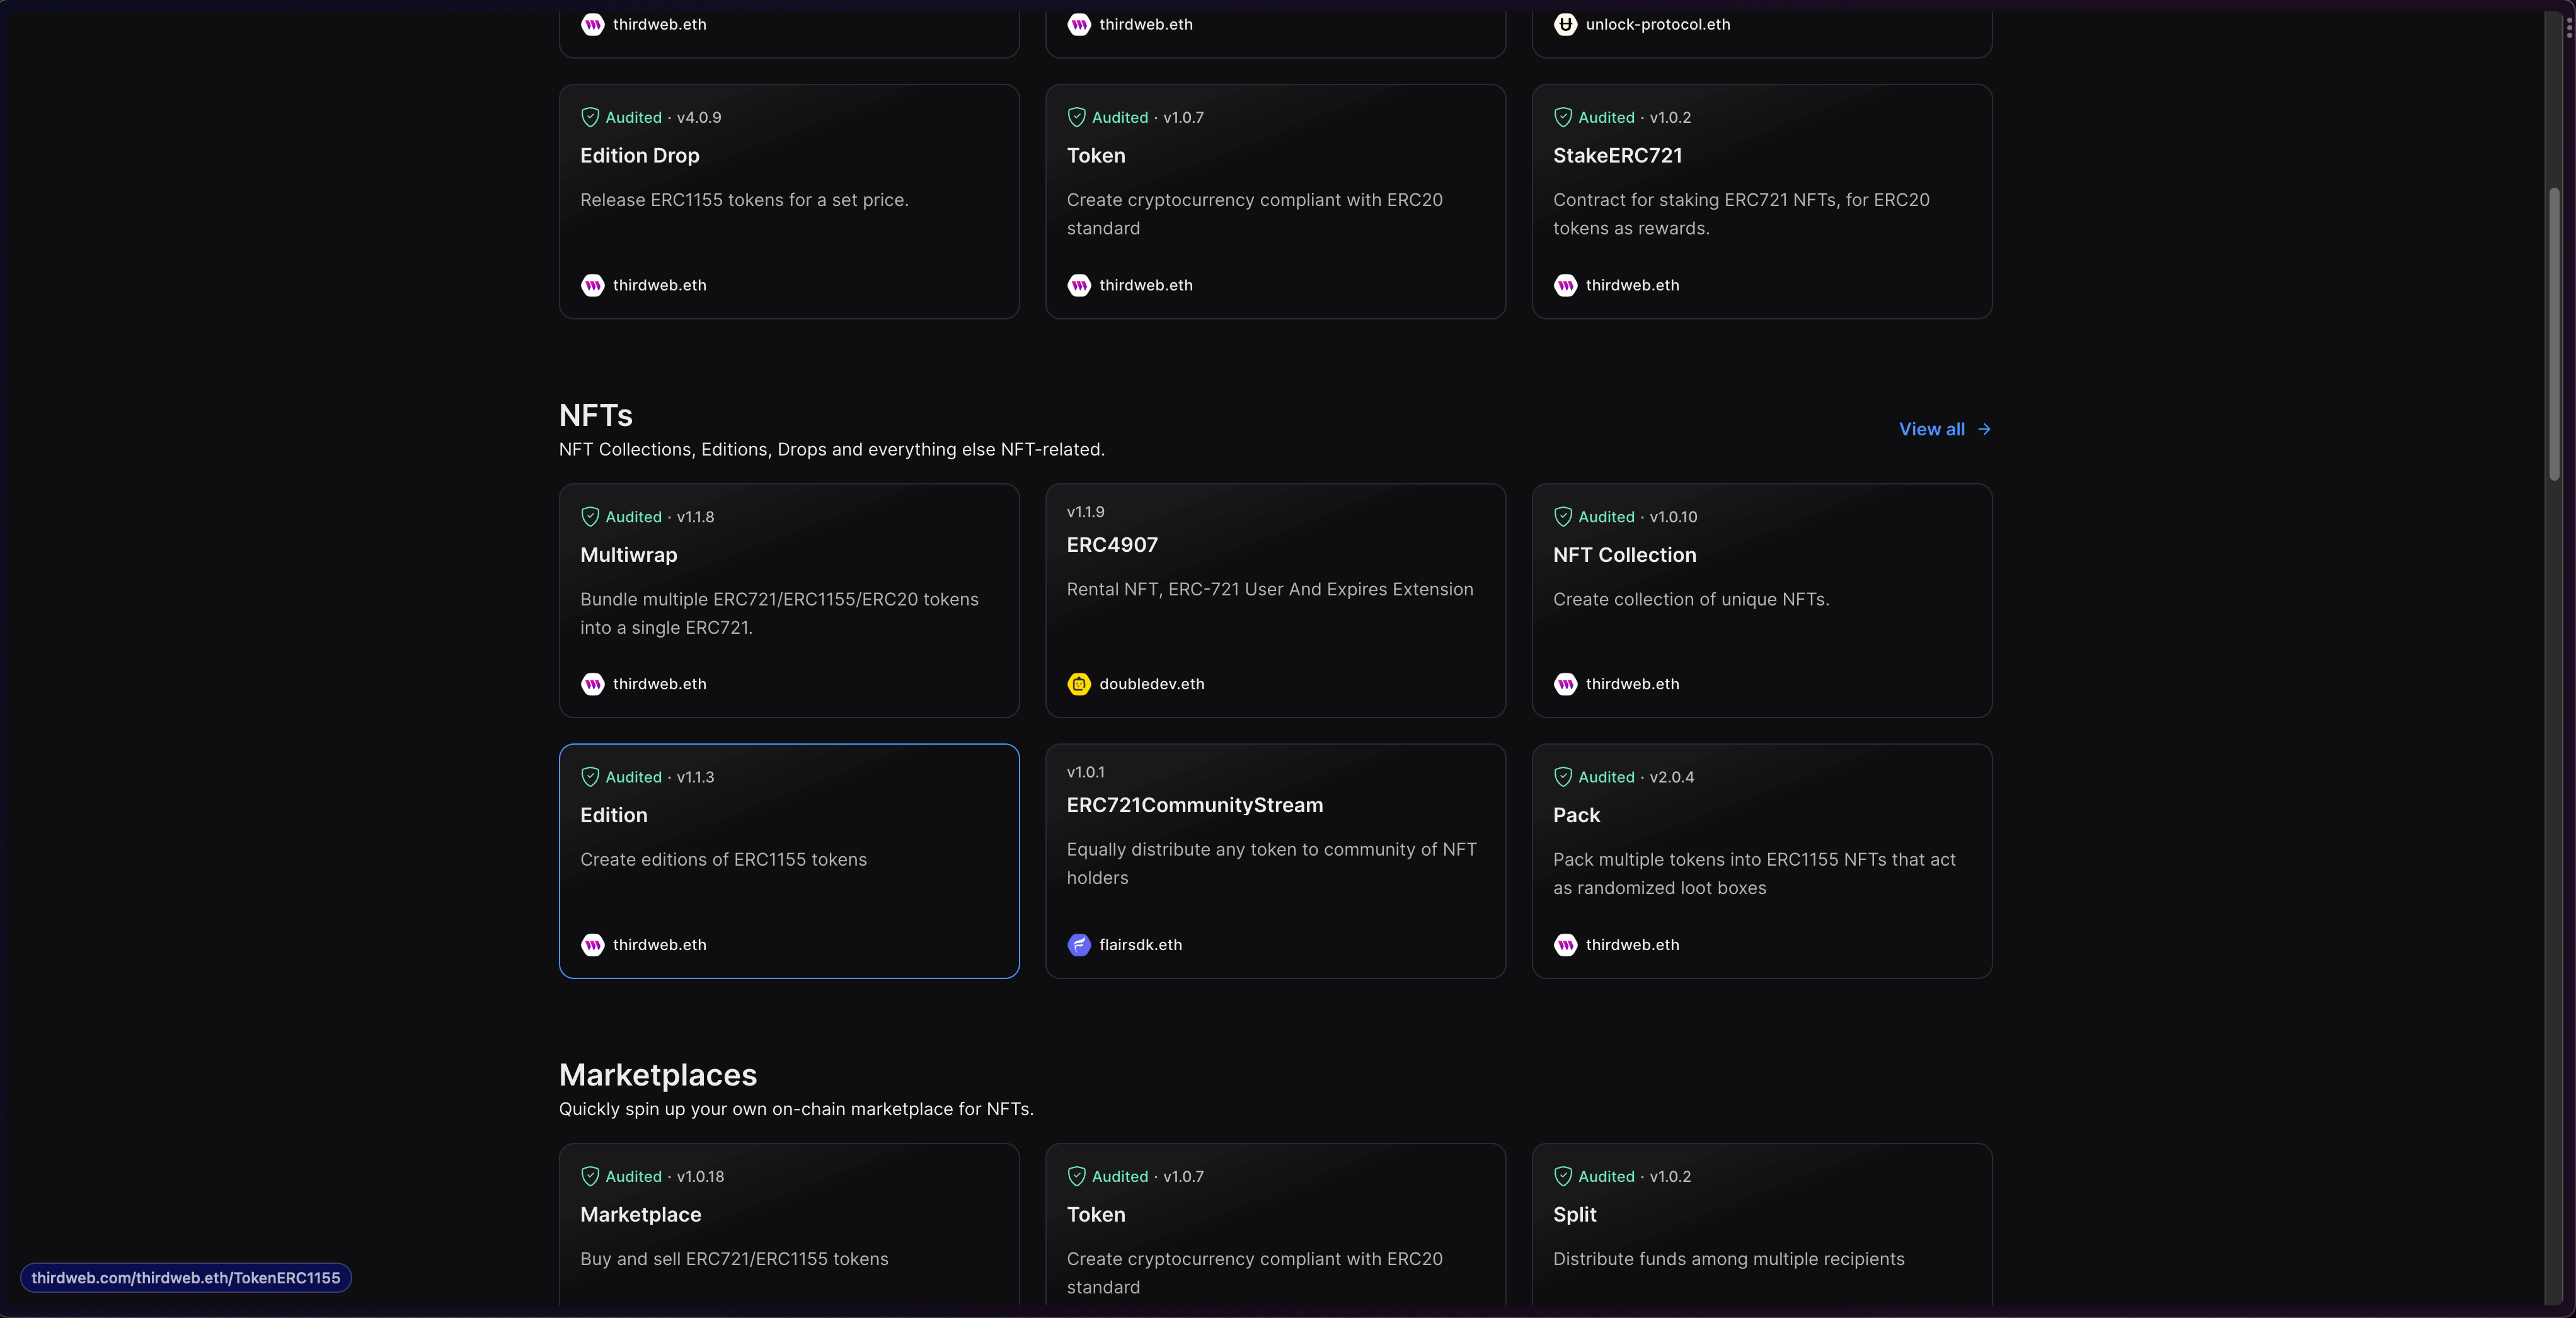
Here, select your smart contract of choice. For this guide, we're going to use the Edition (ERC1155) contract to create our NFT collection:
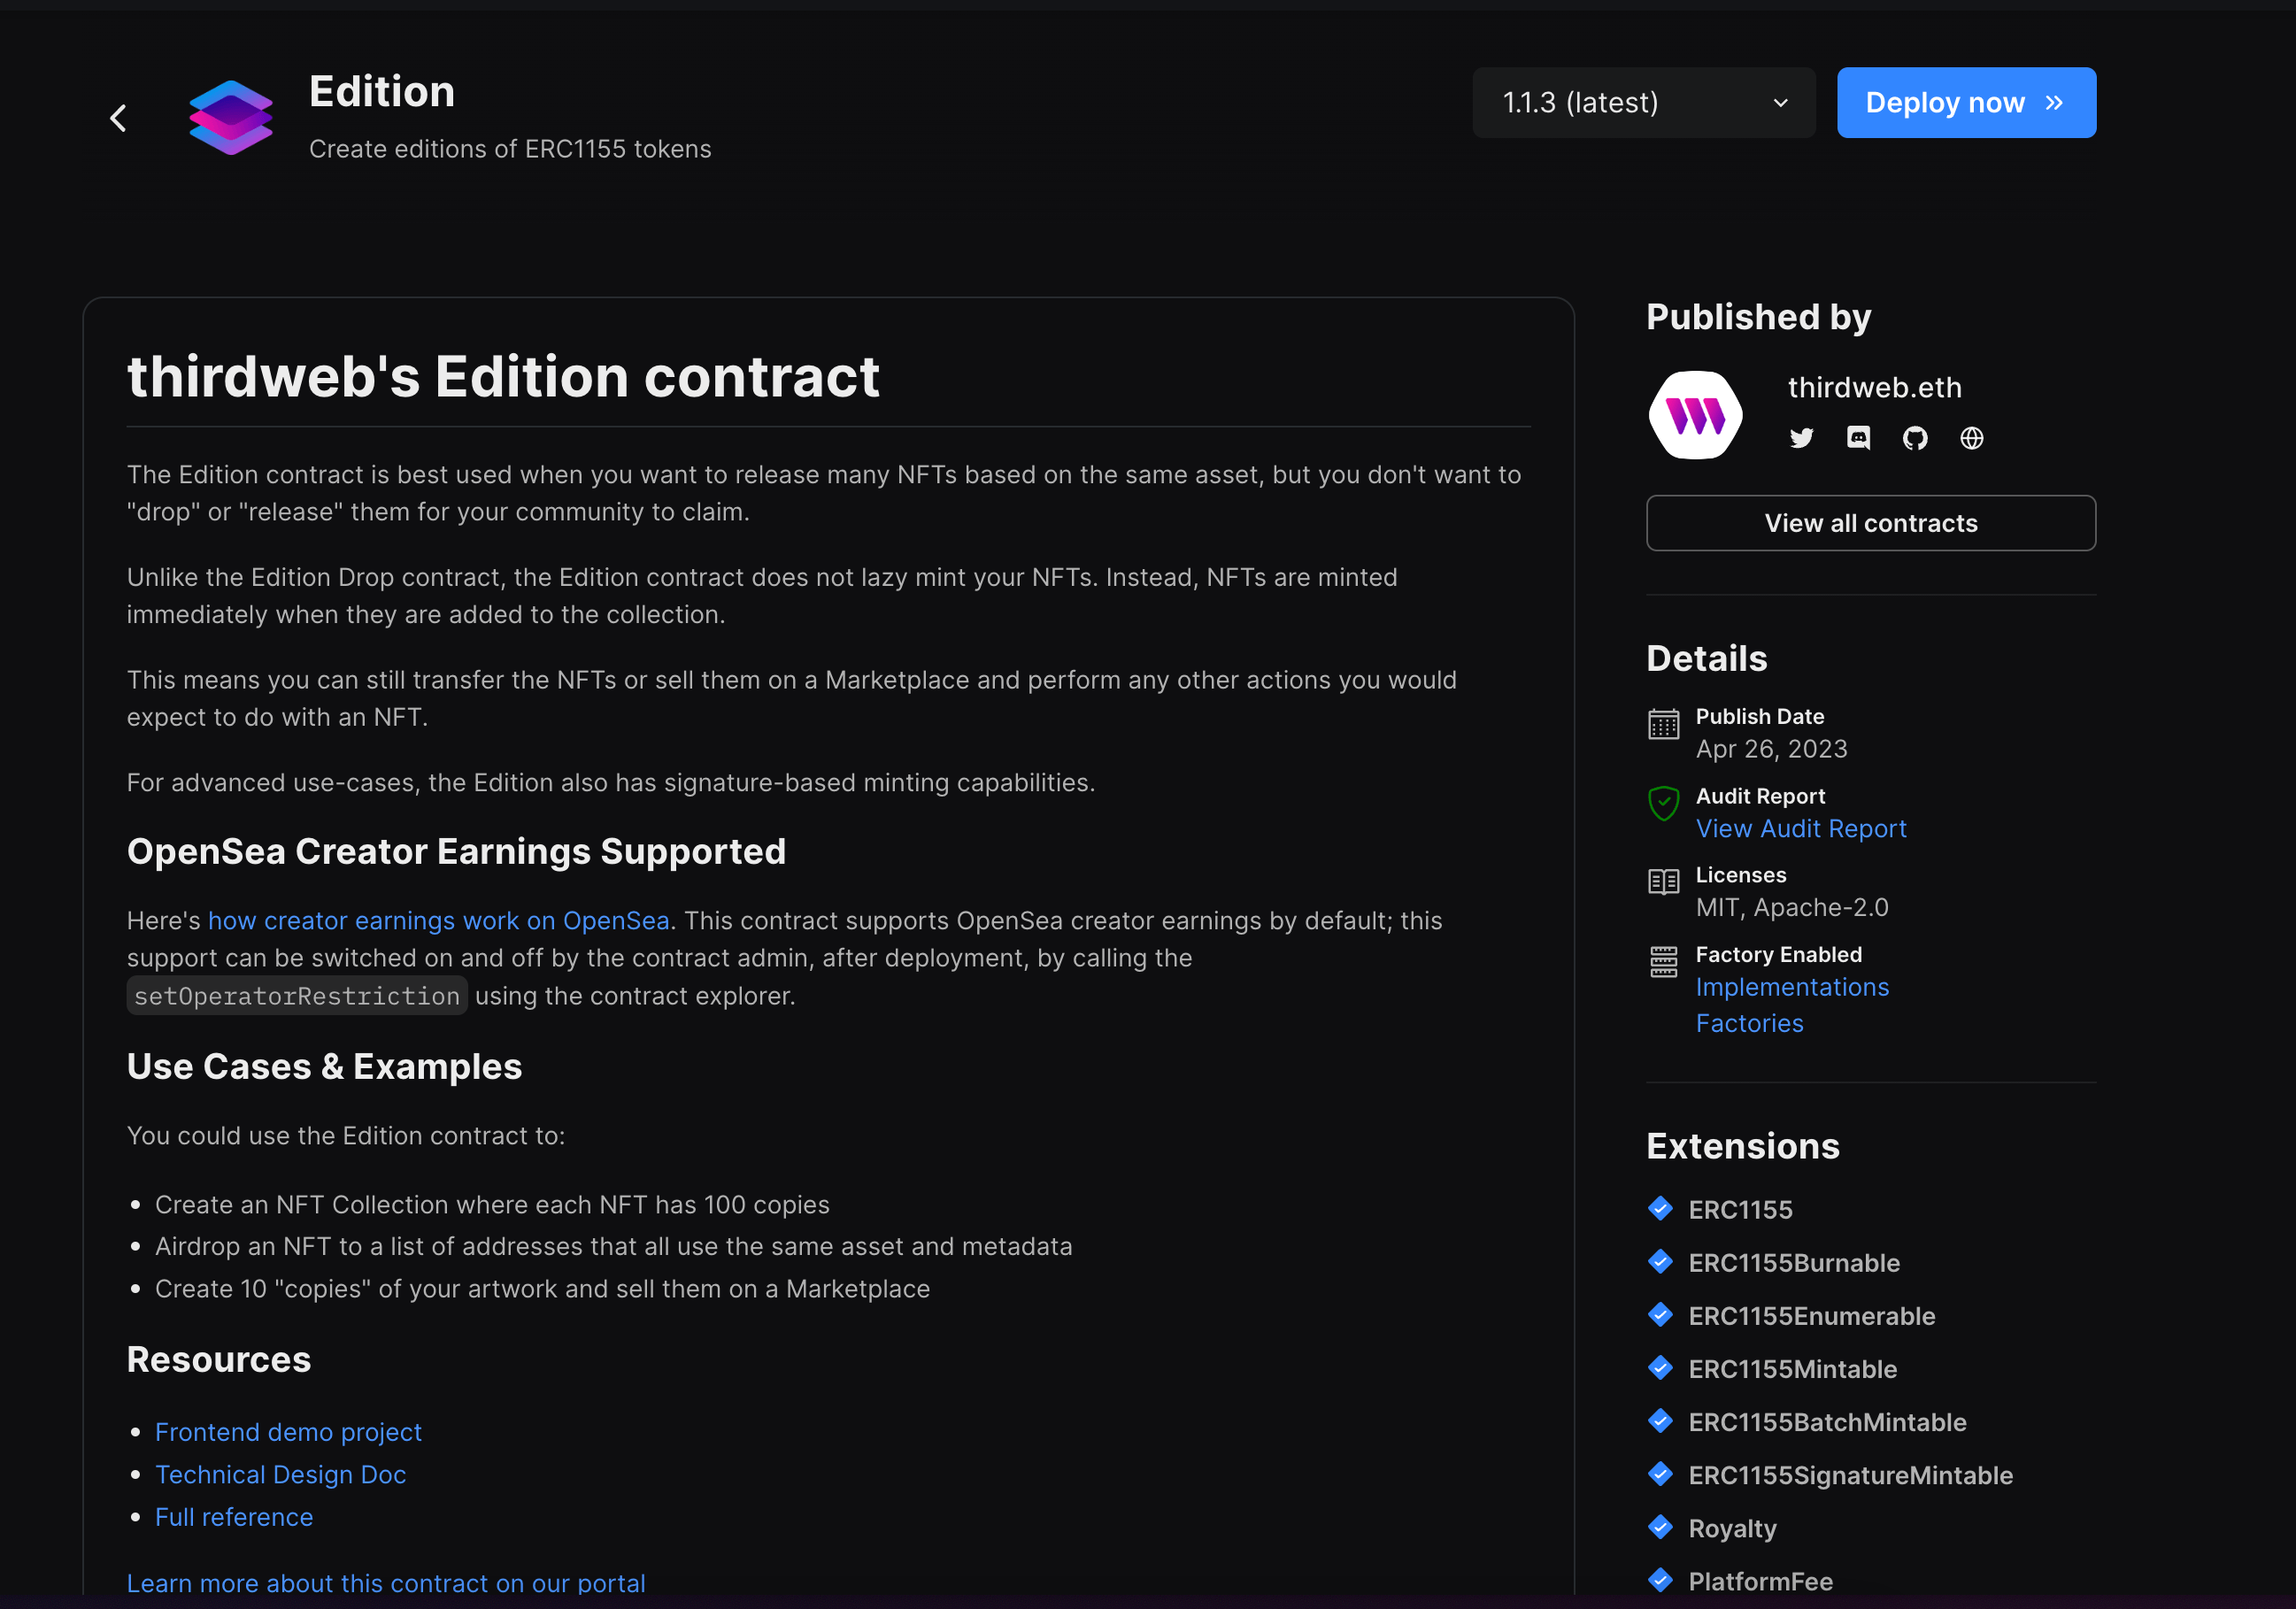
Set up your smart contract with an image, name, description, etc., and configure which wallet address will receive the funds from primary and secondary sales:
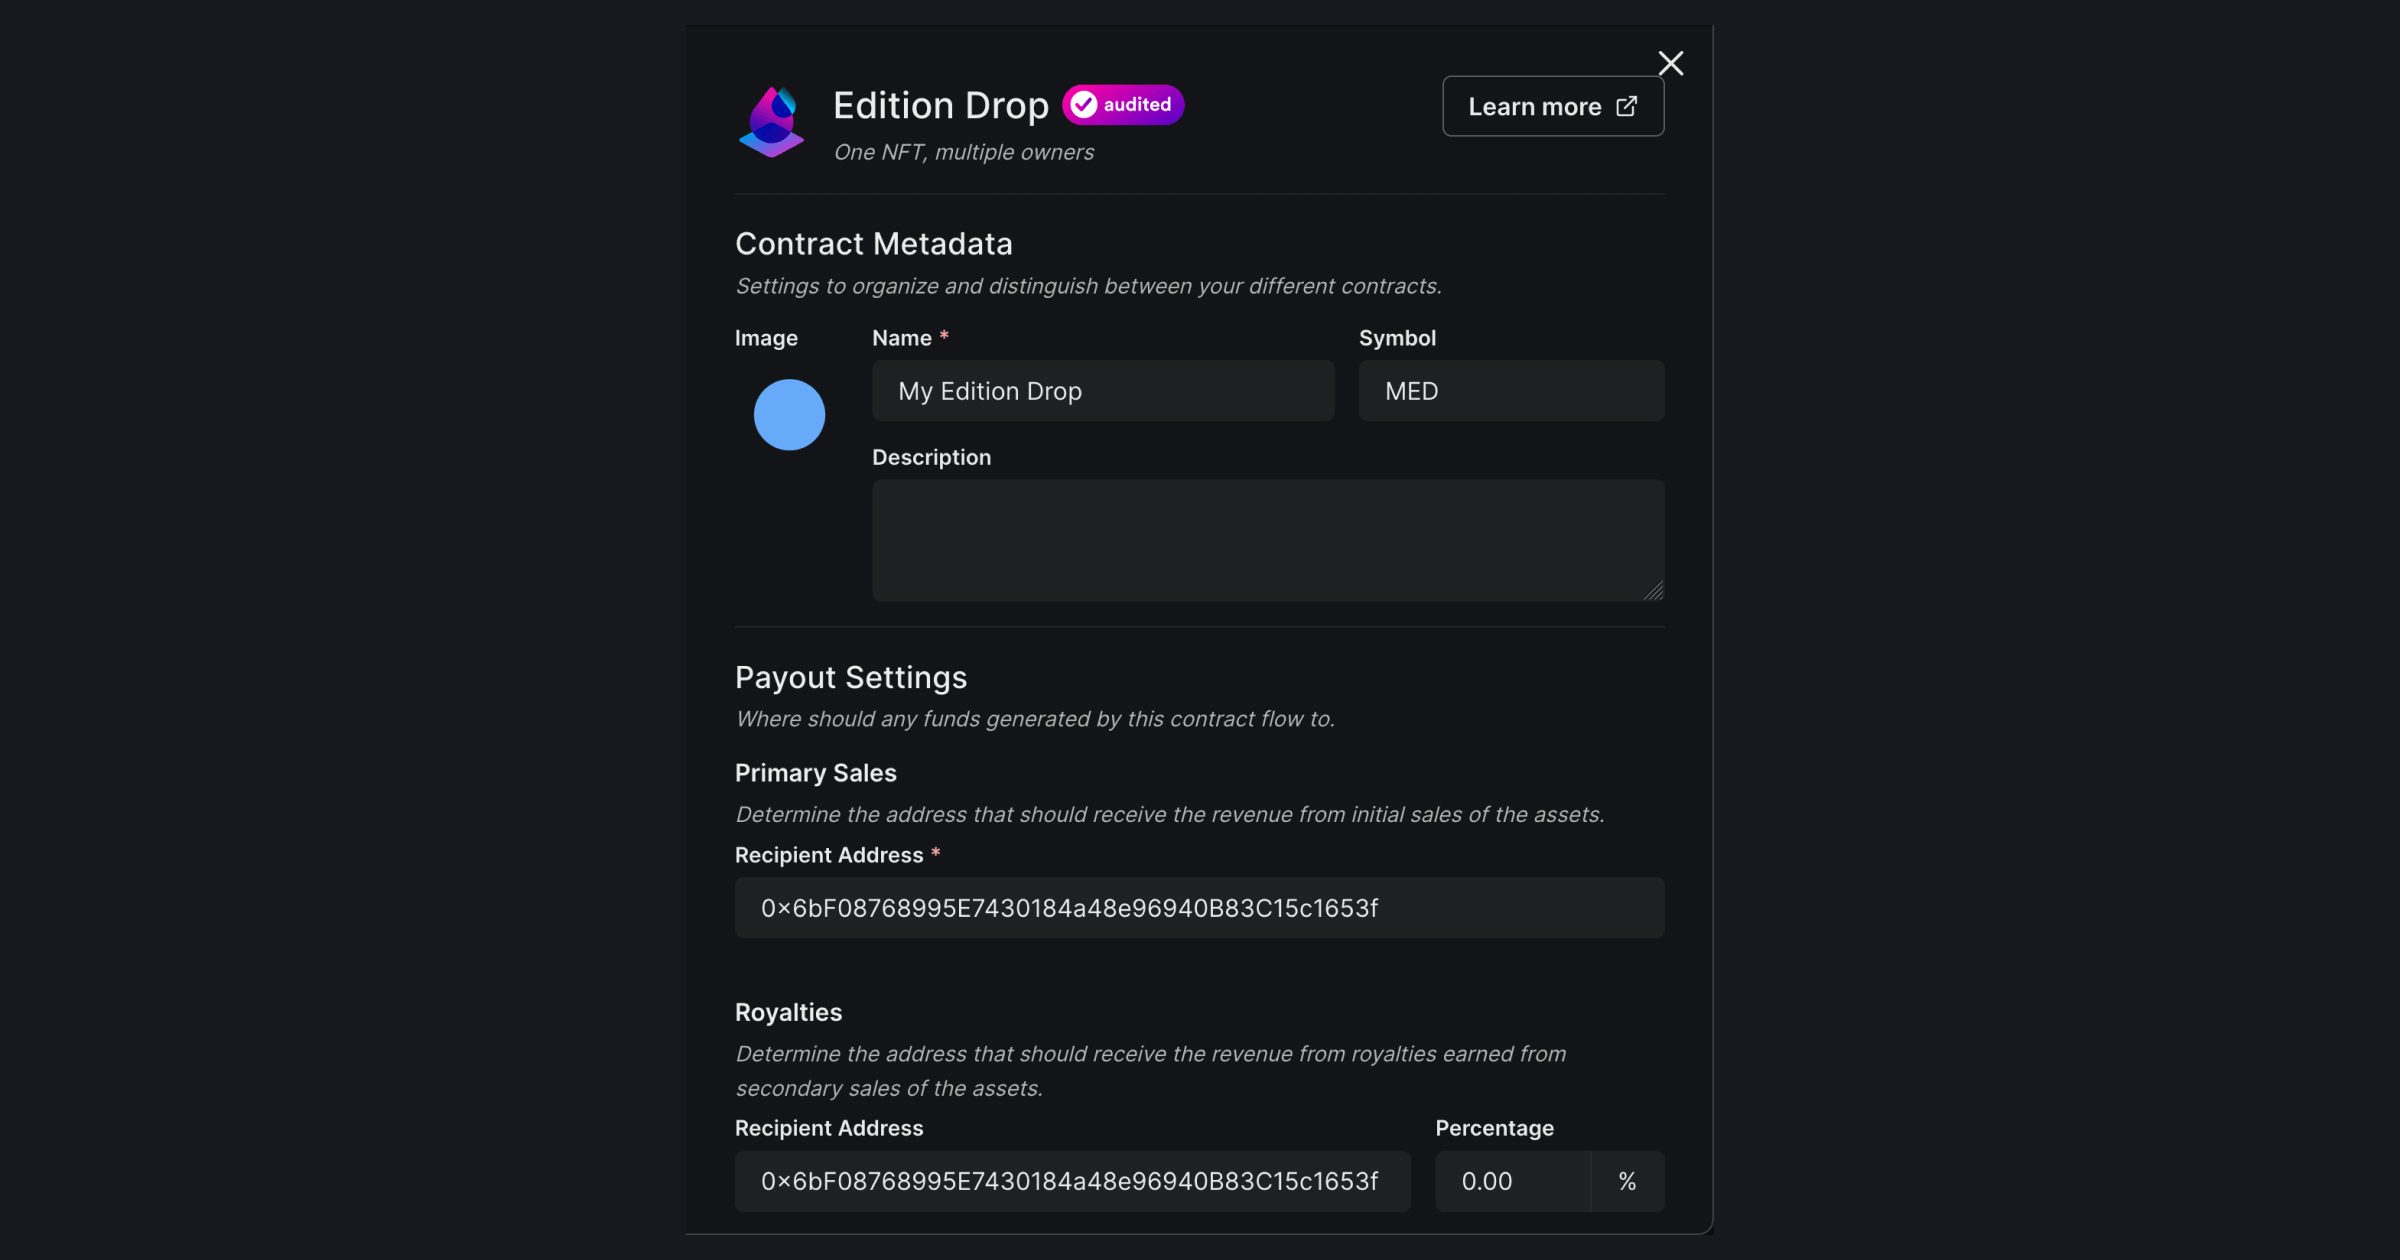
Once the contract is deployed, just copy the address as we are going to need it later!
Setting up Auth
We need the user to sign in both with their wallet and with their GitHub account, to do this, we'll first set up web3 sign-in using thirdweb then use NextAuth to add GitHub authentication!
thirdweb Auth
Firstly, we need to install the thirdweb auth package:
npm i @thirdweb-dev/auth # npm

yarn add @thirdweb-dev/auth # yarn
Now, create a file called auth.config.ts and the following:
import { ThirdwebAuth } from "@thirdweb-dev/auth/next";
import { PrivateKeyWallet } from "@thirdweb-dev/auth/evm";

export const { ThirdwebAuthHandler, getUser } = ThirdwebAuth({
  domain: process.env.NEXT_PUBLIC_THIRDWEB_AUTH_DOMAIN as string,
  wallet: new PrivateKeyWallet(process.env.THIRDWEB_AUTH_PRIVATE_KEY || ""),
});
- The domain is important since you don't want your users to sign malicious signatures.
- Create a new
.env.localfile and add a new variable namedPRIVATE_KEY. Learn how to export your private key from your wallet. Using private keys as an env variable is vulnerable to attacks and is not the best practice. We are doing it in this guide for the sake of brevity, but we strongly recommend using a secret manager to store your private key.
To configure the auth API, create a new folder inside pages/api called thirdwebauth and a [...thirdweb].ts file inside it!
Within this file, we need to export the ThirdwebHandler that we made in the config file previously.
import { ThirdwebAuthHandler } from "../../../auth.config";

export default ThirdwebAuthHandler();
This will catch all the API requests that go to /api/auth/..., using Next.js's catch-all API route syntax.
Behind the scenes, this handles the logic for three endpoints that we're going to utilize: /login, /logout, and /user.
Finally, inside the _app.tsx file, add the authConfig prop to ThirdwebProvider:
<ThirdwebProvider
  activeChain={activeChain}
  authConfig={{
    authUrl: "/api/thirdwebauth",
    domain: process.env.NEXT_PUBLIC_THIRDWEB_AUTH_DOMAIN as string,
  }}
>
    <Component {...pageProps} />
</ThirdwebProvider>
Next Auth with GitHub
Create a new folder called auth inside the pages/api folder and then create a file inside auth called [...nextauth].ts. Once you have done this add the following to the file:
import NextAuth, { NextAuthOptions } from "next-auth";
import GithubProvider from "next-auth/providers/github";

export const authOptions: NextAuthOptions = {
  providers: [
    GithubProvider({
      clientId: process.env.GITHUB_ID as string,
      clientSecret: process.env.GITHUB_SECRET as string,
    }),
  ],

  callbacks: {
    async session({ session, token }) {
      session.id = token.sub as string;
      return session;
    },
  },
};

export default NextAuth(authOptions);
Now, go to _app.tsx and wrap the component in a session provider like this:
<SessionProvider session={session} refetchInterval={0}>
  <Component {...pageProps} />
</SessionProvider>
The SessionProvider will be imported from next-auth like this:
import { SessionProvider } from "next-auth/react";We need to add some env variables to make the auth work! In the .env.local file add these variables:
GITHUB_ID=
GITHUB_SECRET=
NEXTAUTH_URL=
NEXTAUTH_SECRET=
NEXT_PUBLIC_THIRDWEB_AUTH_DOMAIN
The NEXTAUTH_URL will be a link to the homepage of your website, since we are working on localhost it will be http://localhost:3000.
To generate a secret run the following command:
openssl rand -base64 32 Now, we need to create a GitHub OAuth app. You can do that from the Github Developer Settings and fill out the information like so:
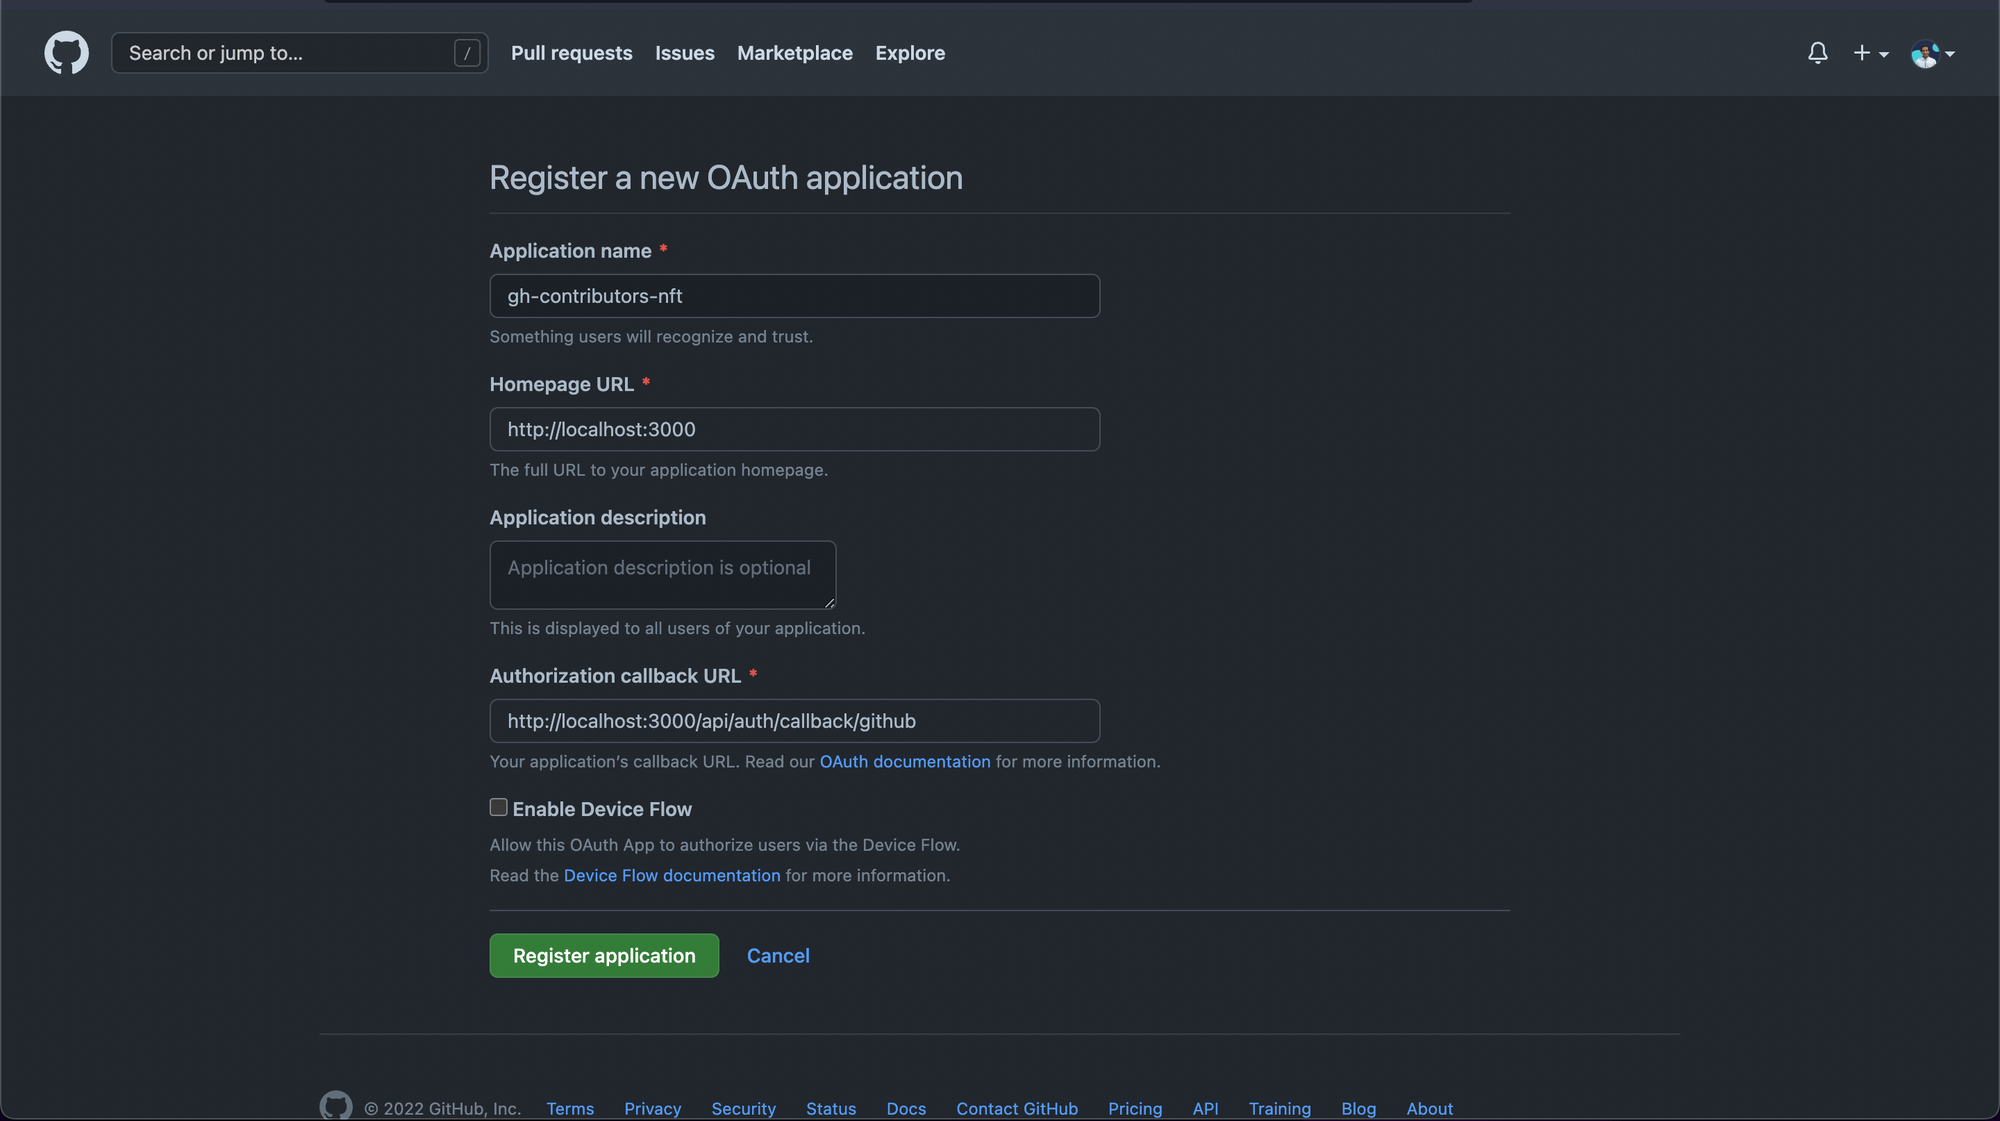
Now, copy the client id and generate a new secret and copy that. Go to your .env.local file and update these variables. Once you have filled all the env vars restart your dev server!
Next, follow Github's Creating a personal access token guide and add this as an environment variable in your project. We'll use this to make requests to GitHub's API without getting rate-limited.
GITHUB_ACCESS_TOKEN=The NEXT_PUBLIC_THIRDWEB_AUTH_DOMAIN will be the domain of your app, for testing on local you can set it to localhost:3000 as well.
Creating the login page
Create a new file login.tsx inside the pages folder and add the following:
import React from "react";
import { useSession, signIn } from "next-auth/react";
import styles from "../styles/Home.module.css";
const Login = () => {
const { data: session } = useSession();
if (!session) {
return (
<div className={styles.container}>
<h1>GitHub Contributor Rewards</h1>
<p>
Claim an NFT if you have contributed to any of thirdweb's GitHub
repositories!
</p>
<button className={styles.mainButton} onClick={() => signIn()}>
Sign in with GitHub
</button>
</div>
);
}
};
export default Login;
This will show a Sign in with GitHub button if there is no session detected from NextAuth.
Now, we will check for the address and thirdweb user. If the user's wallet is not connected/the user isn't signed in we will show the corresponding buttons.
Firstly, we are going to need 3 hooks:
const login = useLogin();Below the session check add the following:
return (
<div className={styles.container}>
<h1>GitHub Contributor Rewards</h1>
<p>
Claim an NFT if you have contributed to any of thirdweb's GitHub
repositories!
</p>
<ConnectWallet />
</div>
);This code block will show some text and a connect wallet which the user can use to connect their wallet and sign in.
We are using CSS modules to add some basic stylings to the app, so if you want to add the stylings as well. Create a new folder styles and globals.css inside it
html,
body {
  padding: 0;
  margin: 0;
  font-family: -apple-system, BlinkMacSystemFont, Segoe UI, Roboto, Oxygen, Ubuntu,
    Cantarell, Fira Sans, Droid Sans, Helvetica Neue, sans-serif;
}

a {
  color: inherit;
  text-decoration: none;
}

* {
  box-sizing: border-box;
}
Now, import it in _app.tsx like this:
import "../styles/globals.css";Now, create another file called Home.module.css and the following:
.container {
  width: 100%;
  height: 70vh;
  display: flex;
  flex-direction: column;
  justify-content: center;
  align-items: center;
}

.mainButton {
  background: linear-gradient(to right, #ff1b6b, #45caff);
  border: none;
  color: #fff;
  font-weight: 700;
  padding: 10px 20px;
  text-align: center;
  text-decoration: none;
  display: inline-block;
  font-size: 16px;
  margin: 4px 2px;
  cursor: pointer;
  border-radius: 5px;
}
Now, we have the auth flow completed! You can go to http://localhost:3000/login and check it out yourself.
Creating the API for claim
Create a new file claim-nft.ts inside the pages/api folder. We are going to need to create an API so add the following:
import type { NextApiRequest, NextApiResponse } from "next";

const claimNft = async (req: NextApiRequest, res: NextApiResponse) => {
  if (req.method !== "POST") {
    return res.status(405).json({ error: "Method not allowed" });
  }

  return res.status(200).json({ message: "gm" });
};

export default claimNft;
This API first checks if the request is of the post method or not and if it is using the post method we will send a message "gm".
Now, let's get into the actual code! We will first get the users from the next auth and thirdweb auth like this:
// 1. Verify the user with NextAuth (their GitHub account)
const session = await getServerSession(req, res, authOptions);
// 2. Verify the user using thirdweb Auth
const thirdwebUser = await getUser(req);

if (!session || !thirdwebUser) {
  return res.status(401).json({ message: "Unauthorized" });
}
We need to import them like this:
import { getServerSession } from "next-auth/next";
import { getUser } from "../../auth.config";
These are the two functions we use to view the authenticated user's information on the server-side:
getServerSessionis our way of getting the connected Github accountgetUseris our way of viewing the authenticated wallet.
Now, we will create a new array that will have a list of repos to check for:
  const reposToCheck = [
    "js",
    "react",
    "typescript-sdk",
    "thirdweb-cli",
    "contracts",
    "auth",
    "storage",
    "go-sdk",
    "python-sdk",
    "docs",
    "portal",
    "examples",
  ];
Here, we have added some of our thirdweb repositories, but you need to update this with your list of repositories to check.
Now, we will loop through this array and for each item we will check if the user has contributed to them:
  let hasContributed = false;

  for (const repo of reposToCheck) {
    const contributors: GithubContributor[] = await fetch(
      `https://api.github.com/repos/thirdweb-dev/${repo}/contributors`,
      {
        headers: {
          Authorization: `token ${process.env.GITHUB_ACCESS_TOKEN}`,
        },
      }
    ).then((res) => res.json());

    const hasContributedToThisRepo = contributors?.some((contributor) => {
      return contributor.id.toString() === session.id;
    });

    if (hasContributedToThisRepo) {
      hasContributed = true;
    }
  }
Now that we know if the user has contributed or not, if the user has not contributed we will say that you don't qualify:
  if (!hasContributed) {
    return res.status(401).json({ message: "Sorry, you don't qualify" });
  }
Now, let's initialise our SDK using our private key:
  const sdk = ThirdwebSDK.fromPrivateKey(
    process.env.THIRDWEB_AUTH_PRIVATE_KEY as string,
    "goerli" // configure this to your network
  );
We will first check if the user already owns one of our NFTs first:
const edition = await sdk.getContract(
  "0x16ab32FAd64E9369e9158B45a0207640dec12056",
  "edition"
);

const balance = await edition.balanceOf(thirdwebUser.address, 0);

// If you already have one, you can't mint again.
if (balance.gt(0)) {
  return res.status(401).json({ message: "You already have an NFT" });
}
Finally, we will generate the signature to mint the NFT!
  const signedPayload = await edition.signature.generateFromTokenId({
    quantity: 1,
    tokenId: 0,
    to: thirdwebUser.address,
  });
Our final API code will look like this:
import type { NextApiRequest, NextApiResponse } from "next";
import { getServerSession } from "next-auth/next";
import { getUser } from "../../auth.config";
import GithubContributor from "../../types/GithubContributor";
import { ThirdwebSDK } from "@thirdweb-dev/sdk";
import { authOptions } from "./auth/[...nextauth]";

const claimNft = async (req: NextApiRequest, res: NextApiResponse) => {
  if (req.method !== "POST") {
    return res.status(405).json({ error: "Method not allowed" });
  }
  // 1. Verify the user with NextAuth (their GitHub account)
  const session = await getServerSession(req, res, authOptions);
  // 2. Verify the user using thirdweb Auth
  const thirdwebUser = await getUser(req);

  if (!session || !thirdwebUser) {
    return res.status(401).json({ message: "Unauthorized" });
  }

  const reposToCheck = [
    "js",
    "react",
    "typescript-sdk",
    "thirdweb-cli",
    "contracts",
    "auth",
    "storage",
    "go-sdk",
    "python-sdk",
    "docs",
    "portal",
    "examples",
  ];

  let hasContributed = false;

  // 3. Check if they have contributed to any repo
  // Make a fetch request to the github api to get the contributors
  // Check if the user is in the contributors list
  for (const repo of reposToCheck) {
    const contributors: GithubContributor[] = await fetch(
      `https://api.github.com/repos/thirdweb-dev/${repo}/contributors`,
      {
        // Use my access token from .env.local
        headers: {
          Authorization: `token ${process.env.GITHUB_ACCESS_TOKEN}`,
        },
      }
    ).then((res) => res.json());

    // Based on the id, check if the user is in the contributors list
    const hasContributedToThisRepo = contributors?.some((contributor) => {
      return contributor.id.toString() === session.id;
    });

    if (hasContributedToThisRepo) {
      hasContributed = true;
    }
  }

  if (!hasContributed) {
    return res.status(401).json({ message: "Sorry, you don't qualify" });
  }

  const sdk = ThirdwebSDK.fromPrivateKey(
    process.env.THIRDWEB_AUTH_PRIVATE_KEY as string,
    "goerli" // configure this to your network
  );

  const edition = await sdk.getContract(
    "0x16ab32FAd64E9369e9158B45a0207640dec12056",
    "edition"
  );

  const balance = await edition.balanceOf(thirdwebUser.address, 0);

  // If you already have one, you can't mint again.
  if (balance.gt(0)) {
    return res.status(401).json({ message: "You already have an NFT" });
  }

  // 4. If they have contributed and not minted before, call the generateFromTokenId from the Edition contract.
  const signedPayload = await edition.signature.generateFromTokenId({
    quantity: 1,
    tokenId: 0,
    to: thirdwebUser.address,
  });

  return res.status(200).json({ signedPayload });
};

export default claimNft;
Calling the API on the frontend
Go to pages/index.tsx and update the return block:
return (
<div className={styles.container}>
<h1>GitHub Contributor NFTs</h1>
<p>Claim an NFT if you have contributed to any of thirdweb's repos.</p>
<Web3Button
contractAddress={EDITION_CONTRACT_ADDRESS}
action={() => mintNft()}
>
Claim NFT
</Web3Button>
</div>
);
We are going to check if the user's wallet is connected and if it is then we will show a button to claim the NFT!
As you can see we are going to need a mintNFT function so let's create that:
const mintNft = async () => {
  try {
    const req = await fetch("/api/claim-nft", {
      method: "POST",
    });

    const res = await req.json();

    if (!req.ok) {
      return alert(`Error: ${res.message}`);
    }

    await edition?.signature.mint(res.signedPayload);

    alert("Successfully minted NFT 🚀");
  } catch (err) {
    console.error(err);
    alert("Failed to mint NFT");
  }
};
We are going to use the useContract hook to access the contract like this:
const { contract: edition } = useContract(EDITION_CONTRACT_ADDRESS, "edition");
Now, if you have contributed to any of the repositories you will successfully be able to mint the NFT! 🎉
Redirecting users if they are not logged in
If the user is not logged in and they come to the home page we should redirect them to /login so, we are going to use SSR to redirect the user if they are not logged in:
export const getServerSideProps: GetServerSideProps = async (context) => {
  const thirdwebUser = await getUser(context.req);

  const session = await getServerSession(context.req, context.res, authOptions);

  if (!thirdwebUser || !session) {
    return {
      redirect: {
        destination: "/login",
        permanent: false,
      },
    };
  }

  return {
    props: {},
  };
};
Conclusion
In this guide, we learnt how to use thirdweb auth to allow only users who have contributed to our repos to mint an NFT!
If you did as well pat yourself on the back and share it with us on the thirdweb discord! If you want to take a look at the code, check out the GitHub Repository.